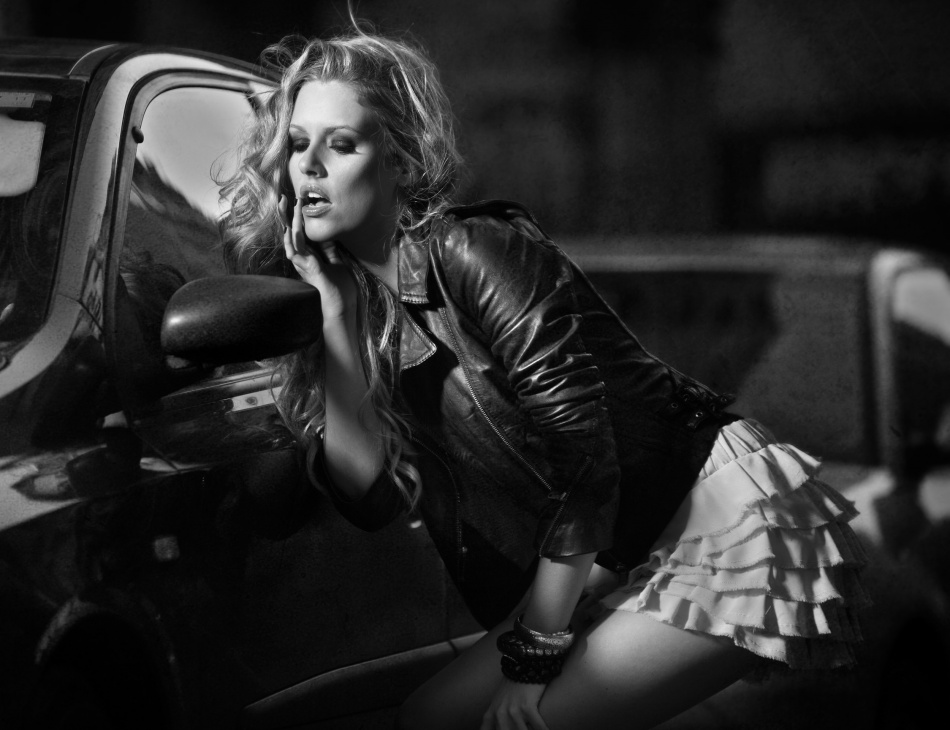
By using the rule of thirds, the shadows and the leading lines of the cars, the viewer is guided to the points of interest in this image.
'Vanity' by Raul Lamoso
Canon 5D Mark II . Canon 70-200mm f/2.8L . f/2.8
I had been commissioned to do a pictorial spread for a fashion magazine of at least ten pictures covering ten to fifteen pages. In addition to showing off the model and her clothes, it had to tell the story of a beautiful girl, dressed by a Spanish designer, going to meet her boyfriend in a hotel. The idea was to give the picture a casual and not so professional look, as if a passerby took the picture.
The story begins with the girl walking down the street toward the hotel. But suddenly she is worried about her makeup, so she stops to check it out in a car's side mirror. The story continues with her reaching the hotel. At the hotel bar she asks for a drink, and then more and more shots. The waiter tells her that she has an incoming call, and it turns out that it's her boyfriend telling her he won't be able to meet her. This disappointing moment causes her to drink more shots.
In this picture, the light was placed intentionally to highlight two things — the face of the model and her skirt — so we used the car shadows to darken the rest of the elements. I also used the leading lines of the cars to guide the viewer to the points of interest. I used a Profoto AcuteB flash, a Profoto 20-inch (50 cm) white beauty dish, a Profoto Air Sync trigger and a UV filter.
I always process my pictures in color, so my first step with this photo was to open it in Adobe Camera Raw CS5. I always try to do as many adjustments with the RAW file as possible before exporting it to Photoshop.
1) First I manually adjusted the global Exposure and the Color Temperature. Then with the Shadow and Highlights clipping warnings activated, I recovered any dark or bright areas by using the Recovery control, but not so much that it filled the image with grey. For areas that couldn’t be recovered with the Recovery control, I used the Tone Curve.
2) I used the Adjustment Brush to adjust the Exposure in some specific areas. I also carefully adjusted the Contrast in the midtones and the Clarity, making sure I didn’t create halos.
3) Once I had completed all of the Camera Raw adjustments, I exported the image to Photoshop as a normal image (not as a Smart Object). I always work in Photoshop in Adobe RGB color profile and 16-bit color mode (the same as my camera). However, it's important to convert it to sRGB color profile before uploading the picture to the web at the end of the process, otherwise the picture will lose contrast and saturation.
4) I made all of the adjustments in Photoshop in separate layers with layer masks so that I could add and remove the effects as required. The first adjustment was to the color of the model’s skin, which I did by creating a Selective Color adjustment layer and adjusting the red color, since it covers most of the skin tones.
5) For more difficult areas I used the Brush tool. I selected the skin color I wanted, and then I painted over the specific areas with the Brush's mode set to Color and a low Opacity.
6) On this image I wanted to change the tone of colors, so I created a Curves adjustment layer to change the shape of the Curves separately for each of the red, green and blue channels.
7) This changed the colors, but also increased the contrast. To correct this I applied a Selective Color adjustment layer, selected White as the color and adjusted the Black control. I find this is better than using the Burn tool: the Burn tool fills areas with grey, but the Selective Color adjustment layer tries to fill the area with surrounding colors.
8) As I said earlier, in this picture we have two focal points: the model’s face and the skirt. I used Cropping to emphasize these even more. Using the rule of thirds and placing her face and skirt at opposite intersection points, I created an image where the face is the prime focal point, followed by the skirt by following the line of the jacket.
9) The next step in processing the color version was to adjust the sharpness. To do this I used the High Pass filter. I duplicated the image, desaturated the new layer, applied a High Pass filter to it and finally changed its blending mode to Soft Light.
10) The last step was converting the image to black and white simply by creating a Black & White adjustment layer and adjusting its controls to make the shadows deeper.
1) Choose a good model. It's important to select a model that fits the styling you are going to use and the story you want to tell.
2) Remember the light. I always use a beauty dish. A softbox creates hard light, hard shadow and hard transitions between light and shadow. But a beauty dish creates hard light, hard shadow and soft transitions between light and shadow.
3) Think of the pose. When I tell the models what pose I want, I never ask them for a static pose. I ask them to do a complete movement, trying to get them into the situation, like an actor playing a role. This way, the picture looks more natural and not forced.
4) When I resize a picture to upload to the web, it can lose some sharpness. So the best way to recover some sharpness is to apply an Unsharp Mask filter (Amount: 500, Radius: 0.2 and Threshold: 0) to the image you want to upload.
I was born in Pontevedra in Galicia, Spain, in 1974. I studied Engineering in Computer Science. My passion for photography led me to open a studio in the center of town, from where I work in various fields of digital imaging. Right now I work for several magazines shooting fashion editorials, covers and advertising work.


