by Lauri Laukkanen
Published the 18th of March 2021
This image was part of a multinational collaboration consisting of so many talented people. We all knew beforehand what we wanted to achieve on the photo shoot, and I knew what I had to do after the shoot to pull it all together. Here's how you create a cinematic creative portrait using your camera and Photoshop.
Canon EOS 5D MarkII . Canon EF 24-70mm f/2.8L II USM . f/2.8
For this photo shoot we assembled a group that was possibly the most multinational team that I've ever been fortunate enough to be part of. We gathered people from Finland, the United States, England and Lithuania, and we all met up in London for the photo shoot.
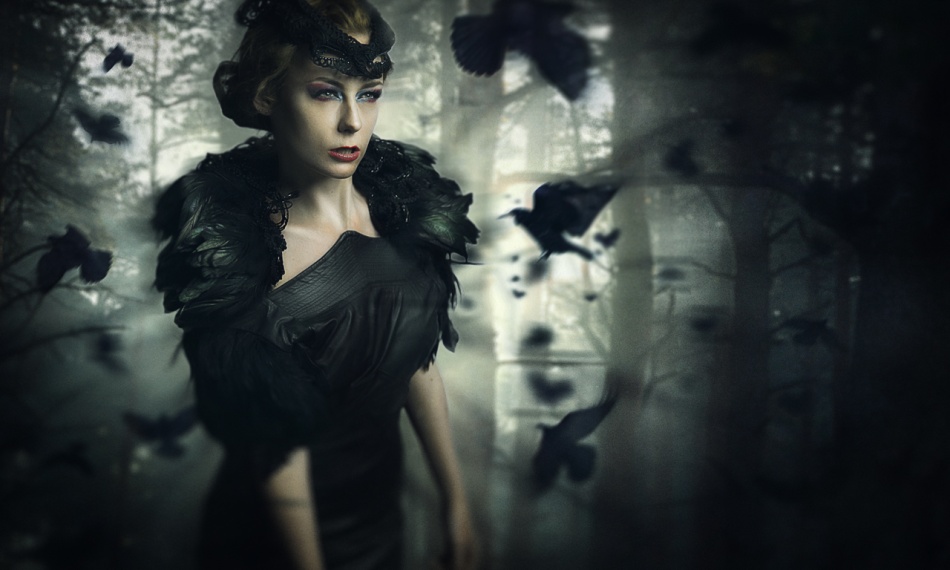
We created a concept around the theme of 'Queen of the Crows' and compiled a mood board based on that theme. We figured out the look and feel that we were going for, and then adjusted our model's makeup, hair and styling accordingly.
We were lucky enough to have the amazing wardrobe designer Kevin Freeman and the talented accessories designer Clear Broad working with us on this photo shoot.
"To get our model in the right frame of mind, just before the shoot I had a discussion with her regarding the concept and the mood required for the photo."
Since we were going for a very magical, almost surreal look, I felt that the best way to materialize the photo would be to create a composite image in Photoshop (synthesizing a photo by using several pieces or complete frames from various photos).
The best way to do that was by shooting our beautiful and very talented model Jen Brook by herself against a plain white backdrop (any solid color backdrop works as well as white).
For the composite photo's background, I decided to use one of my old landscape photos from my archives.
To get our model in the right frame of mind, just before the shoot I had a discussion with her regarding the concept and the mood required for the photo. We had to be on the same page from the very beginning to get the job done properly and efficiently. To help her get into the right state, we also played some very moody, cinematic background music, which seemed to work very well.I was not able to carry a lot of lighting equipment with me on the plane to London, so the lighting setup for this shot was fairly simple. I used a very large, white reflector near the backdrop and lit the scene with an Alien Bee strobe with an umbrella attached to it. I positioned the light just outside the frame on the left side, and aimed at our beautiful model Jen at a 45 degree angle. This gave me the dramatic lighting I was looking for.
The final image came together in Photoshop.
1) I started out by cutting my model away from the white backdrop. To separate your model (or any object) from the background you can use various tools in Photoshop, such as the Magic Wand tool, the Magnetic Lasso tool, the Quick Selection tool and Clipping Masks with the use of various Brushes. Some tools work better than others depending on the task at hand. You may need to experiment with them to find which one works out best.
2) I then loaded the landscape photo I had already decided would be the background for the composite photo as a new layer.
3) After having my model successfully cut away from the plain white background (this leaves your model on her own in a new layer), I positioned her on top of the other layer containing the imported landscape photo.
4) In order to blend her into the new backdrop, I created a white Radial Gradient behind her.
5) I then blurred the background using the Lens Blur filter.
6) Once I was happy with the background blur, I brought in the crows. I grouped the crows into a few different groups, and then positioned them in a way that created a pleasing composition.
7) To add depth to the photo, I used the Transform tool to downscale some of the birds. I applied different types and amounts of blur to different birds to add a bit of randomness to the image.
8) It was time to color grade the image. I applied a Curves adjustment layer to perform color grading. I started by adding a bit of blue tint to the shadows and some yellow tint to the highlights. Then I moved to the green Channel in Curves, and added a bit of green to the shadows and midtones. Finally I removed a bit of red from the midtones.
9) Once I was happy with the color grading, I finished off my post-processing workflow by adding a slight vignette around the edges of the image. It keeps the viewer's eye focus on the subject.
All in all I'm very happy with the way the photo turned out. I feel that we truly achieved the creative storytelling and surreal look that we had in our minds, and all of the different elements we brought into this image worked really well together.
Three things to keep in mind when organizing a similar photo shoot:
1) Conceptualize, plan and discuss the idea with the whole team, and let everyone take part in the creation of the photograph.
2) Once you’ve decided what kind of mood and/or emotion you want your photograph to convey, make sure that you use a lighting setup that will reflect that mood and feeling. For example, to create a moody photo, ideally you will have some form of dark, cinematic lighting.
3) A lot of the magic is done in Photoshop. Stay calm and patient — take your time editing the photo.
4) Try to take into account all of the little details in order to achieve a convincing composite image. Every little thing matters in composite images — often one tiny detail can rat you out, making your composite photo look unreal and unbelievable.
I am an award-winning editorial and commercial photographer from Finland specializing in creative portraiture, fashion and sports photography. People usually describe my style as cinematic, creative and sometimes a tiny bit crazy. I was awarded with the "WDP 2012: Photographer of the Year" award, and my work has been featured all across the internet.


