


|
|
|
|
by Victoria Ivanova
Published the 24th of September 2020
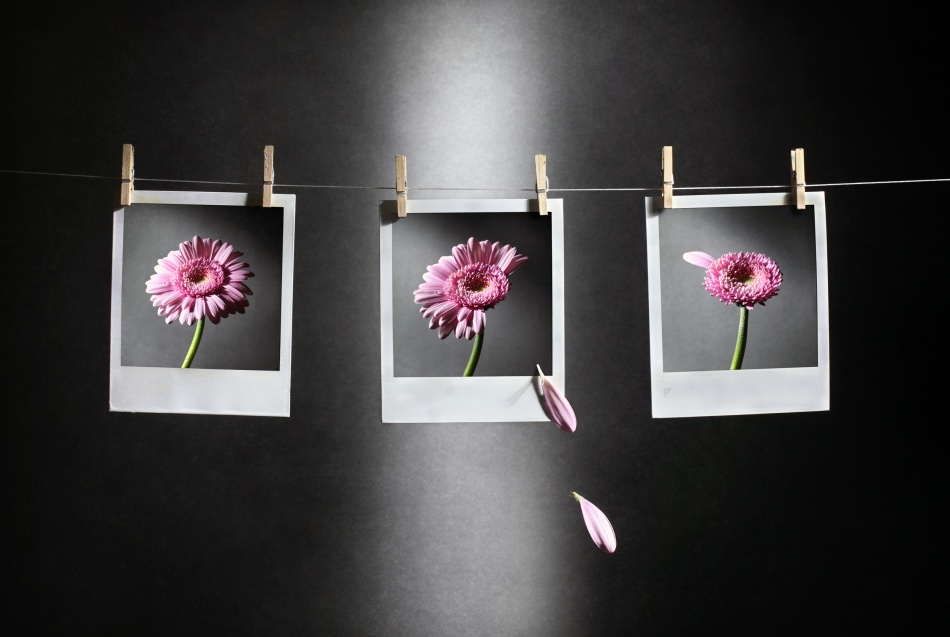
In Moscow, the month of September is one of the saddest months of the year. It is time to say goodbye to sunshine, warm wind, flowers and clear skies. It is time to get prepared to meet the long, grey and dull half of the year. This photo was made during the last warm days of September.
As usual, the first part of September here is nice and sunny, the second part looks like the bridge between summer and autumn and the third part is autumn itself. I wanted to show these changes in a photo. The Polaroid pictures symbolize the three parts of September, and the gerbera daisy stands for Nature itself. The pink of the flower reminds me of the color of sunrises in autumn.
Canon 5D Mark II . Canon 50mmf/1.4 . f/14
"An old lady was standing near the bus station and selling flowers that she had picked 75 miles (120 km) away from Moscow. The flower in the photograph was one of hers."
One of the most interesting parts of making the photo was searching for the perfect flower. I found it late in the evening on my way home from the office. An old lady was standing near the bus station and selling flowers that she had picked 75 miles (120 km) away from Moscow. The flower in the photograph was one of hers.
The Polaroid photos are real and were made in 1991. I used Photoshop to replace the old photos with the new pictures of the gerbera. This picture consists of four shots: the main picture, which is three photos attached to a piece of string, and the three separate photos of the gerbera. The photos were taken in a small, dark room and I used grey paper as a background behind the polaroid photos attached to the string.
The most difficult part of the shoot was shining the light. I used my handmade light brush to create the lighting effect. It's a pocket flashlight with just six light-emitting diodes (LEDs), which produces nice, soft shadows.
Here is the step-by-step guide to take this photo:
1) Place you camera on the tripod and position it where you will get the best composition. Do not forget to use manual focus on your lens, or switch to manual after you use automatic to set the focus. This is very important when you use a light brush because you make the photos in a completely dark room.
2) Put your camera on self-timer for a couple of seconds (or use a remote control) so you will have enough time to get close to your still life and get ready to switch on the light brush.
3) Begin to shine the light on the background. Draw a wide vertical line on the background paper with the beam, behind the middle Polaroid photo. This is the most difficult part. You should do it at an angle to make a good vertical band. Be sure that your hand doesn’t shake. You have to constantly shine the light for half of the shutter time. After that, shine the light on the Polaroid photos, the rope and the pegs. This will take up the other half of the exposure time.
4) Make several attempts. It is difficult to get the perfect light; it may take five or ten tries until you get it right.
5) Take three different photos of the flower using the same technique.
6) To create the illusion of the falling gerbera petals, place the petals on a small wooden stick. It's easy to erase the stick in Photoshop.
POST PROCESSING
Post-processing didn’t take much time. I shot all of the photos in RAW format and worked with them in Digital Photo Professional (DPP). I then exported the images to Photoshop CS3 to create the montage.
1) In DPP I added some contrast and adjusted the color temperature.
2) After that, I converted all 24 RAW files to TIFF format and exported all of them to Photoshop. I then proceeded to combine the three flower photos and the main photo (the one with the Polaroid photos and the background) in Photoshop CS3.
3) I opened the main photo and then made a copy of it.
4) I opened the first flower photo, copied the layer and pasted it into the main photo. I inserted the flower layer between the two layers of the main photo.
5) I then selected the top layer (the main photo copy) and used the Polygonal Lasso tool to select the area inside one of the Polaroid photos. Once the entire area was selected, I used the Cut tool to delete it. Through the hole that I created, I could see the flower layer. I selected the flower photo layer, made it smaller and moved it behind the top layer, positioning the gerbera behind the hole in the Polaroid photo. It now looked as if it was a real Polaroid photo of a flower.
6) I repeated Steps 4 and 5 for the two remaining Polaroid photos and the other two flower photos.
7) After that, I had five layers: the bottom layer (the main photo), the top layer (the main photo copy with three holes in it) and three layers of the different flowers in between.
8) I selected the top layer and added some shadows to the edges of the holes (see below).


9) I merged all of the layers.
10) Finally, I used the Clone Stamp tool to remove the wooden sticks that held the petals.
TIPS
1) If you want to use the same light for your still life photo, you don’t need to go to a studio or buy expensive equipment. You don’t even have to buy a real light brush for this kind of photo. A simple flashlight with light-emitting diodes (LEDs) will do. If you want to have soft light and soft shadows, you can spread some hand cream on your pocket flashlight. It is good to refresh it every 15 minutes so it doesn't dry out.
2) Try to shoot at least five frames of each subject. Each time the trajectory of your light brush will differ slightly, and you want to give yourself a good selection to choose from.
3) Never turn on the light in your room (if you use a light brush) while the shutter is open for the long exposure. It will make the picture flat.
4) Always use a tripod.
5) Listen to music when you use a light brush. The rhythm really helps to know when to move your hand with the light brush.
BIOGRAPHY
I live in Moscow, Russia. I’m a senior lecturer at a university (Candidate of Economics) and a PR manager in Russia, but photography is the best part of my life. I’m a member of the Russian Photo Union. I participate in photo exhibitions, write articles for photo magazines and give lectures about still life and urban photography.
 | Write |