


|
|
|
|
by Kovács Levente
Published the 9th of July 2020
Every portrait needs an atmosphere that completes it; otherwise, it would just be an ordinary shot. In this particular case I told Tímea to play with her hair in a sensual way, and this introduced motion to the image, which always creates some kind of atmosphere. A thorny bush, the setting winter sun and unusually warm weather in Transylvania were also useful elements.
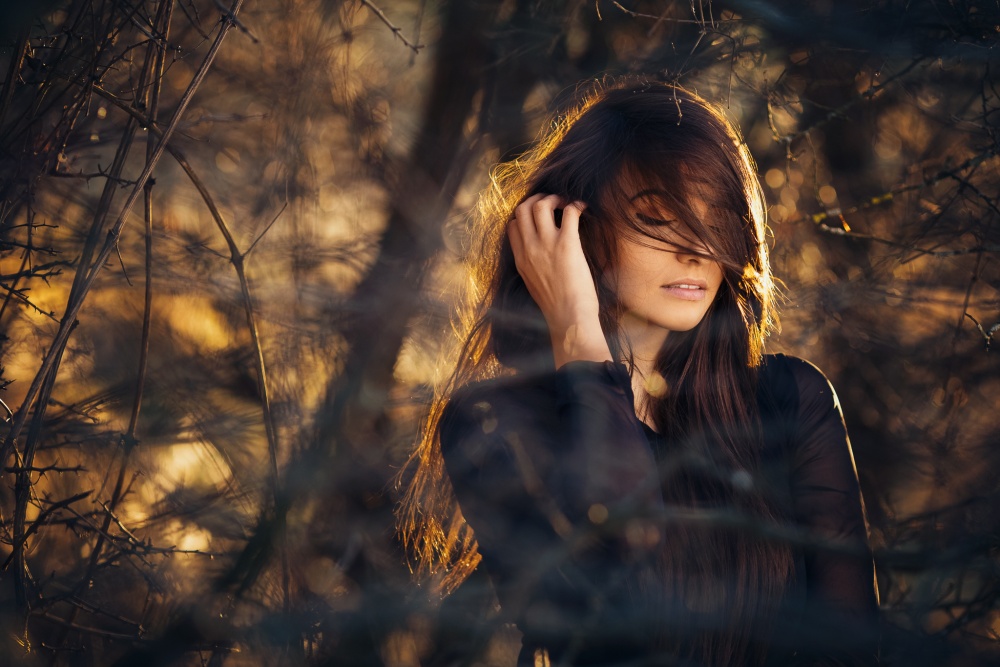
'Thorns' by Kovács Levente
Tímea is an old friend of mine — a beautiful young lady, full of energy with a photogenic face. We've known each other for a few years now, which helps a lot because she is able to completely relax during the photo shoot. This particular image was created spontaneously. I was in the mood to shoot, and it wasn't hard to convince her to make a great portrait with me. I knew that I wanted motion in the picture with lots of flowing hair, and we had already discussed the clothing and makeup, so the image was roughly thought out prior to our session.
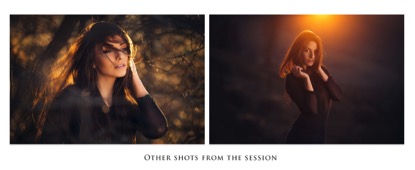 Other shots from the session
"With practice, anyone can come up with hundreds of possibilities using a simple bush as a prop."
I usually take portraits near my home, mostly outdoors, using forests, large bushes, rocks or old buildings as a backdrop. I've found it's most important that I know what kind of light to expect in a specific place at a specific time. With practice, anyone can come up with hundreds of possibilities using a simple bush as a prop. After you've walked around a location enough times and have completely familiarized yourself with the area, you'll know precisely when the sun will hit certain spots, creating the perfect atmosphere and setting for your photos.
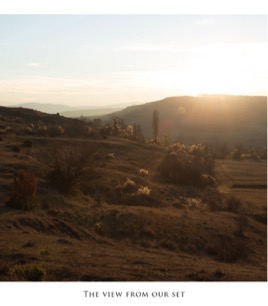
The view from our set
"That lens is a beast! It has beautiful bokeh, and it's tack sharp at its widest aperture of f/2."
When I shoot portraits, even outdoors, I typically use off-camera lighting. My choice is the Elinchrom Ranger Quadra portable strobe with a 100cm Rotalux Deep Octa. For starters, this combination is so easy to carry around, and I only need one basic, sturdy light stand to set it up. Also, the Octa produces a wonderful soft light, there's a modeling light built into the strobe, and the batteries are powerful and long lasting. I shot this image with a Canon EOS 6D and a 135mm f/2 L lens. That lens is a beast! It has beautiful bokeh, and it's tack sharp at its widest aperture of f/2.
I literally shot through the thorny bushes to create a soft, out-of-focus foreground. The setting sun behind the model created a beautiful rim light, and my strobe provided just enough frontal fill light. We, of course, had to take a lot of pictures until we got her hair looking the way we wanted. It could have been better, but I had other ideas in mind that I wanted to capture before the sun set, and we were running out of time.
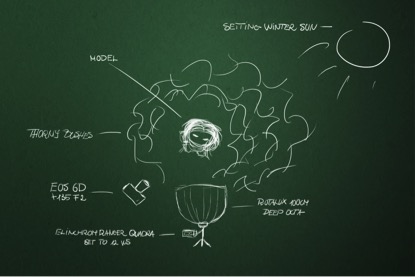
Diagram of setup
POST PROCESSING
The image was processed in Photoshop, Nik Software's Color Efex Pro 4 and Sharpener Pro plugins and Lightroom, using some film emulsion presets that were both custom-made and purchased. You can find many presets from OnOne Software, Mastin Labs, Rebelsauce, and the list goes on, or with a bit of study, you can make your own. This way, not only can you move sliders in the basic sections just the way you want to, but you can also adjust Camera Calibration, HSL, Color and Tone Curve settings. Anyone can use these filters; you just need a lot of patience in the beginning so you can learn how to match them to your style.
I have experienced an interesting behavior of presets: some of them work differently, depending on the type of file (RAW or PSD, for instance) that I apply them to, so I use this to my advantage and try them on both.
If a preset in Lightroom is too strong for me, I take the picture into Photoshop and adjust it with and without the same preset I applied to the RAW file in Lightroom. I then copy-and-paste the layers into the same document and play with each layer's opacity to see which one I prefer. In some cases I even apply two different presets to the same picture with the following trick (as I did in this case):
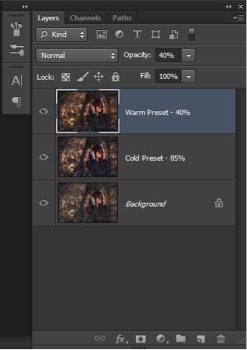
1) I opened the RAW file in Lightroom and made some basic corrections to Exposure and Contrast, and then I cropped the image.
2) I tried some presets on it, but none of them worked out, so I changed the file to a PSD and tried the presets in Photoshop. I have some old favorites, although I don't recall where I found them. I edited and renamed them long ago, but they match my style. Two of them looked great: one was warm with strong contrasts, while the other was cold with a hazy feel, so I put fire and ice together. I opened the previous PSD file again, applied both of the presets and copied the layers to one file, ending up with three layers in Photoshop.
3) I played with the layers' Opacity settings a bit too.
4) Next, I exported the image to Nik Color Efex Pro 4 and applied the Darken/Lighten Center filter to make the face pop out even more. I also applied a bit of the Skylight filter to enhance the sunset mood. Back in Photoshop, I adjusted each layer's Opacity.
5) If the makeup is strong, you'll have to pay attention to the neck and hands in post-processing. In this case I had to correct the color of the hand to match the skin tones of the face. I did this by sampling a color from the face and painting it onto the hand, using the Brush tool set to Color mode. I corrected this by adding a Curves adjustment layer and a layer mask, and then painting on the mask to shade some areas until I liked the result.
6) Finally I set the image to LAB color mode (Image > Mode > Lab Color) and added some final touches to the colors using the Curves tool (Image > Adjustments > Curves). Don't forget to set the mode back to RGB Color when you're done with Curves. Also, I sharpened the eyes and lips with Nik's Sharpener Pro plugin; it's easy and fast.
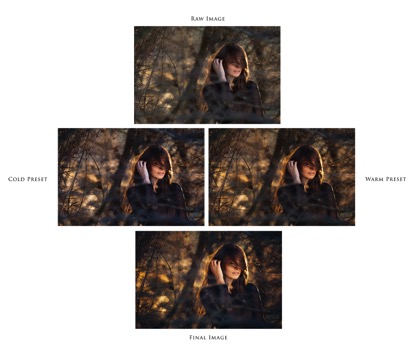
RAW image, Cold preset, Warm preset and final image
TIPS
1) When I use strobes I always set my camera to Manual mode and try to underexpose the environment by â…” stop. This will ensure that it isn't too dark, but dark enough so the strobe can illuminate my subject without blowing out any areas. Sometimes I go below –â…”; it depends on the kind of atmosphere I want to create.
Once you have achieved the desired exposure on the unlit areas, experiment with your strobe's power until you get the optimal light on your model. With practice you'll know by heart what power to use for any setup (my Ranger Quadra was set to 12 watts and positioned one meter away from the model.) Do not place the light too far away from the subject because it will be harsh and poor quality.
2) Environmental light: What does your meter say?
a) Is the scene too bright?
If your camera and flash allow syncing with shutter speeds faster than 1/180 second, use them. Decrease the ISO (even to 50 if your camera has that capability) and increase your aperture a bit. (For me, increasing the aperture from f/2.0 to f/2.8 or f/3.2 doesn't make a big difference as far as the background is concerned.) If these settings are still not enough to correct the exposure, use a good quality ND 4 or ND 8 filter on your lens.
b) Is the scene too dark and your strobe's minimum power still too much?
Move the light a bit further away from your subject, but keep in mind that doing this will deteriorate the light's softness. Instead of moving the light, you can try adding more diffuser material to your softbox, but watch out for colored diffusers. It's your choice; sometimes you have to make small sacrifices if you want to use strobes outdoors.
3) Always experiment with post-processing. If you are looking at your image too much, take a break, do something else, step back from the monitor and look at the image from further away and from different angles. Most importantly, plan on making the final adjustments to your image another day. You will see your mistakes or the adjustments you need to make much more clearly with fresh eyes.
BIOGRAPHY
I am freelance photographer currently living and working in Transylvania, Romania. Portraits have been my favorite from the beginning, but I also enjoy documentary, wedding, conceptual and some landscape photography. The way I see it, the most important thing in every picture is the mood — that world in which I imagine the set, indifferent to the meaning of the photo. My dream is to make a living from portrait and conceptual photography.
Check out my homepage: http://www.kovacslevente.com
 | Write |