by Alfonso Novillo
Ever since I was very young, I have had passion for photography, specifically architectural photography, which I have been drawn to since I got my first analog camera. I enjoy going out with my camera and my laptop every chance I get, especially when I have the opportunity to shoot in a big city environment.
I am fortunate to live in Madrid. The city has grown in recent years, which has given me access to all kinds of new structures throughout the city, from breathtaking skyscrapers to modern, colorful buildings.
"I most enjoy photographing buildings in the last hours of the day when the majestic light enhances the features of the structure best. That's the photograph I am constantly searching for."
When I photograph buildings in a big city, I keep in mind that although the buildings are always there, standing motionless and seemingly uninspiring at first glance, I only need to spend time searching for their best angles in whatever light is available at the time to create a unique image. I find that it's best if I am shooting on a cloudy day, but if I am there in the morning on a sunny day, I use a neutral density filter. This way I can take a long exposure and use the hard sunlight to my advantage since it illuminates the buildings beautifully, especially for black and white images. I most enjoy photographing buildings in the last hours of the day when the majestic light enhances the features of the structure best. That's the photograph I am constantly searching for.The day I took this photograph, I had decided to try out my wide-angle lens. I always like to include a close-up when I make a picture like this, either a low angle or a frontal shot. Doing so brings the subject to life and highlights intriguing features. I was unlucky with the weather; it was a completely sunny day, so for this photo I used a tripod and a variable neutral density filter to reduce glare and reflections. I looked for a good angle while also trying to include an unusual element in the composition, and I was lucky to find this lamppost near the building. I knew I would have to work on the image in post-processing since it wasn't a cloudy day, but as I was shooting, I planned to convert the photo to black and white anyway.
"The idea to include the 10-foot (3-meter) tall lamppost in the foreground, however insignificant, not only helped me create an interesting composition, but it also counterbalanced the very tall tower that stood 515 feet (157 meters) high."
I set the camera to Manual mode to take this shot, and I lowered the ISO to the camera's lowest setting to avoid noise and also to be able to shoot at an aperture of f/11. This 43-story tower, called Torre Picasso, is one of Madrid's giants, and because it is so tall, a larger aperture could have caused sharpness issues. The idea to include the 10-foot (3-meter) tall lamppost in the foreground, however insignificant, not only helped me create an interesting composition, but it also counterbalanced the very tall tower that stood 515 feet (157 meters) high.I had been researching this type of architectural black and white photography on the internet. The photographs I discovered really impressed me, so I decided to try this style of post-processing. I was very pleased with the result, and since then I have focused on shooting and processing more images like this. The idea for the title of the photograph was purely anecdotal. Once the post-processing was complete, the image resembled a spaceship taking off, and in turn, that reminded me of a newly released movie with the same title.
The image was processed in Adobe Camera Raw (ACR), Photoshop and four plugins: Nik Silver Efex Pro 2, Nik Color Efex Pro, Topaz DeNoise 5 and Topaz Detail 3.My goal in post-processing is to produce a dramatic black and white image. 1) I first opened the RAW file in ACR and made basic adjustments, which always makes it much easier to process images in the later steps. Exposure: +15Brightness: +80Contrast: +25Lights: –15Shadows: –10This is the resulting image that I exported to Photoshop.
2) In Photoshop, I opened the image in Nik Silver Efex Pro 2 plugin. I usually apply the first two presets: 000 Neutral and 001 Underexposed (EV –1). In this case, I used the Neutral preset and then under Global Adjustments, I decreased Brightness (–8) and increased Contrast (+4). It is very important to add Control Points: I tend to use a total of 9 points (3 at the top of the photo, 3 in the middle and 3 at the bottom). It's also very important to increase the Brightness and the Contrast in those Control Points using values between +10 and +30, but do not adjust the Structure settings at this stage because it might spoil the final result.
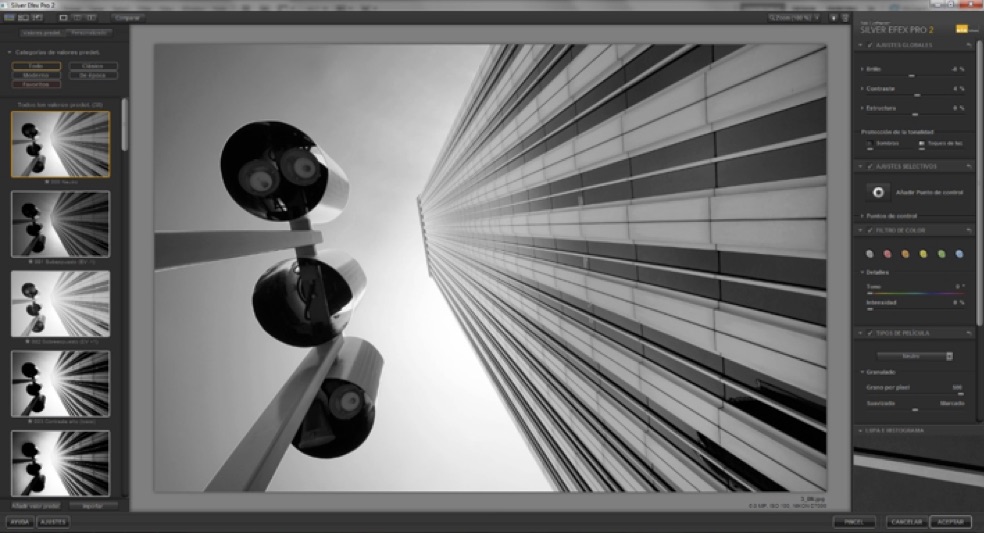
4) Nearing the end of processing, I opened the image in Silver Efex Pro again, this time to give it more definition. In the Neutral preset and using Control Points, I set Structure somewhere between +10 and +30, and I also increased Contrast to +22 and Brightness to +20.
5) This next step is very important: applying a softening effect to the overall image. I opened the image in Color Efex Pro 3 and applied the Glamour Glow filter, Glow set to 30%, mainly to eliminate imperfections and contour lines.
6) Now I needed to turn on the streetlights and then brighten and strengthen the light emitted from them. Many times you have to generate the light in streetlights because they're not usually lit in the daytime when you are shooting. I selected the lights and using a Brush, white and gray in this case, set to Normal mode and 50% Opacity, I intensified the effect for the lights. I then applied a slight Motion Blur filter, just to be a bit more creative.
7) I exported the image to Topaz DeNoise 5 plugin to removed the noise in the photo.
8) Next, Topaz Detail 3 plugin was used to sharpen the image. 9) Back in Photoshop, I needed to correct the neutral values and give more clarity to the image. So I applied a Selective Color adjustment layer and removed Black (–12) from the Whites.
10) Finally, to give the black and white image a very slight blue tone, I applied a Photo Filter adjustment layer and selected Blue from the drop-down menu. Density was set to a very low 6%.
11) At this point I decided to make a minor perspective correction, but I normally do this at the beginning of post-processing. Here again is the final result.
When you are shooting, do the best you can, be relaxed and comfortable at all times and never despair. If you are not quite happy with your results in-camera, you can always adjust your photos in post-processing.
I was born in Madrid, Spain, and have always lived there. I began to study photography at age 13 at a vocational school, and I graduated in the photo imaging industry. Since then I have been in contact with the world of photography, although I started with analog and did not join the digital photography world until very late. When I bought my first DSLR, I began to squeeze the most out of this art form. It really excites me, but so far, only as an amateur photographer.


