by Arnd Gottschalk
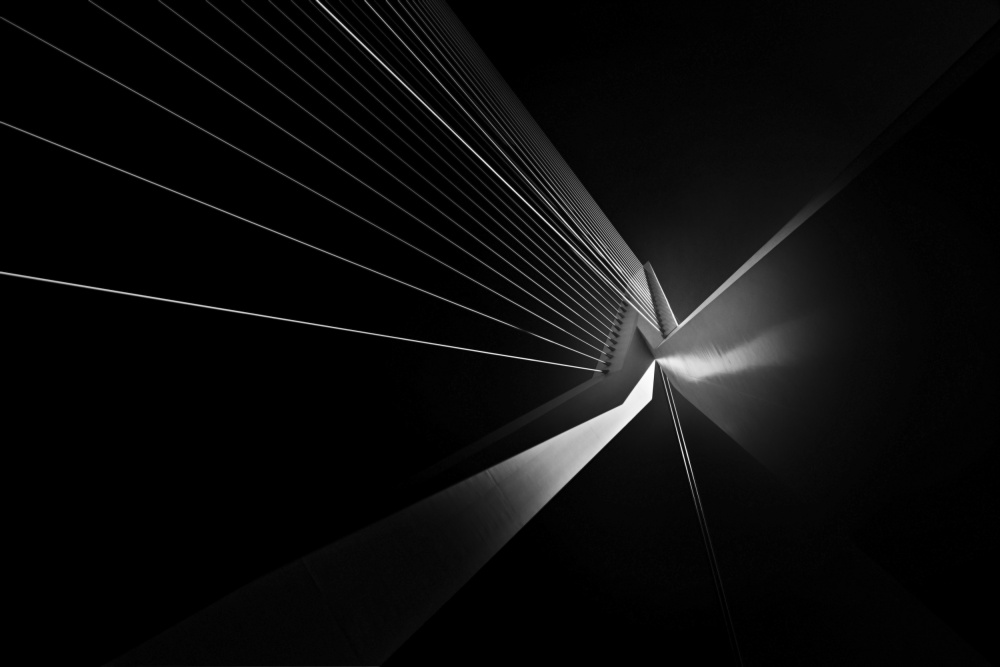
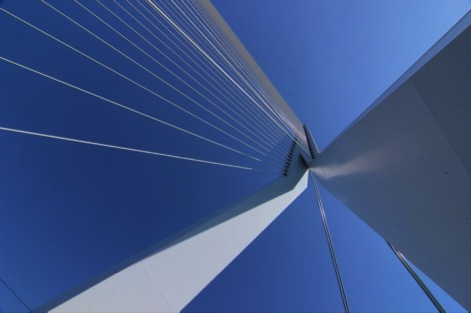
I shot this picture during a photography trip in Rotterdam, the Netherlands. The original image is a quite acceptable wide-angle shot. It took intensive post-processing to obtain the expected result. My work reaches beyond the borders of classical photography; it is an interpretation rather than pure depiction. This tutorial is meant to explain the methods I have used to obtain this result.
Canon 600D . Tokina 12-24mmf/4 . 1/80s . f/14 . ISO100
The picture shows one of the most recognizable and photographed bridges in the world — the Erasmusbrug in Rotterdam. It was shot at high noon, in bright sunlight and clear blue sky, creating an intense, flat light. That would have been a problem for the unprocessed picture as such, but it created perfect conditions for further image processing. I shot this photo using the Canon EOS 600D camera combined with a Tokina 12–24mm lens, selected exposure was 1/80 second and aperture of f/14 — all providing a good depth of field and sharpness and, at the same time, preventing diffraction blur.
"It was obvious that in post-processing I needed to focus on creating a visual anchor in the image."
Once you see the original picture, problems are easily identified. The pillars tend to gain too much attention in the frame. The viewer’s eye cannot lock onto on anything specific, so the image appears narrowed and not in harmony. It was obvious that in post-processing I needed to focus on creating a visual anchor in the image.
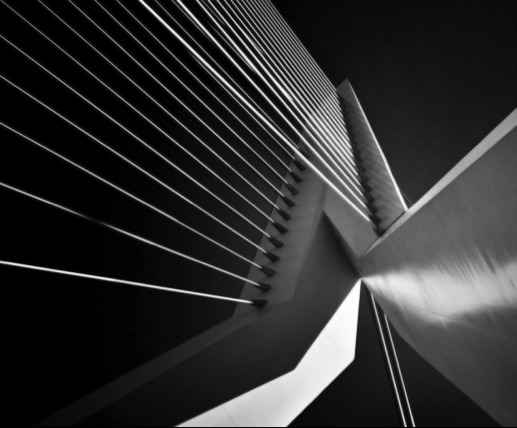
Even before the processing starts, one has to ask oneself how the final image is supposed to look. In this particular case, I wanted to emphasize the lines converging toward the center of the image and to exclude everything else that would have diverted the viewer’s attention away from those lines. While doing this, one must also vary the light in a very subtle manner in order to emphasize the lit edges. There is no golden path in reaching this; I always have to try different means and combinations. Using layers is one of the ideal methods. I first processed the image in Adobe Camera Raw, and then exported it to Photoshop to make further adjustments. 1) Post-processing starts with the RAW file. I increased the sharpness via ACR, and then created three different exposure versions of the file: one properly exposed, one underexposed and one overexposed. 2) I exported the three images to Photoshop as Smart Objects/layers in the same file. The underexposed layer was the foundation/background image. The correctly exposed layer and the overexposed layer were added above it in the Layers Panel in order to highlight certain portions of the image by means of masking and grading. 3) On top of all the layers I added a Black & White adjustment layer, of which the blue values were darkened. 4) So much for the preparation — now follows the most decisive, but also most elaborate step. With the Pen tool I created Paths to the individual components of the subject (all bridge parts, including cables), converted these Paths to selections and saved them. While doing this, it is important to name these selections in a clear manner, otherwise you will get easily confused. 5) Next I set the exposure of each image element with the layers and pre-customized masks. I recommend using gradients within masks; these allow you to obtain very fine transitions. 6) The next step is about fine-tuning, especially when addressing the cable connections to the pillars. In the original image, the cable endings fall in the shadows, therefore I had to copy brighter parts of the cables and paste them in. Nevertheless, I still kept a slight dark toning in order to create an additional visual guide toward the top of the bridge.
You will notice that the second cable (counting from the bottom upward) has a shadow projection from another cable — I intentionally left it like this. 7) Finally I performed image sharpening and noise reduction on each mask in order to protect the surfaces (when sharpening) and the edges (when reducing the noise). Sharpening was performed by a three-step High Pass sharpening (Filter > Other > High Pass). Radius values were set to 10 pixels, 1 pixel, 0.2 pixels respectively. The decreasing pixel value also decreases the opacity of the layer (Soft Light and Overlay blending modes). I saved this sharpening method as an action. I use it on all of my images. Once the action has been performed, all layers are still available so that I can easily undo it if I have over-sharpened any areas.
1) Photography nourishes itself with light, but also by focusing upon the essentials. Post-processing clearly plays an important role in the creation of artwork these days. Nevertheless, the groundwork is still set via a neatly composed, sharp and properly exposed initial capture. And this is a matter of practice, patience and serenity. Using this set of skills is the key to creating a contemplative photograph.
2) The camera choice itself is of secondary importance, in my opinion. It is more important to identify the type of camera that best suits you. Once you have the camera, you then need to learn it by heart and use it with blind confidence.
I am 46 years old, married and a father of six children. I live in the metropolitan area of Aachen in the region formed by the three countries Germany, the Netherlands and Belgium. I work as an editor in the press office of the University of Applied Sciences of Aachen. I am a passionate amateur photographer.