by Gerard Jonkman
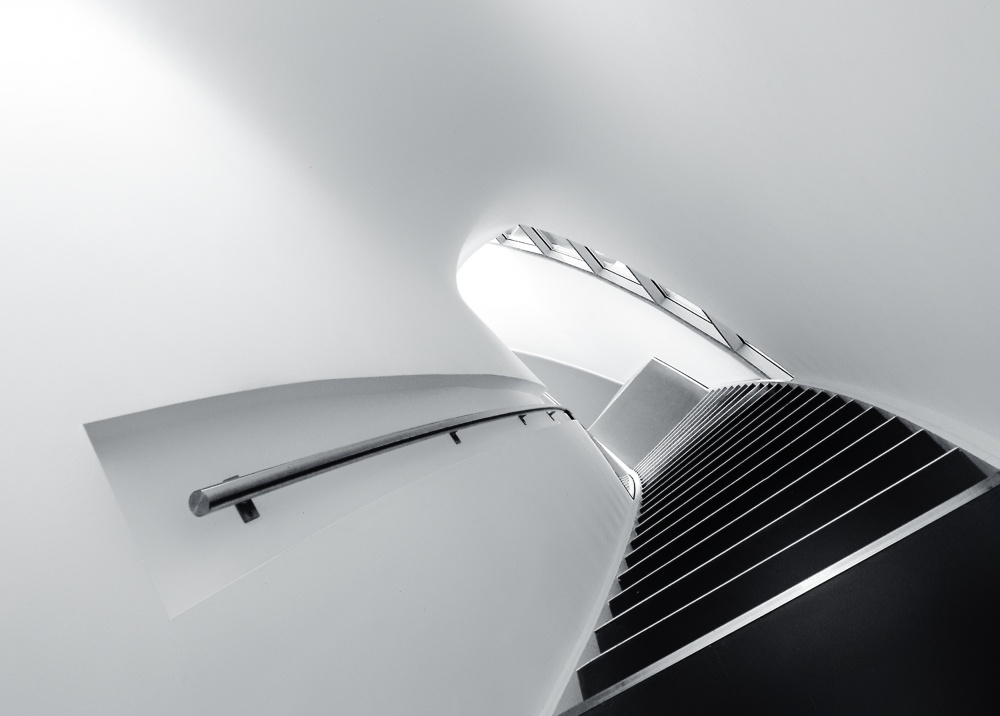
When you're practiced at creating artistic architectural imagery, it's impossible to see a stairway like this one and not jump at the chance to photograph it. The question is: If you were there, would you have just seen a bunch of stairs and walked on by? If you answered yes, this is a must-read.
Nikon D700 . Nikkor 14-24mmf/2.8 . 14mmmm . 1/40ss . f/8 . ISO800
The picture was taken in the Museum de Fundatie in Zwolle, the Netherlands, where I had visited a few days prior and noticed this beautiful staircase. It's the staircase to the new exhibition space of the museum, located on the roof of the original neoclassical building. On my first visit to the museum, I had only my 24–70mm lens with me, so I wasn't able to shoot a very wide angle. For this kind of image to be successful, only a very wide angle will do, so I went back on a Sunday with my 14–24mm lens. When we arrived the sun was not shining too intensely through the window, so the light was more diffused. I checked my camera settings, adjusting the shutter speed to 1/40 second, the aperture to f/8 for enough sharpness and the ISO to 800 so I could take the picture without using a tripod.
"It's important to take a much wider picture than what you have envisioned as the final image."
I wanted a dynamic point of view with the curve to the left, and I used the lines of the staircase to further enhance a strong, balanced composition. I had to wait for a few minutes until no one was on the stairs, and then I took the picture. It's important to take a much wider picture than what you have envisioned as the final image. By doing this, you will be able to later rotate the image in post-processing and produce the best composition. The diagonal lines that lead to the different corners of the picture create the balance in the composition. I took a couple pictures and after seeing them on my camera's LCD, I was very pleased because they were exactly what I had in mind.
I did the post-processing in Adobe Camera Raw and Photoshop CS6. I also used two Nik Software plugins, Silver Efex Pro 2 and Viveza.

Original image
1) Take your time to analyze the building. Walk around to study the facade up close and from a distance. Return to the building when the light is different — sometimes that’s all it takes to discover the nuances of the architecture.
2) Find an element to use in your composition to give your photo some extra tension or alienation.
3) Do not be afraid to take pictures in strange postures or positions. The results can sometimes be very surprising and rewarding.
4) Find strong, graphic lines while shooting and make several pictures, each with a slightly different perspective. Repositioning yourself a few inches further to the left or right can make a world of difference.
5) Make use of reflections on the walls and pay close attention to the lines. It's all about the details.
I was born in 1959, and I live in Raalte in the Netherlands. I am a physiotherapist and a passionate amateur photographer. Modern architecture, concert, sports and street photography are my main interests. I am especially drawn to architectural photography because I appreciate the graphic lines and textures of buildings, and I enjoy using them to create graphic compositions and abstract images.