by Gianni Giatilis
The idea to photograph Rio–Antirrio Bridge came to me during its construction, when I saw the massive piers and pylons being built. Many impressive photographs of this bridge have been taken from almost every viewpoint and time of the day. My intention was to capture the magnitude of this megastructure by photographing fragments of it instead of the whole bridge.
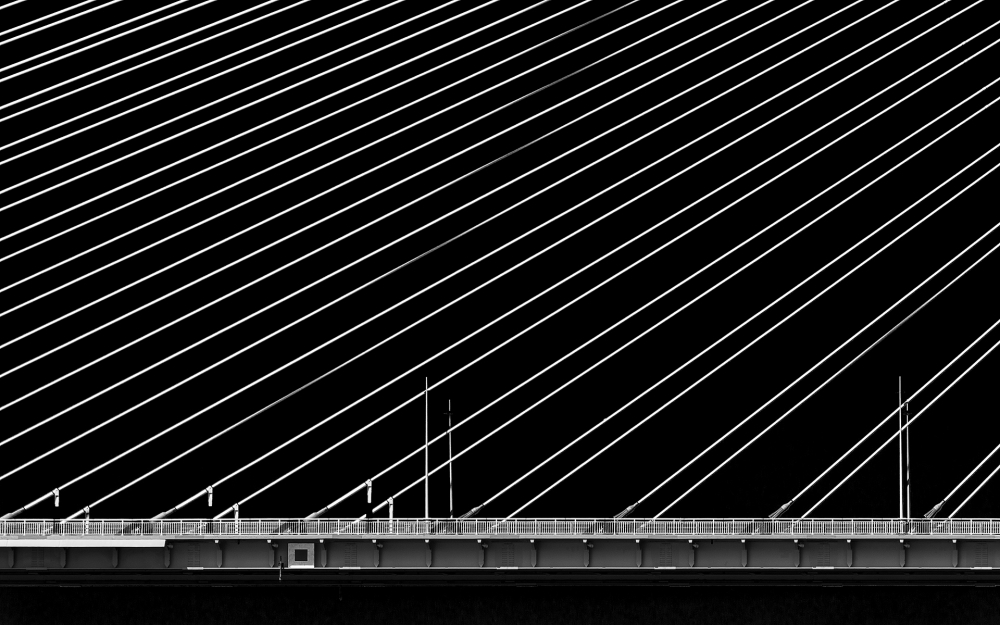
Nikon D3200 . Nikkor 55-200mmf/4-5.6 . 200mmmm . 1/640ss . f/7.1 . ISO100
I planned to drive from Athens to Rio in May 2013 and then cross by ferry to Antirrio — the traditional way of crossing prior to the building of the bridge. In this way, I would have the best view parallel to the bridge and at a close distance. I carefully prepared my camera and my three lenses — the 18–55mm VR, the 55–200mm VR II and a fast prime 35mm f/1.8. I charged batteries, formatted my memory cards and took some time to clean my camera sensor and set a new reference with the Image Dust Off tool. I also checked the performance of the 55–200mm lens and found that an aperture between f/5.6 and f/8 would give me the best resolution and the least amount of chromatic aberration in a high-contrast situation. No tripod was used since I was planning to shoot on the ferry. Because of the north–south orientation of the bridge, I planned to arrive around 10:00 a.m. when the sunlight would hit it from southeast. That would give me the highest possible contrast.
"I shot around 50 photos, most of them with the 55–200mm lens, in an effort to include one of the central pylons and to show the distance of the deck from sea level."
The ferry takes about twenty minutes for the 1.8 mile crossing. I shot around 50 photos, most of them with the 55–200mm lens, in an effort to include one of the central pylons and to show the distance of the deck from sea level. At this point, another ferry coming from the opposite direction was crossing between me and the bridge, which ruined the best of those shots. My second thought was to take some unobstructed photos of the deck and cables. I realized that excluding all elements from the left, right and top lines of the frame gave me a strong yet minimal composition. I chose to shoot RAW at ISO 100 for the best dynamic range and minimum noise. It was bright and sunny, so I could use an aperture of f/7.1 and an exposure time of 1/640 second. This was perfect for my lens sharpness and fast enough to minimize any possible camera shake. All of the shots were in Aperture Priority mode, AF and VR on, although VR is not crucial at 1/640 second.I was more than satisfied with the final result, as it was much better than I had originally visualized. The fragment of the deck and cables extend without obstacles to an imaginary point, thus giving the best possible impression of the magnitude of this architectural masterpiece. Another set of the small vertical columns on the left may have resulted in a more balanced composition.This photograph includes two optical illusions: the left frame line of the photo appears to be higher than the right one. This is similar to the “Ponzo illusion." I also found it particularly difficult to follow the diagonal lines from corner to corner. This may be a variation of the “Poggendorff illusion."This is the original image.
I made the first adjustments in Lightroom 4, and then I exported the image to Photoshop to make a few final adjustments. I also used Nik Sharpener Pro plugin at the end.
1) I opened the RAW files in Lightroom 4. I chose this particular framing because it had the best horizontal and vertical covering and because there were no cars or trucks crossing the bridge. (I was very lucky that traffic was minimal.)
2) I corrected small distortions using the Lens Correction tool with Profile Corrections enabled. The highest acceptable contrast was achieved by adjusting Highlights to –47, Shadows to –45 and Contrast to +42.
3) I then increased Clarity to +45 and corrected the colors as follows: Aqua Hue –20, Yellow Hue –13, Yellow Saturation +66, Yellow Luminance +46.
4) At this point, I did a final resize of the image for the internet and a bit of sharpening.
5) Looking again at the result a few days later, I had the impression that the colors detract from the architectural impact of the image, so I decided to do a black and white conversion in Photoshop. With the Eyedropper tool, I selected any color from the photo and converted it into black and white tones. The light blue sky turned almost completely black when I reduced Cyan to –130. The yellow deck of the bridge needed to be much brighter, so I increased Yellow to +170.
6) In the final crop, I intentionally distorted the photo by compressing the height by about 5%. This small distortion decreased the distance between the cables, and the photo completely covered my 16:10 monitor. Final sharpening was done using Nik Sharpener Pro at 55% on Adaptive Sharpening tool.
1) Familiarize yourself with your chosen subject. Visit the location in different seasons and under varying light conditions, gather the most information as possible about it and look at other photos of the same or similar subjects.
2) Plan your own session. Think of your main concept and alternative ideas in case of unexpected obstacles, weather or other shooting conditions.
3) Have a thorough knowledge of your gear and software, as well as good preparation of it.
I was born in Piraeus, Greece, in 1959 and now live in a small village outside Athens, Greece. I have been taking photos for forty years. My favorite genres are street and documentary. In 1982 I became a professional photographer and started to work in art galleries where I photographed sculptures and paintings. In 1983 I attended a cinema college where I studied cinema direction. My education at this college enabled me to further develop my technical expertise. I joined 1x in January 2013, which inspired me to start shooting again, exploring pinhole cameras, macro and, of course, architecture.


