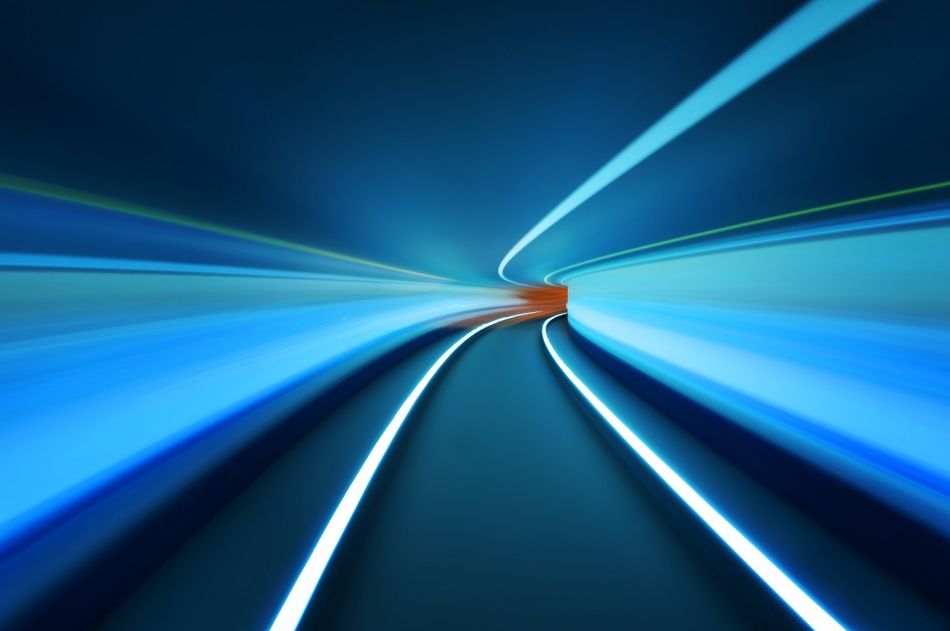
Yes, the camera was tied onto the front of a moving car to make this shot! It may be a nerve-racking experience, but it's worth it if you want to find new perspectives and create unique, surprising images. Want to try it yourself? Got a camera that you would prefer not hit the pavement? Then you definitely want to read this.
Nikon D300s . Nikkor 10.5mm . 4ss . f/11 . ISO100
I originally shot this for a photography challenge that required the concept to also be considered a Photoshop term. I had tried shooting a long exposure through this same tunnel before, and I felt that this image would be a good embodiment of the term "vanishing point." I've frequently found that my best photos are taken when I put my camera somewhere unusual as opposed to in front of my face while I'm standing up. If you find a scene you like, I think it's important to look at it from down on your knees, while standing on the roof of your car or in this case, while your camera is tied to the front bumper of your car.
"I put my camera on fully manual, focused it how I wanted, swallowed hard and tied my camera to my front bumper with nylon rope."
This is a 4-second exposure of a narrow car tunnel in Dubai, taken while I was driving through it. The tunnel actually leads to Palm Jumeirah. Since I planned on attaching my camera to the front of my car while shooting, I had to make some educated guesses on how to expose it. I figured that my parking garage at home had about the same ambient light and a similar white balance since it was lit with fluorescent lights. I wanted a 3- or 4-second exposure to give that smooth, surreal look, and I found that 4 seconds at an aperture of f/11 and ISO 100 looked pretty close. I set my white balance to Tungsten to produce a very blue tone in the image. I put my camera on fully manual, focused it how I wanted, swallowed hard and tied my camera to my front bumper with nylon rope. I also used some gaffer tape to secure the focus ring and switches. This is my only camera and I don't think I've ever tied tighter knots!
"I drove down the highway at about 75 mph (120 km/h) just waiting to hear the smack of a camera and lens on the pavement, but thankfully that never happened."
I drove slowly at first, took some test shots and stopped the car and made sure the counter was actually going down. I wouldn't know if I had good shots until I was done with the shoot, but at least I knew the remote was working. I drove down the highway at about 75 mph (120 km/h) just waiting to hear the smack of a camera and lens on the pavement, but thankfully that never happened. I slowed down to about 12 mph (20 km/h) once I got to the tunnel exit towards Palm Jumeirah and took two or three 4-second exposures through the tunnel. As soon as I saw the orange glow of the streetlights as the tunnel ended, I knew I would get something special.Out of all the shots I took, this one immediately stood out, mostly because there were no bumps in the lines. Most of the other shots looked a little shaky as the car was hitting uneven spots in the road. I also loved the welcoming, warm orange glow at the end of the tunnel.
"If you turn this image upside down, you'll see that it's obviously a road. I think this touch added some more surrealism to the image."
I adored the surreal, high-speed look of this shot and how the creamy blues and whites take my eyes through the tunnel. It looked like a scene straight out of the movie "Tron." I wasn't finished processing, however. At this point, the photo was obviously a two-lane road going through a tunnel. But I loved the way the overhead lights looked like rails, so my last step was to rotate the picture 180 degrees to make it look like the car was traveling on those light rails. If you turn this image upside down, you'll see that it's obviously a road. I think this touch added some more surrealism to the image.
I processed this straight from JPEG format in Adobe Photoshop CS5.
1) Since I was driving several miles before I got to the tunnel, I had some small dirt blobs on the photo that I used the Patch tool to remove.
2) I then added a Black & White adjustment layer, adjusted the blues and yellows to increase the contrast and set the layer's blending mode to Soft Light. This added some nice contrast and tonal range.
3) I applied a Hue/Saturation adjustment layer and boosted the Saturation slightly.
4) I used the Unsharp Mask filter to sharpen it a bit.
5) Finally, I rotated the image 180 degrees, and then I was pretty much done.
1) To get a shot like this, you need to be very careful in your setup. The forces acting on a camera strapped to the front of a moving car are significant, and if you don't have it properly strapped down, it could come loose and be destroyed. It could also constantly jiggle around and give you fuzzy pictures.
2) I shot this by myself, but afterward I realized that I should have had a passenger in the car working the remote trigger so I could concentrate on driving.
3) I initially thought that driving at faster speeds would give me sharper pictures, but I found that slower speeds actually worked better.
I'm from the United States. I am an engineer by trade, but in my free time I have been an obsessed, egotistical diva of a photographer since 2008. My wife bought me a Nikon D60 on Christmas Day that year, and it was the last mistake she ever made. Two bodies and a dozen lenses later, I am still learning everything I can about this craft and enjoying every minute of it.