by Lauren Malcampo
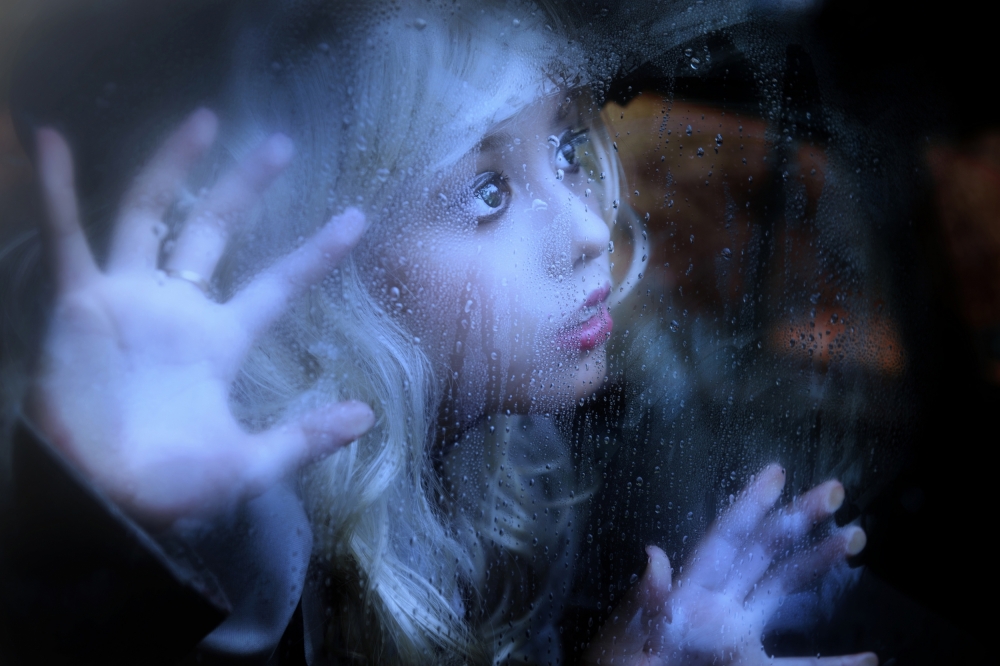
The plan was to make modern doll-like portraits with the model who participated in cosplay, a popular performance art. It would not stop raining that day, but that did not stop us from relocating our photo shoot indoors. As it turned out, the raindrops on the window added an extra special effect that was completely unexpected.
Nikon D700 . AF-S Nikkor 24-70mm f/2.8 G ED . 62mmmm . 1/50ss . f/4 . ISO200
For this photo, the model was a "cosplayer" and the concept of the photo shoot was to replicate an Asian ball-jointed doll. They are modern, articulated and posable dolls that are customizable and primarily intended for adult collectors and customizers. "Cosplay" is short for "costume play" — a popular performance art in which participants dress up to look like fictional characters usually, though not necessarily, derived from manga comic books, anime or sci-fi. Through photographs, cosplayers get to show their artistry and character permanently captured much like a frame from a comic strip. It wasn’t hard to coach her on the poses for the photo shoot since she already had sufficient practice as an active participant at cosplay conventions.
"At a 62 mm focal length, a shutter speed of 1/50 second is a little bit too slow, but I kept my elbows close to my body to give the camera additional support and reduce the likelihood of camera shake."
It had been raining almost daily for a couple of weeks leading up to the shoot, and the day of the shoot was no exception — it poured with rain. So we made arrangements for the set to be indoors at a large venue with a translucent roof, which allowed a lot of natural light despite the gloomy weather. Still, I had to compensate by using a wide aperture (f/4) combined with the ISO setting at auto to ensure that I could maintain an adequately fast shutter speed to avoid camera shake. At a 62 mm focal length, a shutter speed of 1/50 second is a little bit too slow, but I kept my elbows close to my body to give the camera additional support and reduce the likelihood of camera shake. I didn’t want to resort to using an f/2.8 aperture because I wanted to capture the model’s left eye, which was too far away from me to be reasonably sharp. To soften the shadows on the model’s face a 32” collapsible silver disc reflector was held in place outside the car just below the window. My camera's white balance setting was auto, and the metering mode was set to matrix metering.
The image was shot in RAW format, imported into Adobe Bridge CS5 and then opened with Adobe Camera Raw. I also used Nik Software's Color Efex Pro 3 plugin to make specific adjustments.
1) In Camera Raw, I set the "Camera Profile" in the Camera Calibration tab to "Camera Portrait" and adjusted the Brightness and Contrast as needed. The image was then opened in Photoshop CS5.
2) I wanted to give the image an overall cool tone, so I tweaked the color balance in Photoshop using "Brilliance and Warmth" within Nik Color Efex Pro 3 plugin by moving the slider to the left toward the cooler end. Color Efex 3 adds this adjustment as a new layer in Photoshop.
3) Next, I felt that the color of the foliage in the background was somewhat distracting and inconsistent with the photo’s overall cool tone. So once again, using Nik Color Efex 3, I applied the "Indian Summer" preset at its default settings to the foliage, hoping to achieve an autumn red color. Nik Color Efex 3 again added this adjustment as another new layer in Photoshop.
4) Then returning to (guess what) Nik Color Efex 3, I added a vignette using the default setting of the "Darken & Lighten Center."
5) Back in Photoshop, I flattened all the layers at this point.
6) In the last step, I duplicated the layer and added sharpening. I applied the High Pass filter with Radius set to 1.8 pixels and the blending mode set to Overlay.
I’m very satisfied with the resulting photo. When I was featured recently in a major local daily newspaper's article, the editor placed this photo on the front page.
This image required minimal editing, just some tweaking of the colors to refine the mood that I wanted for the photograph. I think it's important to maintain a consistency in the color tones and in the mood of a photograph.
This image was photographed and post-processed in 2011. Since then I have a much better understanding of Photoshop's color tweaking tools such as Selective Color, Color Balance and Hue and Saturation, as well as the Gradient tool. I have also gained more experience using them when post-processing images. You can perform similar color tweaks like I did for this photo with Nik Software's Color Efex plugin, but it's entirely doable in Photoshop as well without the need of any extra software.
I'm from the Philippines. I am a certified public accountant with a full-time job and a passion for photography. I’ve been a photography hobbyist since 2008. My photographic interest is in portraiture, but I also do some travel and landscape photography.