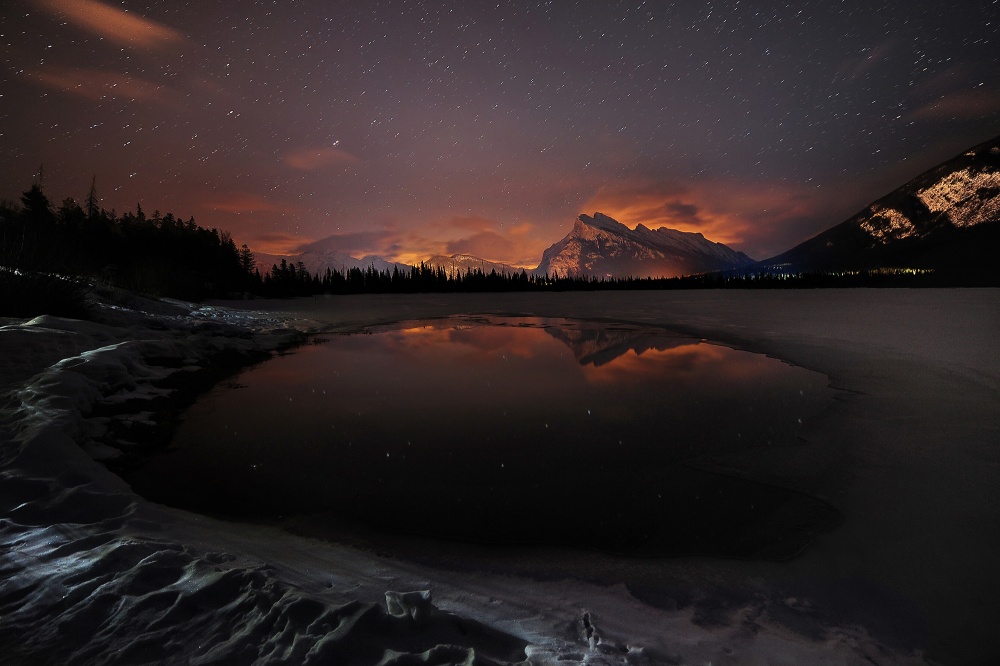
From far away, I could see burning red and orange clouds and the shining stars scattered among them. The perfectly still air transformed the lake into a gigantic mirror. Just as I was about to press the shutter button to capture this magnificent show, I jumped as a car unexpectedly drove by.
The Vermilion Lakes in Banff National Park are famous for their spectacular sky at sunrise and sunset, as well as their snow and ice formations in winter. However, few photographers have shot night scenes here. As an Alberta based photographer, I’m constantly looking for unique compositions and lighting conditions of these lakes, and this is one of them.
Nikon D700 . Nikkor 14-24mmf/2.8 . 39.9ss . f/4 . 1600ISO
It was one day after an aurora storm hit the Canadian Rockies in February 2014, and I was out hunting for the northern lights. The weather forecast predicted partly cloudy skies in the evening and a few clouds overnight, which sounded ideal for a night shot. Instead of observing the aurora borealis, though, that night the city light pollution put on a magnificent show for me.
"I could see this spectacle from a distance and decided to drive to the Vermilion Lakes to have a closer look. I knew that they would present the best reflections due to their unique location near Banff."
I could see this spectacle from a distance and decided to drive to the Vermilion Lakes to have a closer look. I knew that they would present the best reflections due to their unique location near Banff. I didn’t have to spend much time searching for the perfect foreground. Parts of the lakes were still thick ice and the water was surrounded by beautiful snow formations. There was no wind at all, which allowed for beautiful reflections of the mountains and the clouds in the water.I tried different exposures at the beginning, from 10 seconds to 1 minute. The stars started to form trails beyond 30 seconds. At an exposure under 30 seconds, however, I had to increase the ISO to a high noise value. After evaluating the lighting and results, I decided to go with 39.9 seconds. This allowed me to use ISO 1600, which is a very decent value for my Nikon D700, and I managed to avoid capturing any star trails. The choice of aperture was also important because I wanted to have as much as depth of field as possible. The new moon sky did not give me many options in terms of exposure. Thanks to the light pollution I could use f/4. I set my camera to manual mode and the exposure setting to bulb.
"This was completely unexpected, but it came out so well that it turned out to be the best shot that night."
After holding the remote release for about 30 seconds, a car passed by and cast a strong light onto the snow. It almost made me jump up, and I nearly cancelled the shot. To make up for the loss, I took more than a dozen shots after that. Surprisingly, however, once I got back home and started post-processing, I realized the strong light cast by the passing car actually enhanced rich details of the snow and offered a great cool tone that contrasted with the warm glowing sky. This was completely unexpected, but it came out so well that it turned out to be the best shot that night.
I use Adobe Photoshop CS6 to edit my photographs. I also use Nik Color Efex Pro 4 plugin to make specific adjustments. For this particular image, the RAW file already looked perfect, so I didn’t make many adjustments. The following are a few minor changes I made:
1) I straightened the horizon by selecting the Ruler tool and dragging across the image.
2) I selected the Dodge tool, set the exposure to 10% and painted on the lower right hand corner to open up that area a bit.
3) Using Nik Color Efex Pro 4, I added a Skylight filter effect with Strength set to 20%. I added a layer mask so that the filter would affect only on the sky and the reflected colors.
4) Back in Photoshop, to add some blue to the foreground snow, I applied a Photo Filter adjustment layer, selected Cooling Filter and set the Density to 25%. I turned its adjacent layer mask to black by pressing Alt + Backspace, and then I used a white Brush to bring out the areas desired.
5) I sharpened the image by applying the Unsharp Mask filter with Amount set to 100%, Radius to 1.5 pixels and Threshold to 0.
1) Never underestimate the unexpected things; sometimes a ruined image can be a perfect shot! Without the passing car casting strong light onto the snow, my image would be a great one, but not perfect.
2) Pay attention to all elements in the sky and on the ground. Sometimes factors like light pollution, flares or a foggy lens can create unique effects.
3) Try different combinations of shutter speed, aperture and ISO. Experiment until you feel satisfied — don’t simply rely on rules of thumb.
Based in Calgary, Canada, I’m a professional photographer, visual artist and poet. I specialize in fine art landscape photography. I began my journey in photography with my love for nature and outdoor activities, such as hiking, mountain climbing and kayak trips. I’m a recipient of numerous national and international photography awards, and have been published in magazines such as Canadian Geographic, Outdoor Photography Canada, Photo Life, National Geographic and Canadian Wildlife. I hold a Master's in Computer Science and work as a part-time software programmer, which greatly contributes to my skills of photo editing and post-processing.