I enjoy creating surreal images packed with fantasy and imagination, and to do this I use my personal stock of objects, people and landscapes. It took me about 40 years, step by step, to create this collection of material and believe it or not, sometimes I still cannot find what I'm looking for in my archives.
I have been making photo montages for 40 years. For 15 of those years I did it in the darkroom. However, when Photoshop became available and digital cameras became dominant, the darkroom was replaced by my Apple computer.
Nikon D300 . Nikkor 16-85mm and 70-300mm
"Sometimes it takes an entire year to finish a montage because it's not always easy or even possible to find the missing element in the right light in my personal stock. So the montage has to be put on hold until I am able to photograph the objects I need."
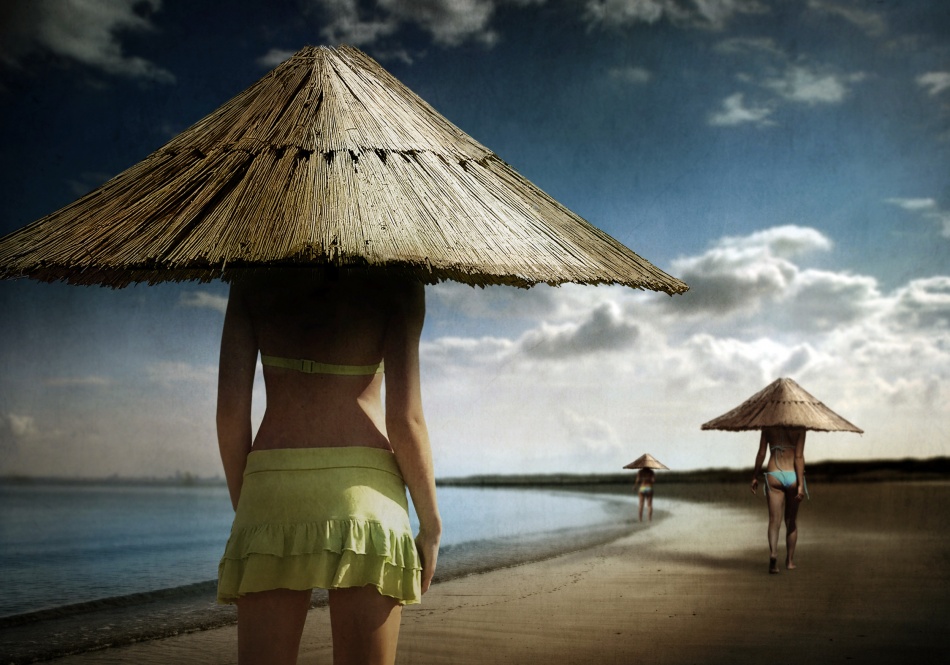
The basis for most of my surreal concepts is photographing an object or a person, and then finding myself with a photograph that isn’t very interesting. If I encounter a situation that needs new visual material for the montage, I go out to shoot that missing element with the final result in mind. Of course, I always try to get a variation on the theme to increase my stock of images at the same time. Sometimes it takes an entire year to finish a montage because it's not always easy or even possible to find the missing element in the right light in my personal stock. So the montage has to be put on hold until I am able to photograph the objects I need. When it’s simply impossible to find or photograph the missing element, I change course and adapt the original concept to what I have in stock or to what I can shoot. And generally I can do this without running into too many problems.This photograph is based on a crazy idea that sun umbrellas have turned human in order to protect the sunbathers from getting sunburned. The idea was germinated when I saw those umbrellas while I was in Turkey. When I shoot subjects, I’m already thinking about what I could do with them.Surreal artists have been a great source of inspiration for me and my montage work. I’m as addicted to surrealism as I am to Photoshop.
I used Photoshop, OnOne Software Mask Pro 4 plugin and Alien Skin Eye Candy 5: Impact plugin to process the images and construct the montage.
1) The sun umbrella was extracted from the background with the software Mask Pro 4.
2) The photograph used as the background was taken from a series I shot on the coast of New Zealand. Some color adjustments were made to this photograph.
3) I looked in my personal stock for images that I made during my holidays on the coast. I searched for women in bathing suits, making sure they were shot in the same lighting conditions as the umbrella. All of the images of the women were extracted from the background, again with Mask Pro 4. Some parts were extracted with the Background Eraser tool in Photoshop.
4) The same umbrella was added to the three women in a new layer.
5) Under the umbrella, I used the Burn tool on the women to create a shadow cast by the umbrella.
6) I added the three composite women and umbrellas, in three separate layers, and positioned them in those specific places to create the best impression of depth and dynamics in the composition. It is very important to be aware of — and to adapt to — the dimension. This is not only so you produce an image with a good sense of perspective, but also to make sure that all the elements in the picture fit together well and are believable.
7) The shadows were created with the Perspective Shadow filter from Alien Skin Eye Candy 5: Impact plugin. The two ladies closest to the background were slightly blurred to create a convincing impression of depth of field as close to reality as possible.
8) When the composition looked good, I added a texture layer from my archives on top of the background layers, set the layer's blending mode Soft Light and reduced the Opacity to about 50%.
9) Once everything was in place, I saved the image as a PSD file with all layers separate. This way I could always return to the file and make corrections if necessary. Remember to close your image when you're finished and then open it sometime later to analyze what you did. It's easier to be more objective and notice small details later than it is during the creation process.
10) I also saved the image as a JPEG file for printing or sending to websites/photo contests.
When I was solicited for a job as an art director, they asked me if I was crazy. I said yes, and I had to prove it for 35 years. Now I sincerely hope I’m still crazy enough. So, keep this in mind: don’t be shy and dare to be crazy. It doesn’t hurt to be crazy, and it really helps to open new, undiscovered creative perspectives.
I'm from Belgium. I received an education in fine art, and then I worked as an art director in advertising for 35 years, where creativity and impact were a must. Photoshop and I go way, way back, and I’m convinced that some filters and plugins, when used in an intelligent way, can give a real artistic touch. My wish is to make a perfectly composed surreal image. Maybe one day I will.