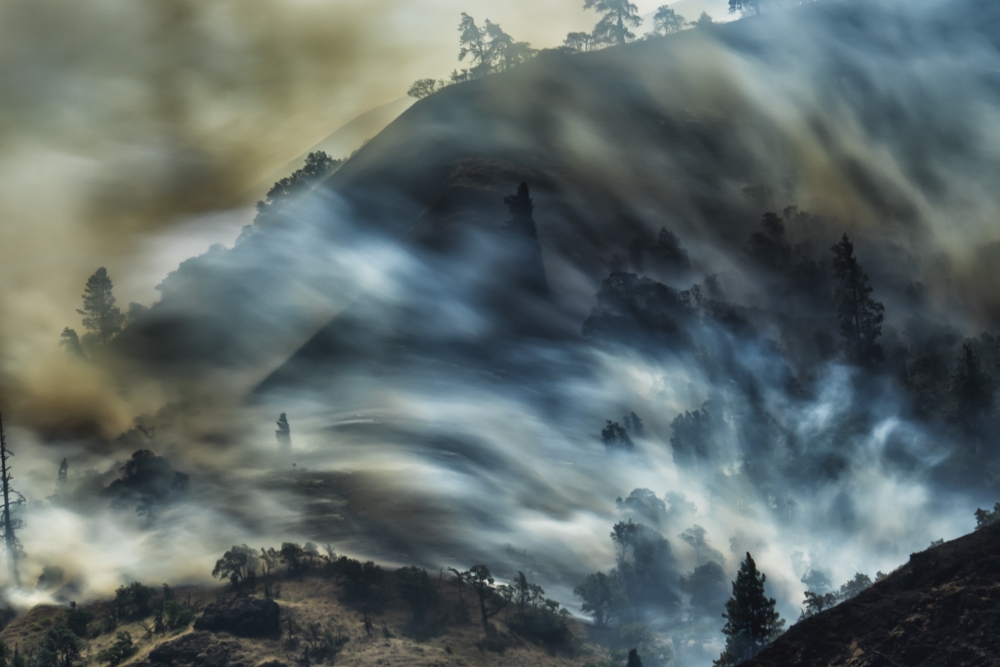
Sometimes it pays off to always carry the camera gear in the car since you never know when a unique photo opportunity will arise. On this day a brush fire was flaring up on this hillside near Hood River, Oregon, as I was driving by on the highway. The strong winds that day were blowing the smoke from the ravine up and over the hillside, almost like water would cascade over a falls. The scene was threatening and beautiful at the same time, so I had to stop and capture it!
Hood River is in the beautiful Columbia River Gorge region where the Columbia River forms the border between Washington and Oregon as it makes its way out to the Pacific Ocean. This region starts near Portland, Oregon, and continues east, becoming progressively more arid as you move further east. Summers are usually quite dry, so small fires are common.
Fuji X-T1 . Fuji 55-200mmf/3.5-4.8 . 156mm . 1.1s . f/14 . ISO200
This brush fire flared up just east of Hood River in August and burned for about a week. Although many homes were threatened, no structures were lost and no one was injured — the firefighters did an incredible job! The photo was shot from a pull-off as I was heading eastbound on Interstate 84 near the Rowena exit.
"I was hoping to capture the textures in the smoke plumes, the sense of motion and both the beauty and threatening nature of the scene."
The wind was very strong this particular day. The fire was actively burning in the ravine, and the smoke was being blown right to left, up and over the hillside by the 30 mph winds. It was a chaotic looking scene as wind shifts caused the fast-moving, horizontal plumes of smoke to change direction and flow over the hillside in different ways. When the wind was strongest, the blowing smoke was spilling over the hillside almost like water flows over a falls. I was hoping to capture the textures in the smoke plumes, the sense of motion and both the beauty and threatening nature of the scene.The photo was a single exposure shot around 11:00 a.m. The sun was fairly high, providing lots of light, and the slight backlighting of the scene added contrast and texture to the smoke plumes. There was no need for exposure blending or other means to capture the dynamic range of the scene.
"I highly recommend that you always carry both a 5-stop and a 9- or 10-stop solid neutral density filter. I use these filters all the time, often for water scenes, but you never know when they'll come in handy."
I used a slow shutter speed to capture the motion and texture of the smoke and experimented with a few different settings. I used a 9-stop Hoya NDx400 screw-on neutral density filter to help with this, and I also ended up stopping down to f/14 just to get the shutter speed I wanted. Depth of field was not much of a concern in this scene. I wanted everything in focus, and since I was shooting from 100 to 200 yards away, that was not an issue. I highly recommend that you always carry both a 5-stop and a 9- or 10-stop solid neutral density filter. I use these filters all the time, often for water scenes, but you never know when they'll come in handy. I used a sturdy SLK tripod: it would have been impossible to capture the image the way I wanted to without one. Always carry your tripod!Choosing the exact shutter speed was a bit tricky because the speed of the smoke plumes varied as the wind gusted, so I had to experiment a bit to get the look I wanted. In the end I chose a frame shot with a shutter speed of 1 second; some frames shot at 2 seconds also looked good but 0.5 seconds or faster proved to be too fast. Just like shooting water rushing over a waterfall, the slower the shutter speed, the smoother the texture and the less detail you'll see. So that is your trade-off, and small differences in shutter speeds can really change the look, so I find its best to experiment a little and see which look you prefer.
"The trees helped to provide a sense of scale: including something of a known size (a tree, person, etc.) often helps to provide scale and can enhance your image."
I didn't have much of a choice when deciding which lens to use since I could only get within about 100 or 200 yards of the hillside; my mid-range telephoto lens was the only option. I wanted to get the whole hillside in the frame and also show the source of the smoke in the ravine; it looked pretty dramatic, almost like an explosion going off. The trees helped to provide a sense of scale: including something of a known size (a tree, person, etc.) often helps to provide scale and can enhance your image. I usually like to show some sky in a landscape photo, even if the sky isn't a focal point in the image. I find that helps to frame the image, so I included just a bit of sky and the few trees at the top of the hillside rather than zooming in tighter on the hillside.I was pretty happy with the result. I feel it captures the scene as I saw it, and it shows the intensity of the moment — both threatening and beautiful at the same time. Capturing this scene was fun. The most enjoyable part was figuring out how to shoot the scene on the fly, but I also enjoyed just watching it — another example of the raw power of nature. And I was super happy that there were no losses associated with this fire.
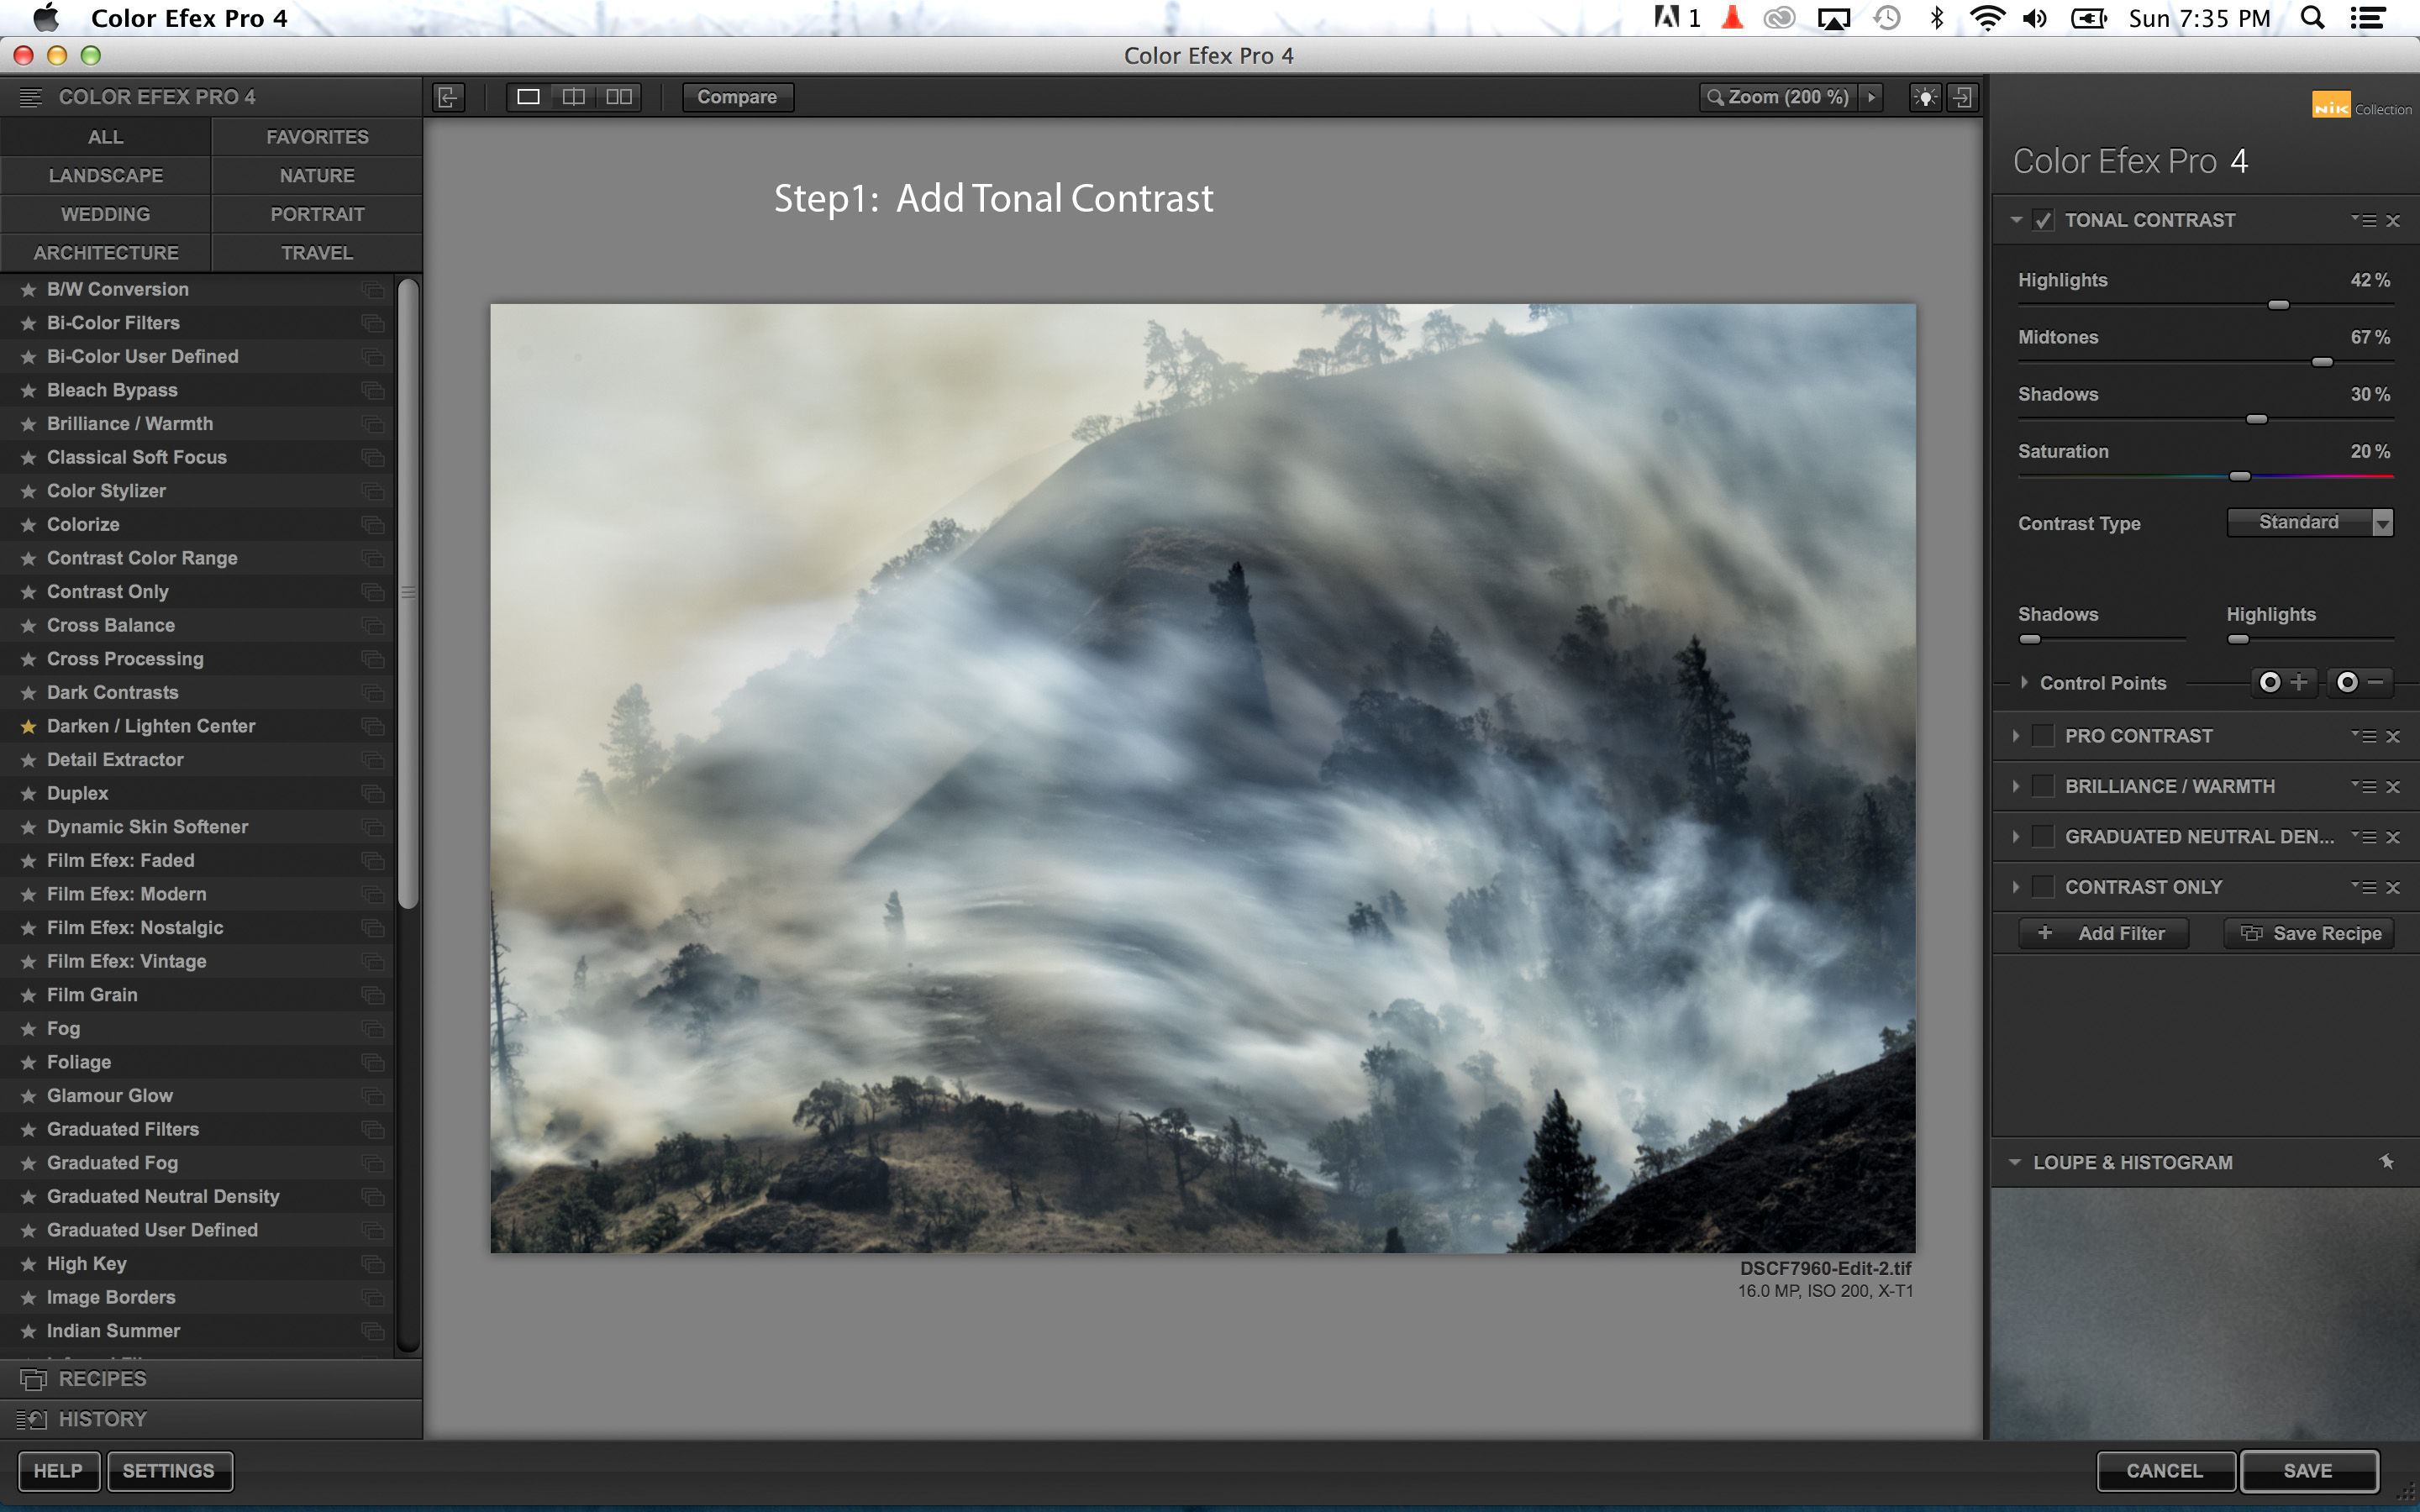
Post-processing was done in Lightroom and Nik Software's Color Efex Pro 4 plugin. The main task was to bring out color and contrast in the smoke. The sunlight and variations in the density of the smoke created some beautiful tones and textures, but they needed to be boosted to really make the image reflect what I saw and felt.
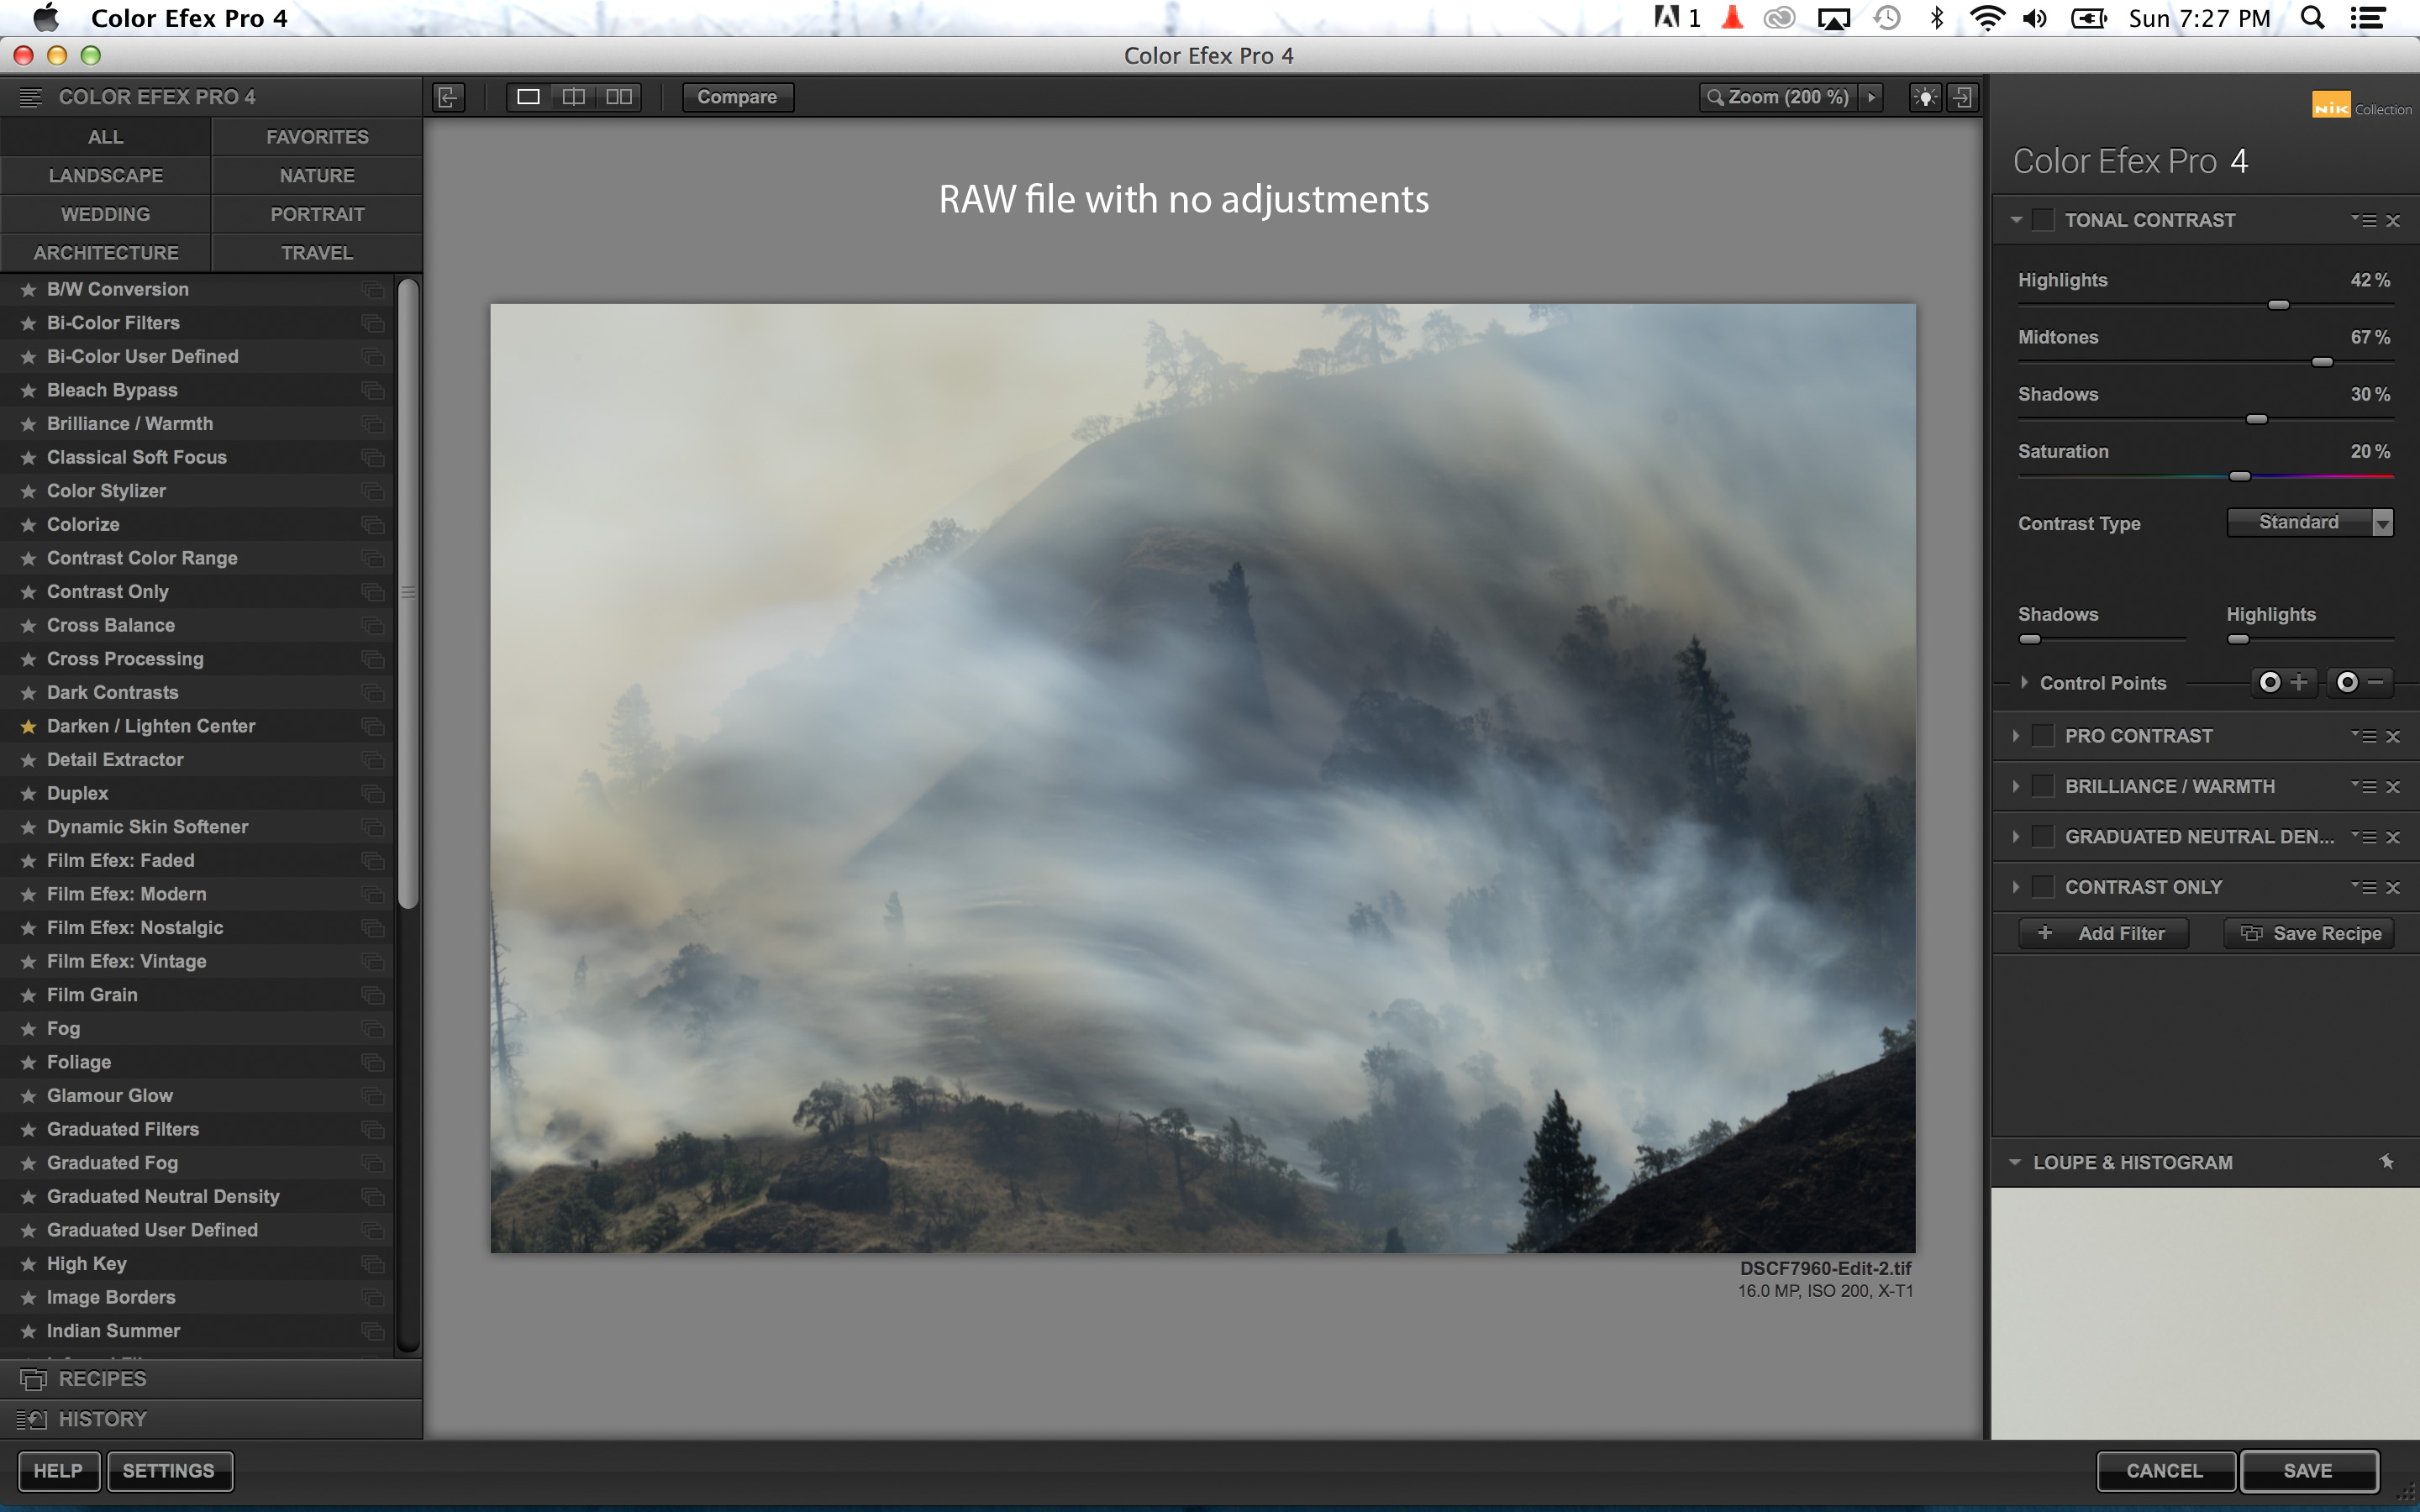
Original image
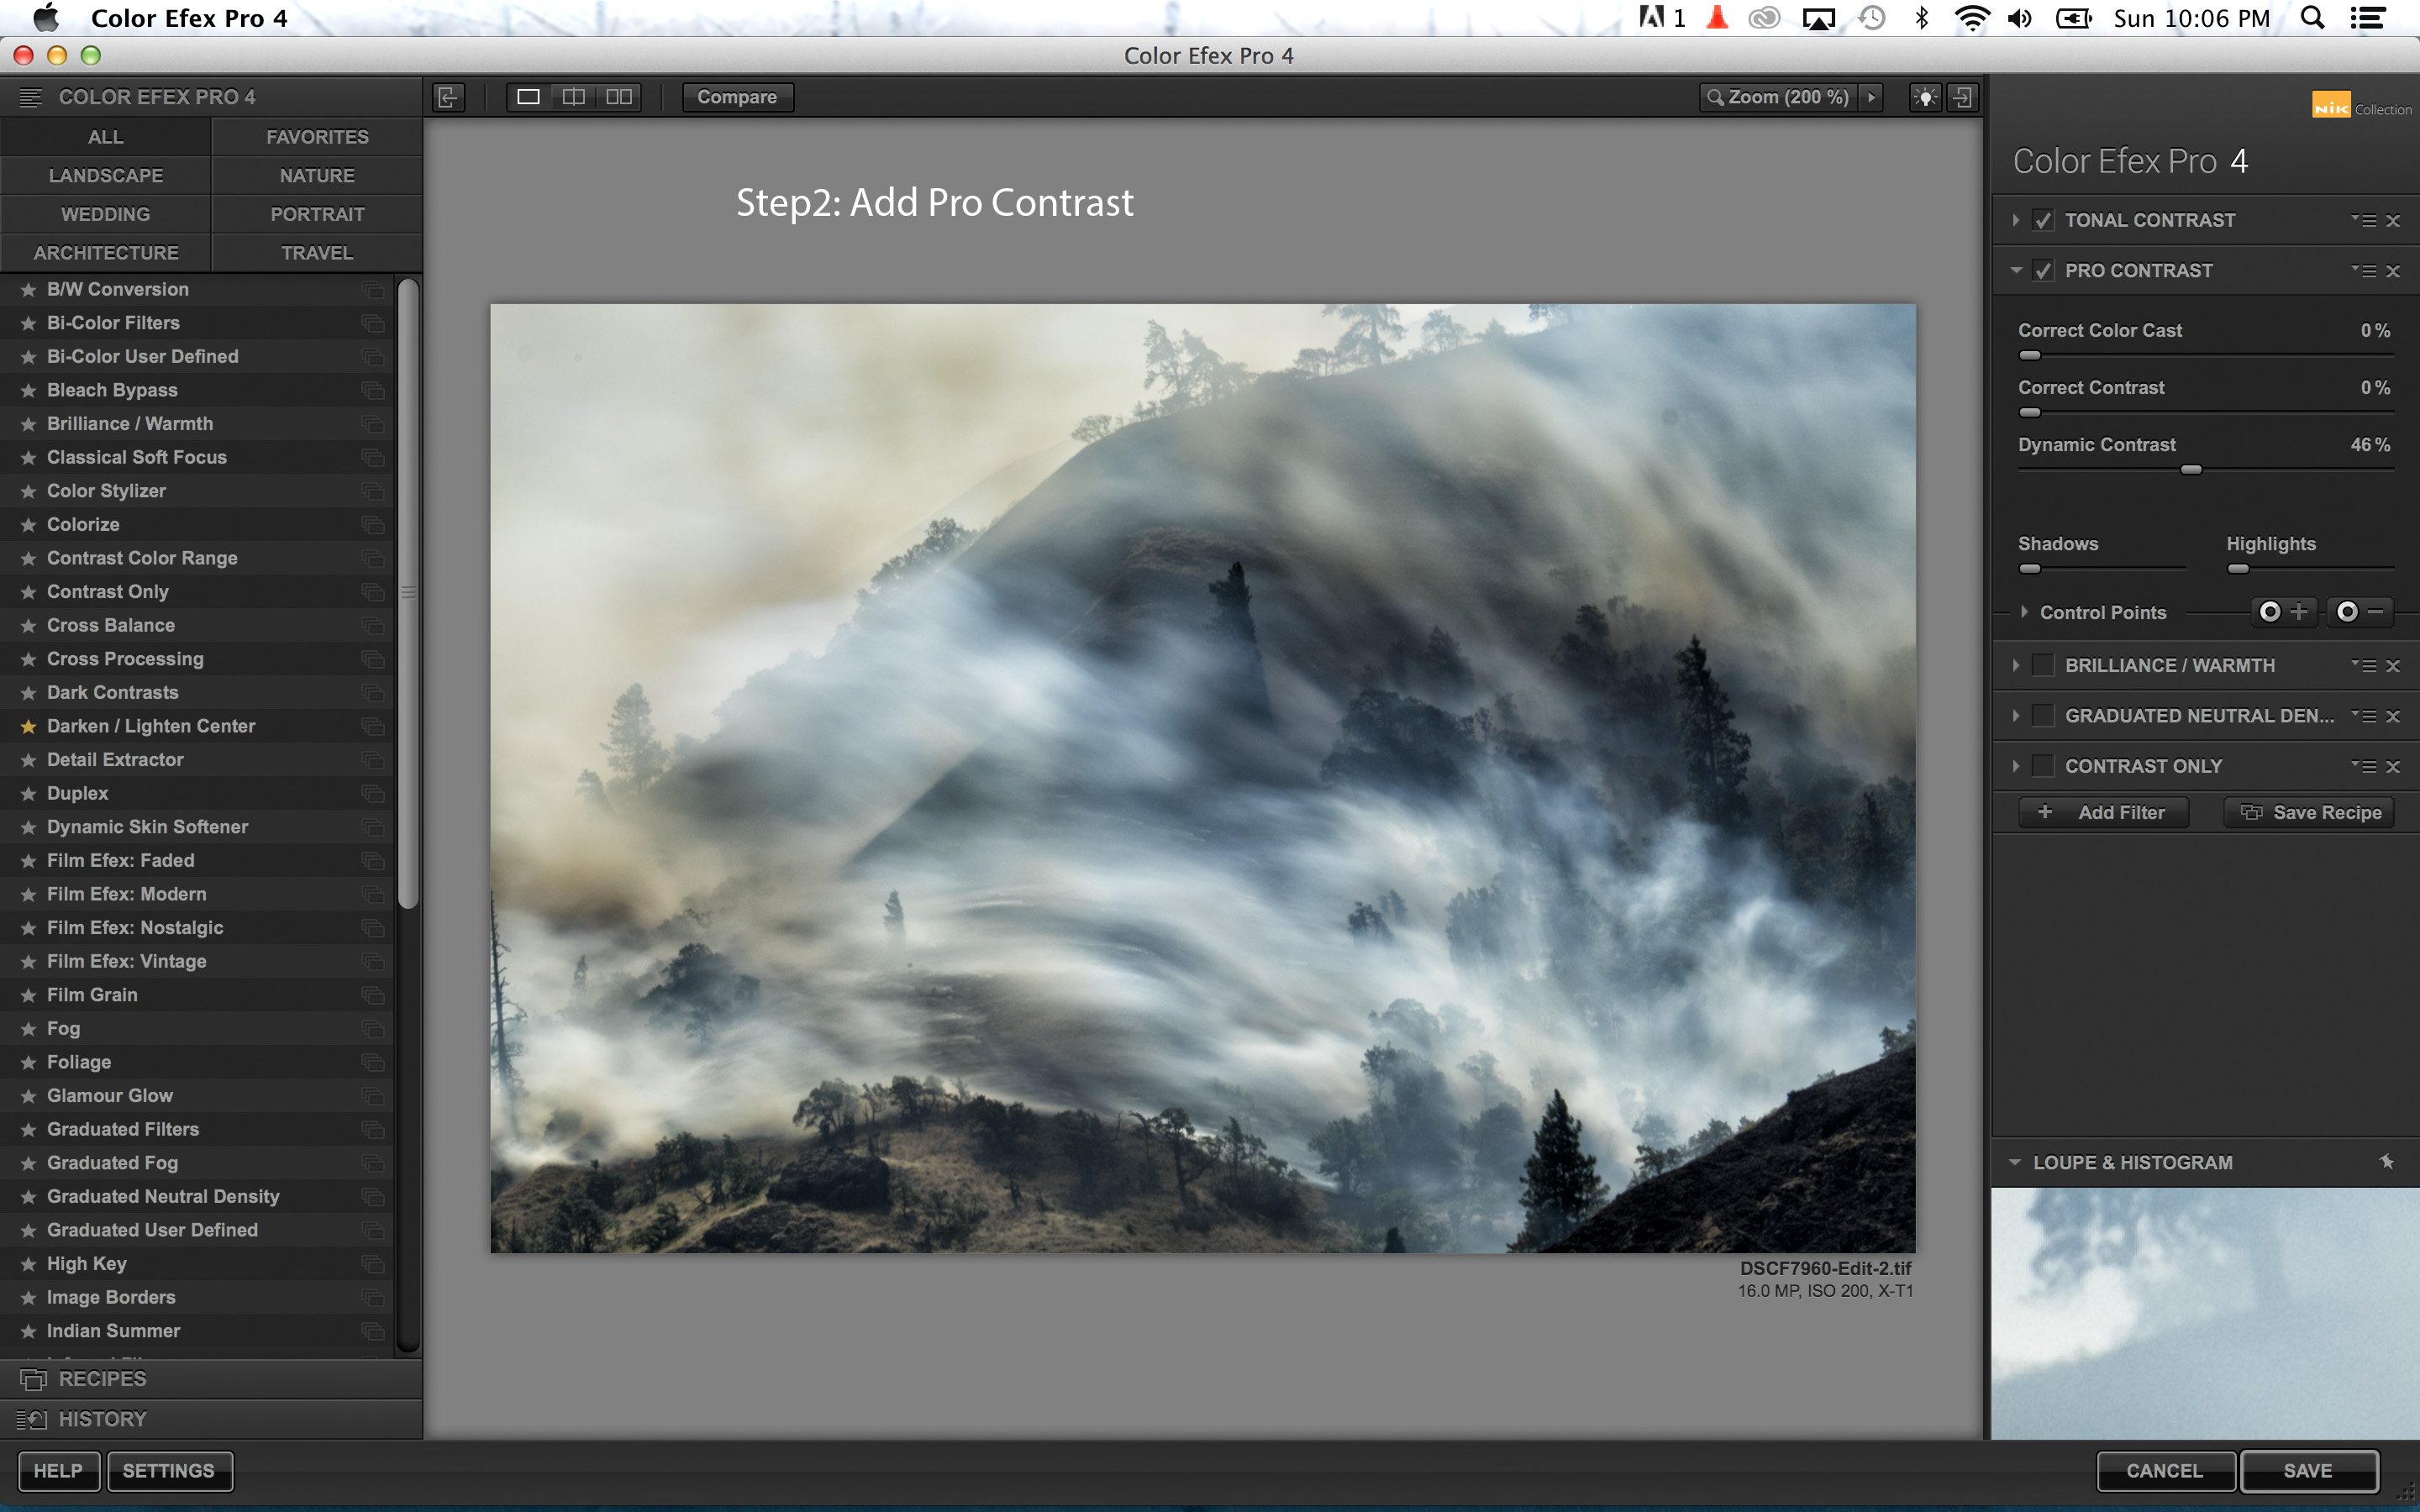
2) In the Pro Contrast filter, I set Dynamic Contrast to 42%.
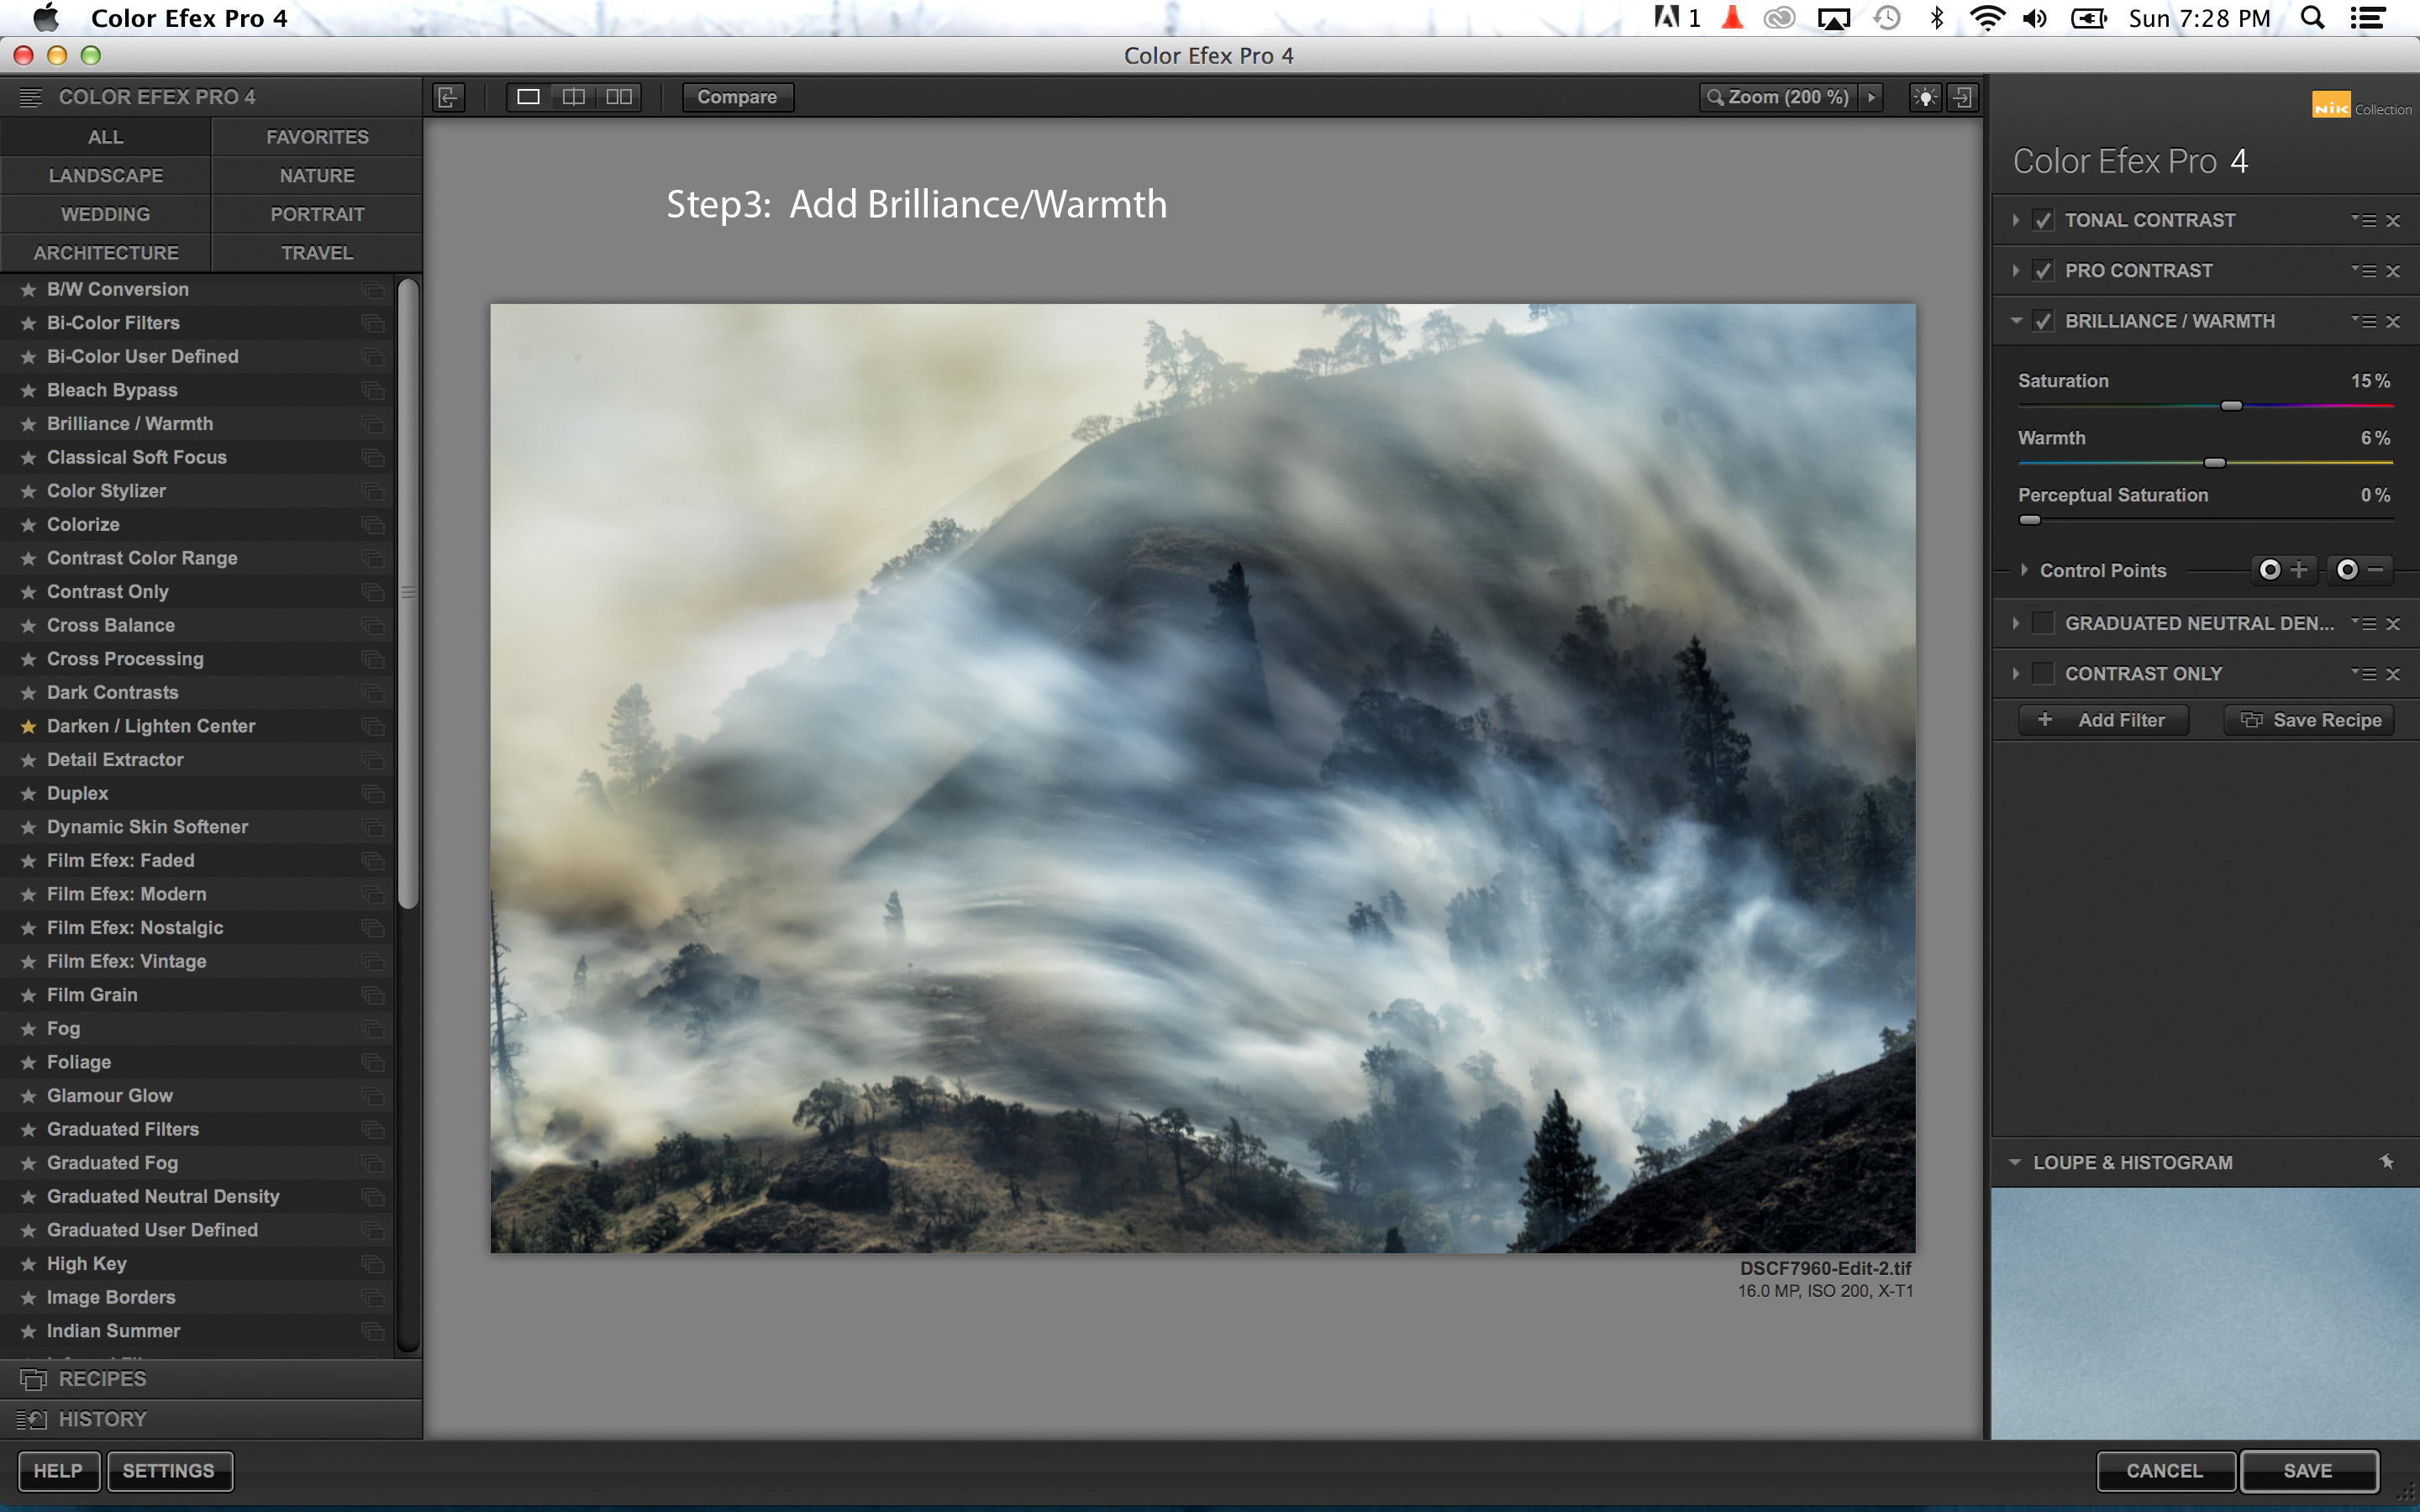
3) In the Brilliance/Warmth filter, I made these adjustments:• Saturation 15% — I pumped the saturation just a bit more• Warmth 6% — I used this to enhance the yellows a bit
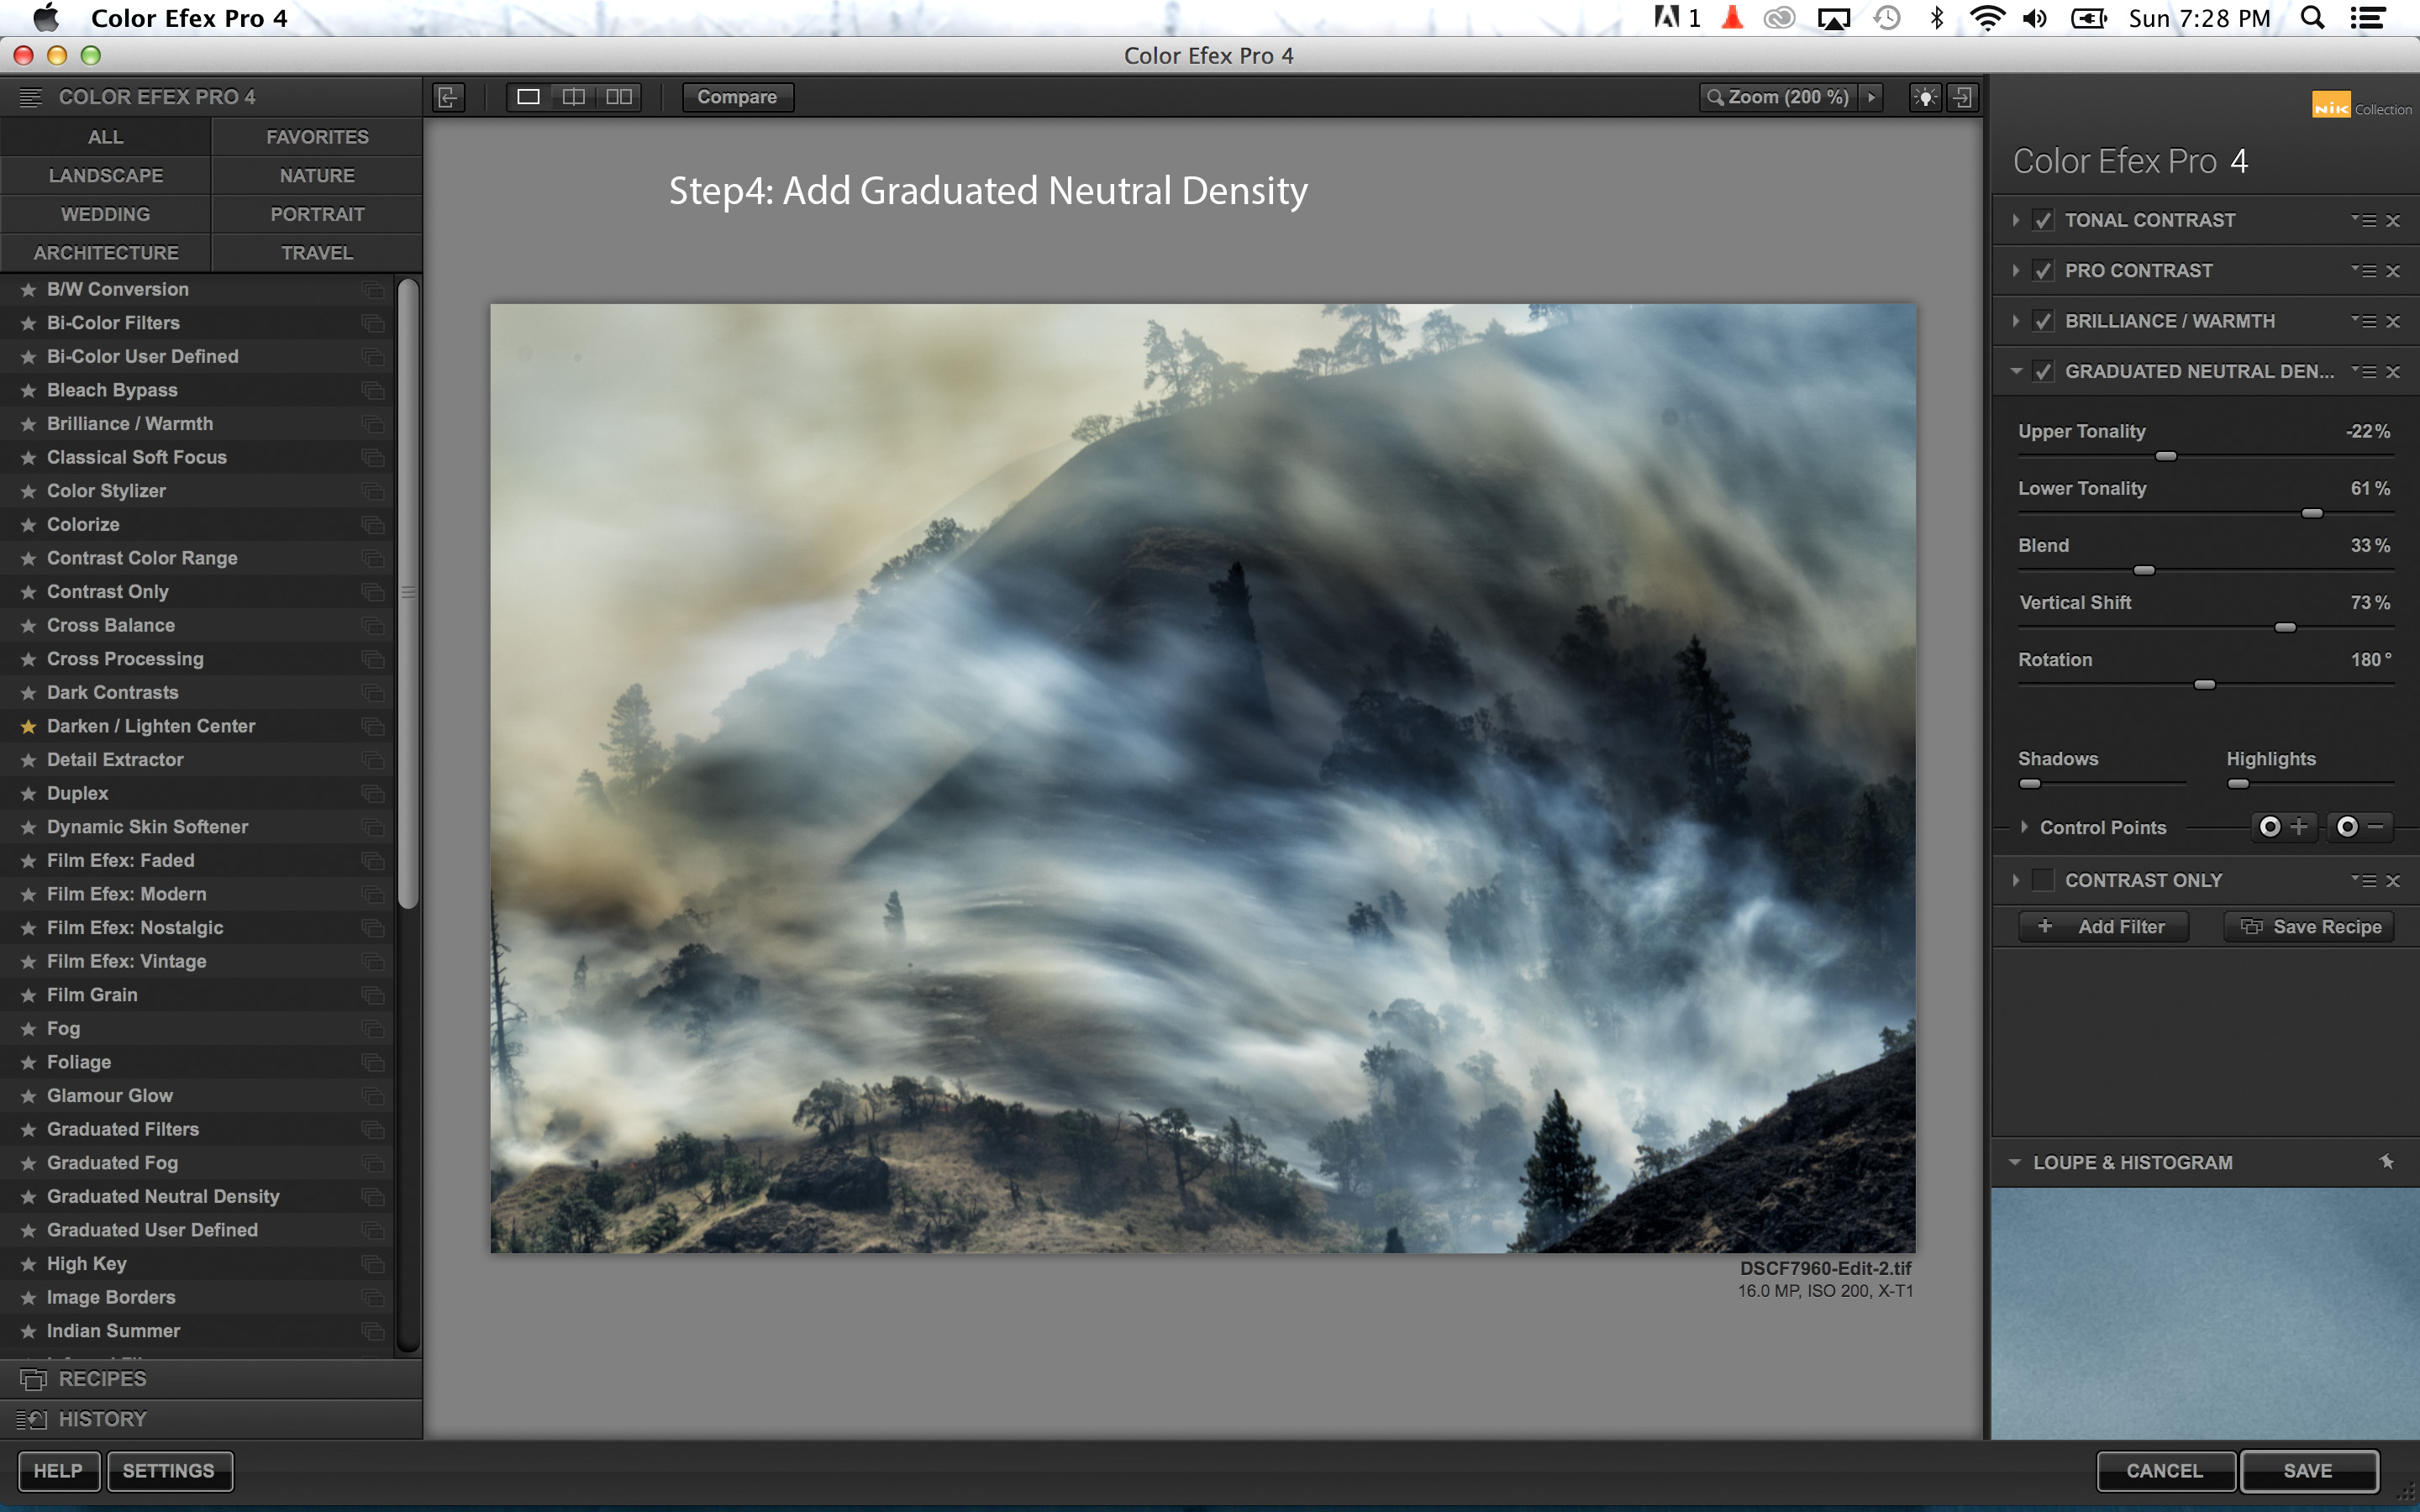
4) I used the Graduated Neutral Density filter to lighten the very bottom of the image:• Upper Tonality –22%• Lower Tonality +61%• Blend 33%• Vertical Shift 73%
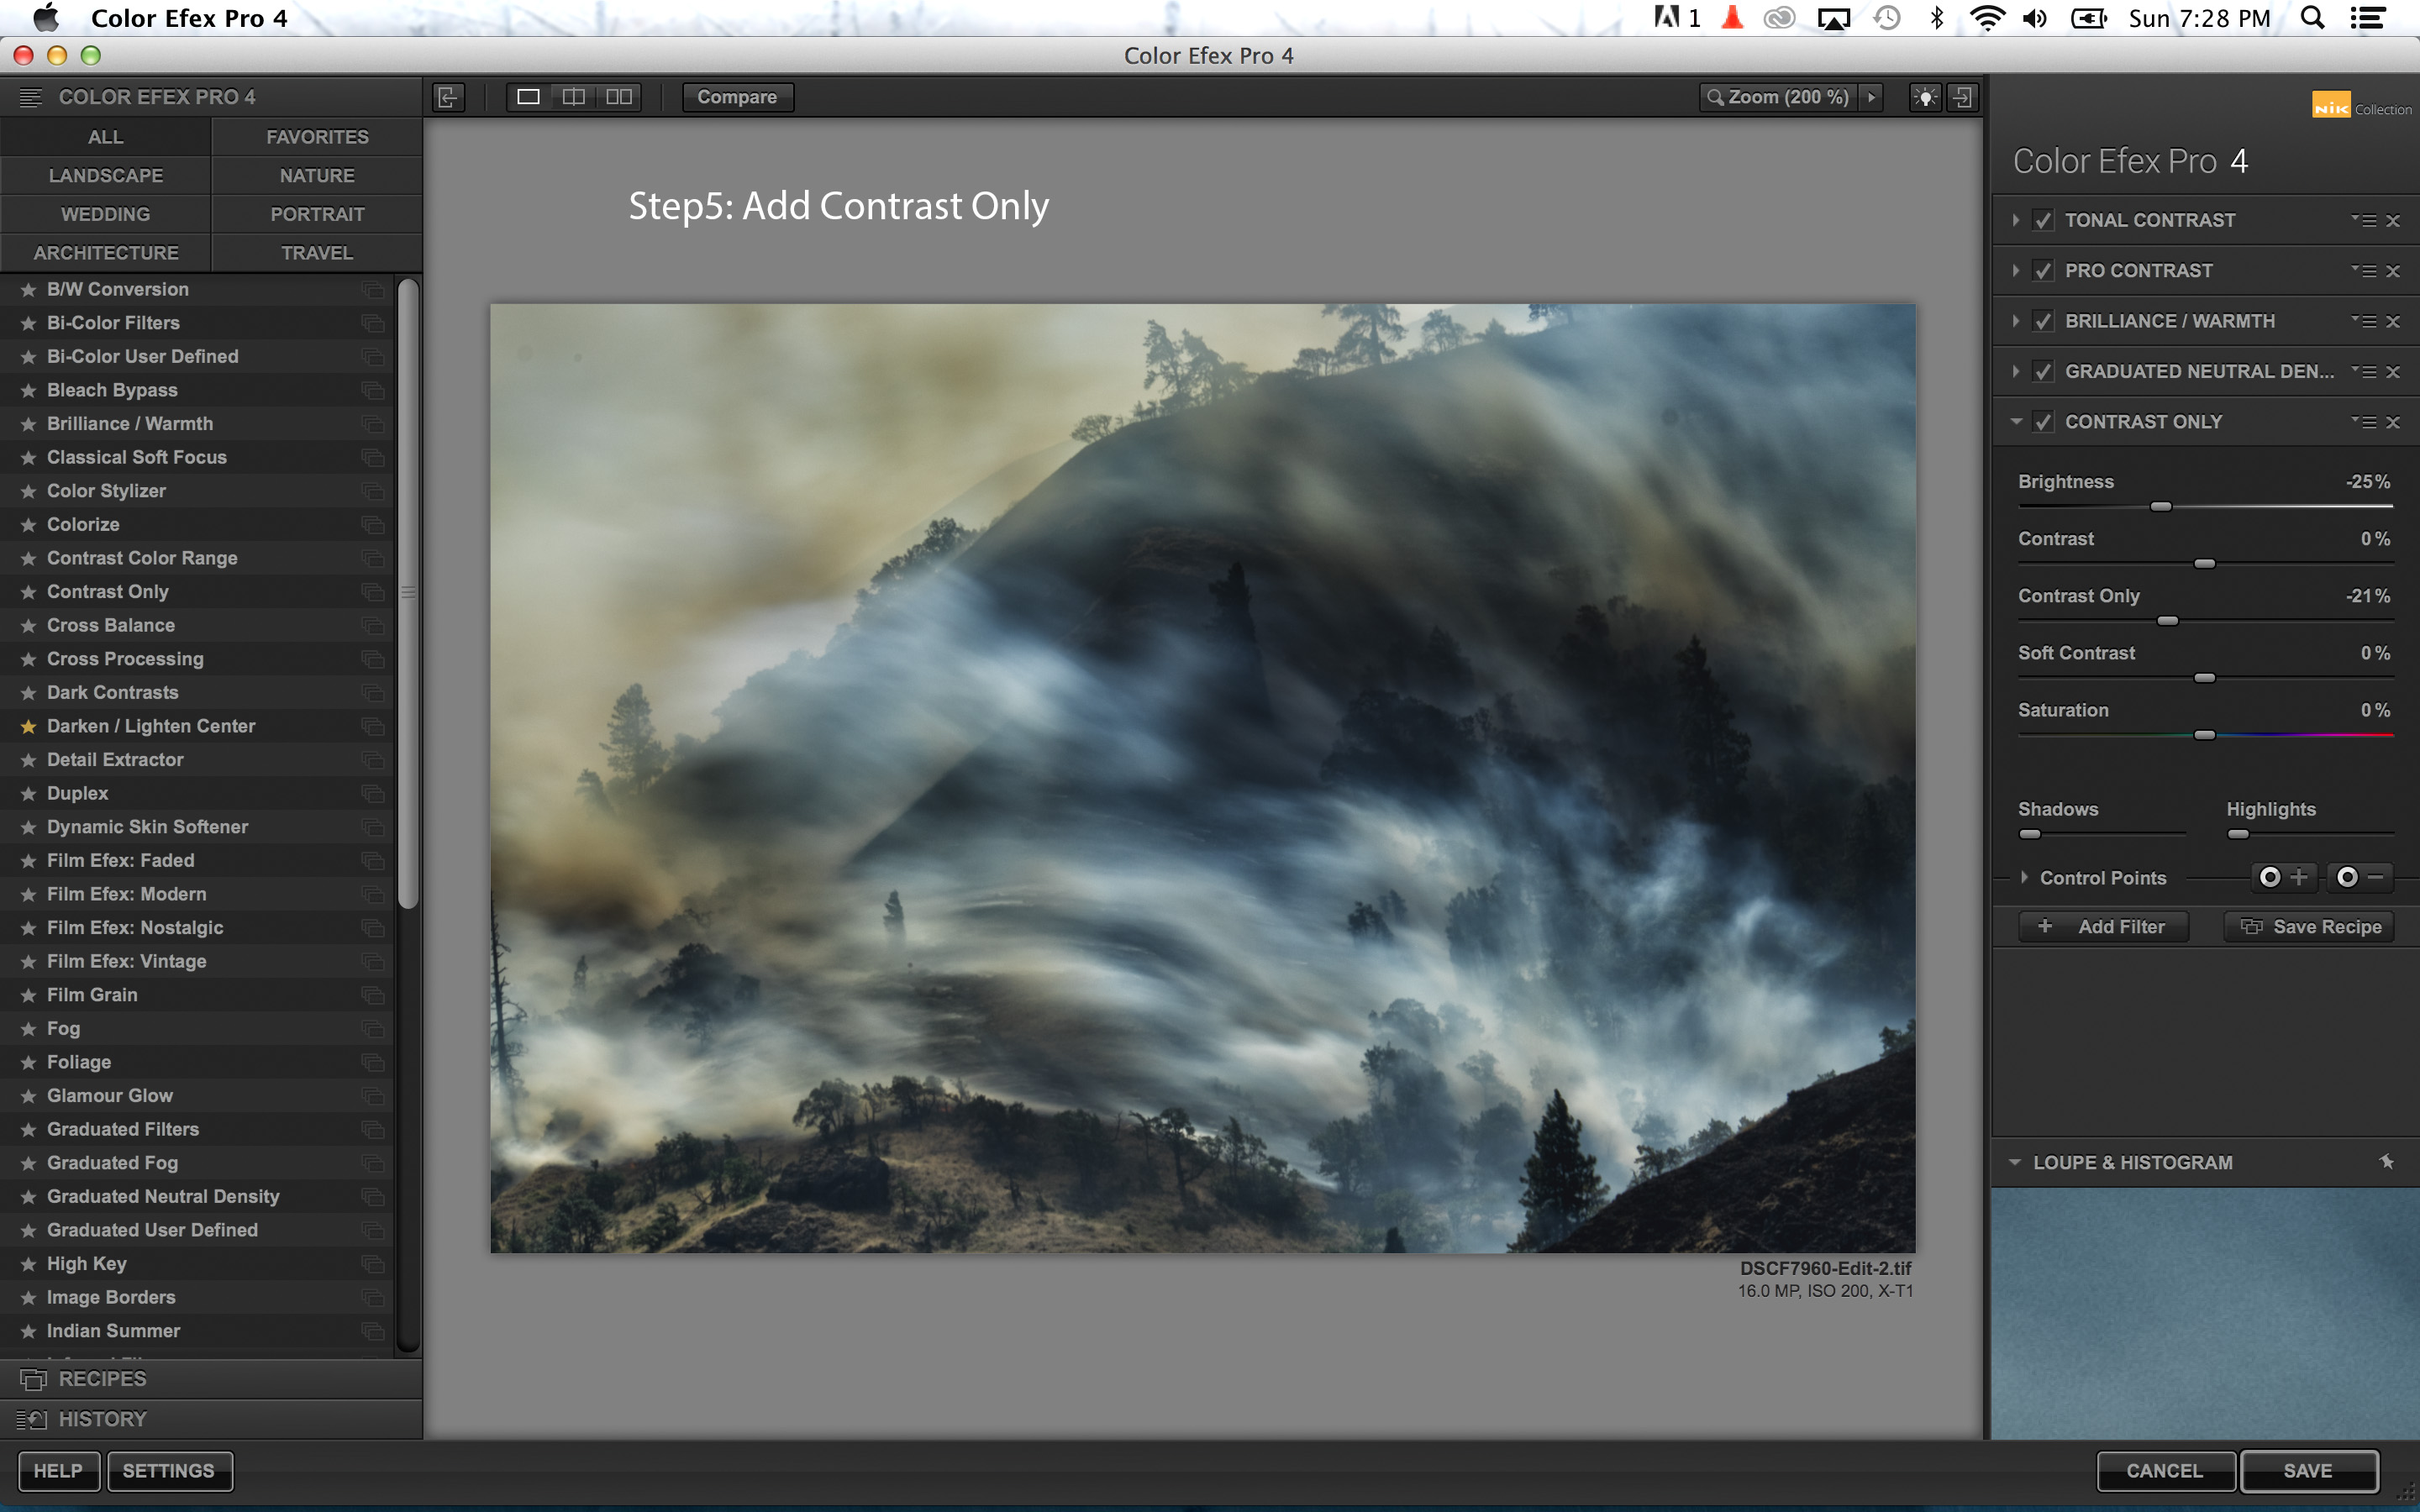
5) I used the Contrast Only filter to darken the image a bit:• Brightness –25%• Contrast Only –21%
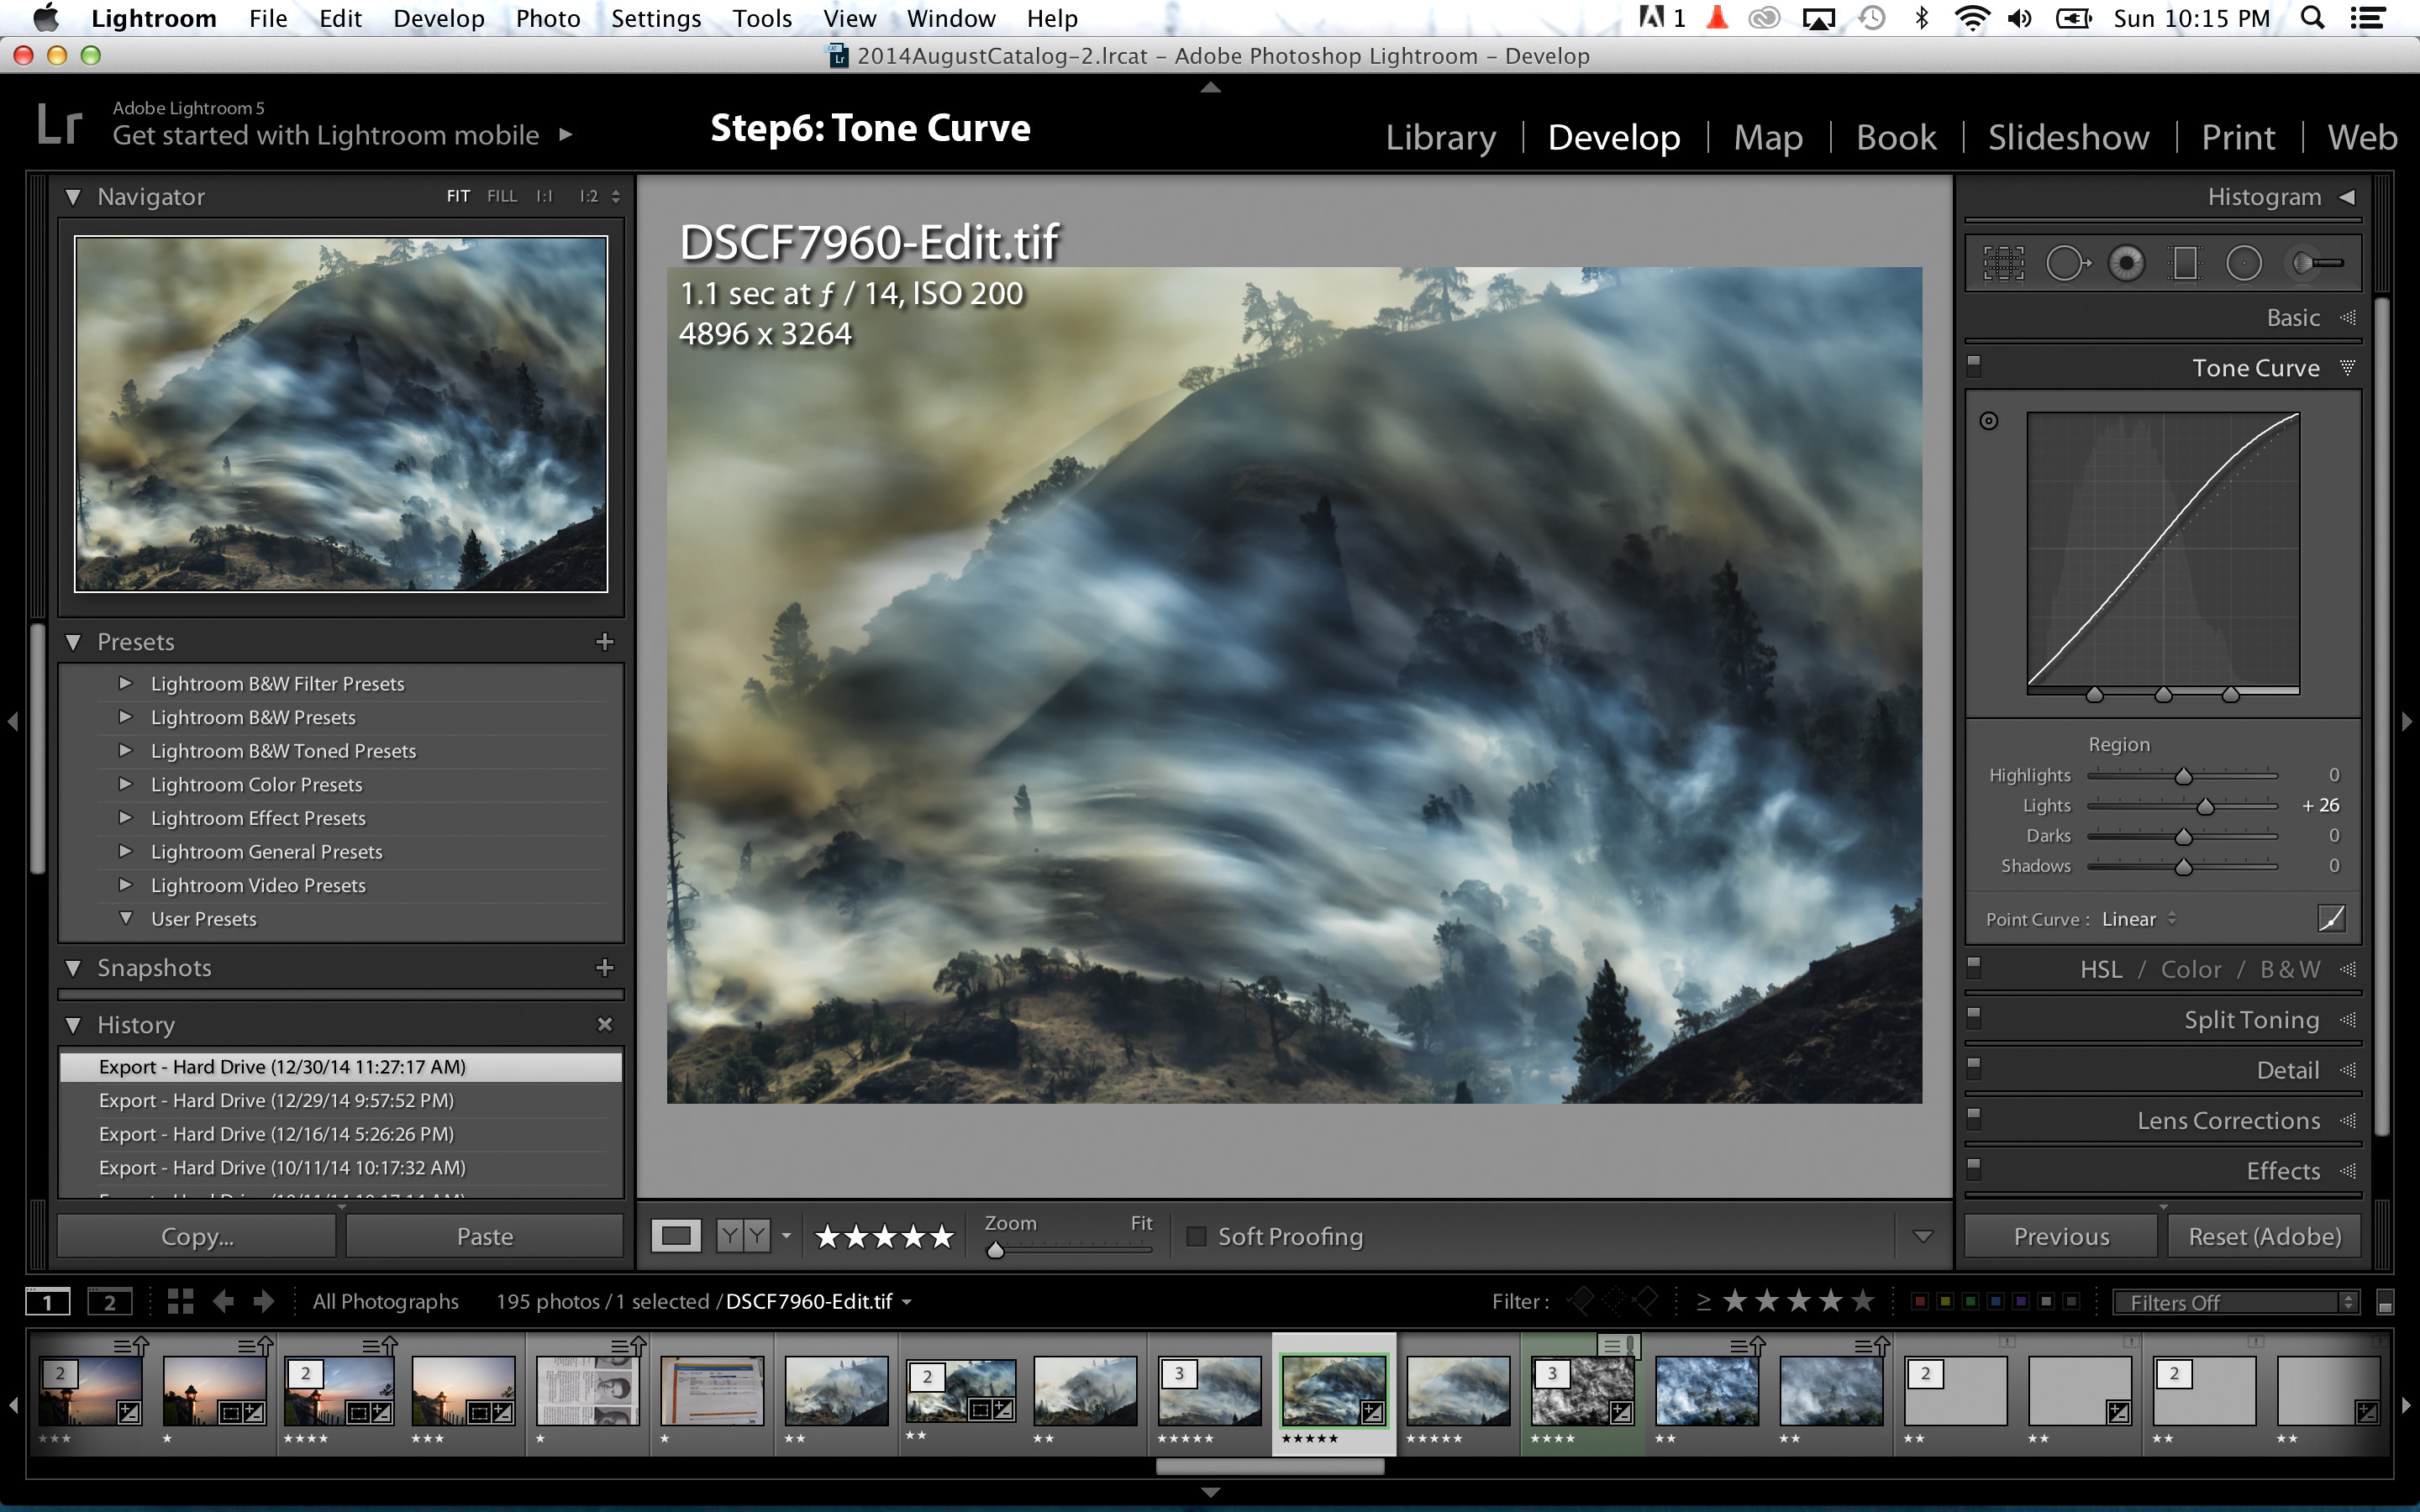
6) Back in Lightroom, I adjusted the Tone Curve filter by boosting the Lights to +26 to give the image a bit more pop.
7) In the end, I added some Noise Reduction (to tackle a bit of noise introduced by the Nik Color Efex Tonal Contrast filter) and final Sharpening:These were the Noise Reduction adjustments I made:• Luminance 40• Detail 50• Contrast 0• Color 0And these were the Sharpening settings:• Amount 70• Radius 1.0 • Detail 25• Masking 0 As an aside, back when I made this image I didn't understand what Masking was for. I now know its used to prevent the Sharpening settings from creating noise in larger uniform areas that don't need much sharpening, like the sky, for instance. Now I typically use a Masking value of around 40 or more if I see some noise creeping in.
2) Experiment with different shutter speeds to convey motion in your images: small changes can do a lot. Make sure you pick up a Neutral Density filter or two; they are amazingly useful.
3) Give Nik Color Efex Pro 4 plugin a try. It's a great tool. I've been using Photoshop more and more over the last six months, but even with Photoshop, I often use Nik Color Efex as a filter. In fact, I would buy Nik Color Efex again, just for the Tonal Contrast filter alone.
I'm from the United States. I've been a serious photographer for a little over a year now — ever since I challenged myself to learn how to make images that I'd be proud to hang on my walls. I've learned a lot, but I am still a relative newbie with much more to learn. I learn about technique by looking at inspiring photos and trying to figure out how the images were made, and I ask for critiques at every opportunity.
Right now I'm doing mostly nature photography since I love the outdoors, especially in the Pacific Northwest where I live. I also do a little action photography as I love to ski, bike and kiteboard. But I'm hoping to branch out a bit more in the coming year — there is so much to learn in other forms of photography.