by Fernand Hick
Sometimes two photographs are more powerful than one, especially when I can fully express my emotional interpretation of a scene by combining two images that were captured within moments of each other.
Nikon D300 . Nikkor 18-200m f/4.5-5.6 . 93mmmm . 1/30ss . f/16 . ISO800
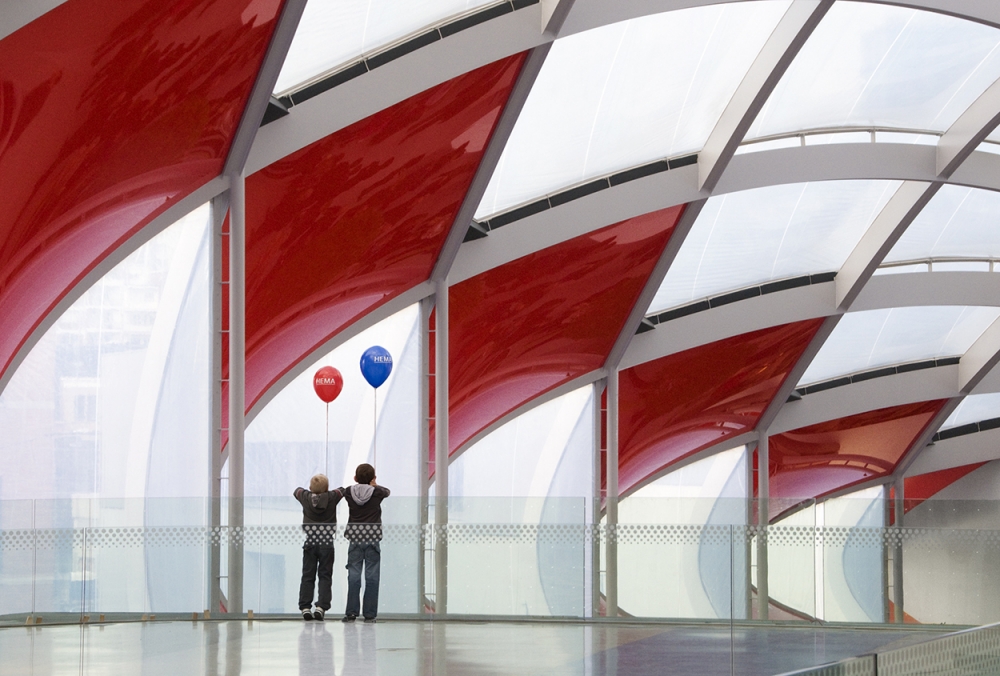
The commercial complex Médiacité in Liege, Belgium is a very modern structure with magnificent graphic design and appeal. The roof especially is quite unique with its network of steel arches and alternating red and transparent glass diamonds in varying sizes. The steel latticework creates many interesting patterns, and the transparent glass allows natural light to illuminate the gallery.
" My hope was that on opening day the security guards would be so busy managing the throngs of visitors that they would forget all about a lonely photographer amongst the crowd."
I live near Liege and decided to assist at the inauguration of Médiacité. I know from experience how difficult it is to make pictures of a building without official authorization, so volunteering at least gave me a bit more freedom to explore. My hope was that on opening day the security guards would be so busy managing the throngs of visitors that they would forget all about a lonely photographer amongst the crowd. As luck would have it, that was indeed the case. For a one-day public outing such as this, I always take my Nikon D300 and three lenses — a fisheye Nikkor 16mm, a Nikkor 12–24mm zoom and a Nikkor 18–200mm zoom — and a compact camera for emergency backup. I leave my tripod at home since it only draws unwanted attention. My modus operandi is to underexpose my photos by –â…” stop and to use the Multi-zone metering mode, but because the transparent windows in the roof were an integral part of my composition, I adjusted my f-stop to slightly overexpose this time. As I shot, I closely monitored the histogram on the D300’s LCD to make sure that the exposure was optimal.
"I knew the instant I clicked the shutter that I would later combine the architectural capture with this one of the two boys in Photoshop."
I photographed several different points of view of this scene, and because it was so crowded, I was pleased that I waited long enough to capture a few frames that were strictly architectural images with no human presence. When the two boys appeared holding those two umbrellas, my exposure and composition were already set, so I took their photo as well. They were not standing in an ideal position — their balloons were overlapping the red glass. But I knew the instant I clicked the shutter that I would later combine the architectural capture with this one of the two boys in Photoshop. That way, I could freely move the boys and balloons to a more optimal place in the final image.
These step-by-step instructions describe how to move a portion of one image to another image and then seamlessly combine them in Photoshop CS6.1) Open the architectural image (Pic. 1) and open the image of the two boys (Pic. 2).
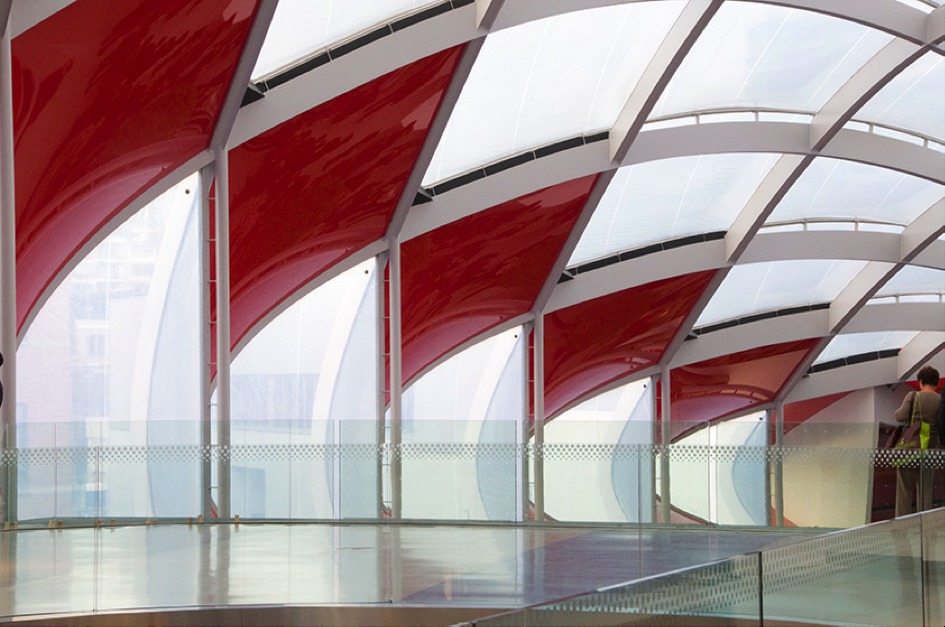
Picture 1.
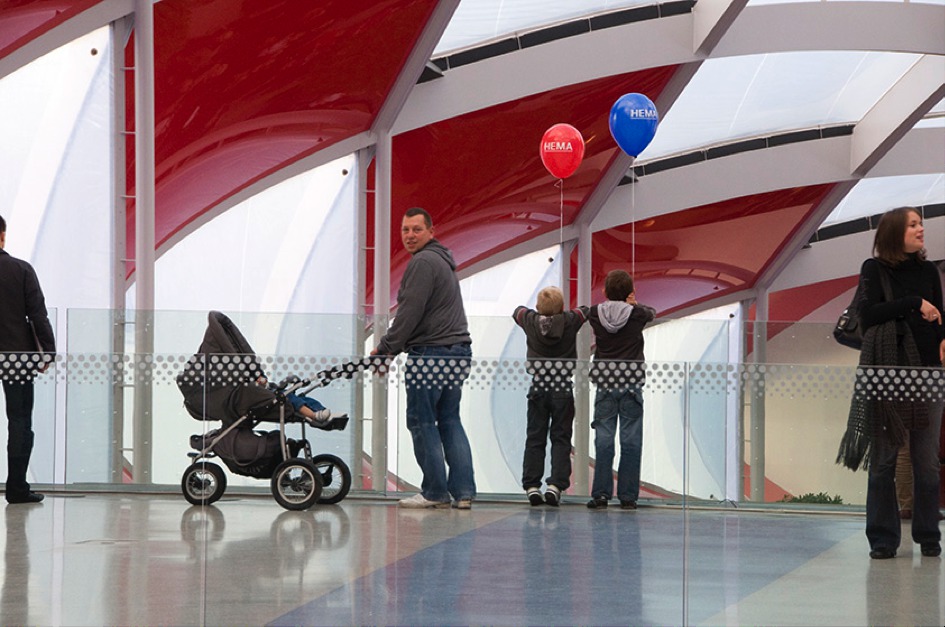
Picture 2.
Both pictures must be visible on the monitor in order to proceed.2) Starting with Pic. 1, make a copy of the background. In the Menu bar, select Layer > Duplicate Layer. This new layer will appear in the Layers Panel.3) Working now on Pic. 2, use the Rectangular Marquee to create a box around only the two boys and their balloons. Make a copy of this selection in the Menu bar using Edit > Copy. The two boys are now stored on Photoshop’s clipboard.4) Return to Pic. 1 and paste the selection using Edit > Paste. The two boys appear in the center of Pic. 1, and in the Layers Panel a new layer appears above the Background copy. Click on this third layer to select it.5) Using the Move tool, drag the two boys to their final destination, and notice that they are not the correct proportions in Pic. 1. To reduce their size, go to Edit > Transform > Scale. A black rectangle appears around this layer with a small square tab at each corner. In order to preserve the proportions of the layer, hold down the Shift key while dragging a corner tab to reduce the size of the boys. Press the Enter key to deactivate Transform.6) The last step is to eliminate all unwanted original picture info surrounding the boys and the balloons. Make sure the boys and balloons layer is selected in the Layers Panel. Click on the Layer Mask icon located at the bottom of the Layers Panel. Select black as the foreground color, and then use the Pencil set at 50% Hardness to paint on the surrounding parts that need to be eliminated. Try different Pencil sizes and different opacities depending on the intricacy of the task. This can be a tedious and time-consuming chore, so be patient. It is important to be thorough so that the layer perfectly blends into the photo and does not appear to be pasted onto the image.7) Flatten the image and Save.
1) Take a photo if you feel that the subject matter has potential, even if you don't envisage the final work at that time. Inspiration may come instantaneously, but it may take weeks, months or even years to arrive.
2) Set up your workspace in a quiet place where you are alone and removed from all external distractions. The creative process requires focus and concentration.
3) Practice makes perfect: never stop trying until you reach your goal. Remember that it takes more than raw talent to be successful. Those who work the hardest to develop their craft are the ones who achieve the greatest success.
I live in Visé, Belgium. I work like a painter, only with other tools. A painter infuses into his work his personal interpretation of the reality he experiences. My objective is the same: to convey to the viewer what I experienced on an emotional level while I was taking the picture. My wish is that those who view my work see more than just a simple photograph — I hope that they also discover some characteristics of my personality.