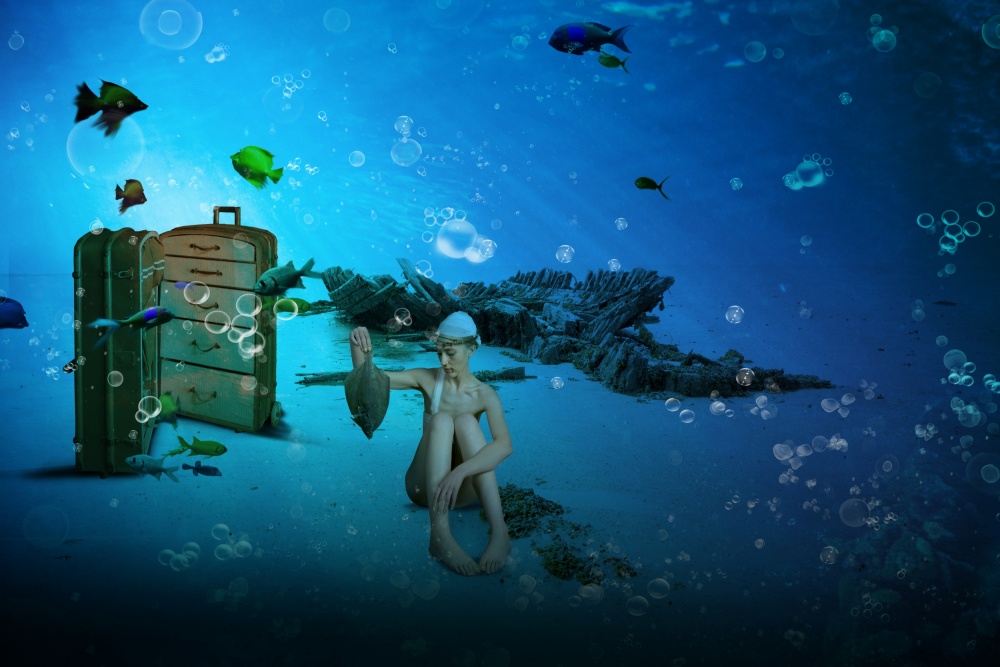
This picture is part of a series entitled "Underwater World," which is intended to document an idea of submarine life by means of surreal and symbolic characters, using “real life” elements. A twinkling eye and some small hints of the “real world,” such as a woman packing a suitcase, are just enough to create an absurd and somehow funny situation.
Nikon D7000 . Nikkor 18-105mm f/3.5-5.6 . 1/200s . f/5.3 . ISO800
The different elements of the picture were taken at different times and places.
1) The background — a shipwreck, which is situated on the beach on the island of Sylt in northern Germany. The wreck is about 100 meters from the shore and is fully visible at low tide. The lighting conditions were good as it was cloudy at high noon, so there were no shadows shown on the wood of the wreck.
2) The blue layer — taken at the Sylt Aquarium through the glass. A few sunrays came from above, breaking up into ray bundles.
3) Fish — taken at different times and places at the Frankfurt Zoo Aquarium. Despite the good lighting conditions, it was rather difficult to take sharp pictures of the moving fish.
4) Model with fish — taken in a studio using three flashes: one for the background and two for the front, positioned on the left and right sides of the camera. I used three Walimex flashes: one CY-300 JZL flash with a softbox and two Walimex Pro Studioset VE 150 flashes, one of them with a honeycomb grid and barn doors to light the background.
5) Suitcase — taken at the Bavaria Film Studio in Munich.
All of the processing and editing was done in Photoshop.
1) First, a suitable background was chosen — in this case, the shipwreck. It was adjusted only with the Auto Contrast command (Image > Auto Contrast).
2) The suitcase was cut out of its original background using the Polygonal Lasso tool and then brought into a suitable perspective using the Transform Perspective tool to create a view from above (Edit > Transform > Perspective).
3) As the original picture had a reddish tint, the Color Balance tool was used to adjust it so it matched the new background (Image > Adjustments > Color Balance). The red color was almost eliminated by changing the color balance to green and blue. Thereafter, the color Saturation was reduced by approximately 25% (Image > Adjustments > Hue/Saturation).
4) A suitable picture of the model was chosen — in this case, with a perspective matching the intended composition. The model was cut out using the Polygonal lasso tool and positioned in the image. The fine structures of the contour were corrected with a layer mask.
5) To adjust the lighting another layer mask was put over the model using the Multiply blending mode, creating shadows on the legs and the right side of the body. The Gradient tool was used to vary the shadow and was applied with the Brush. Softening was done with the Gaussian Blur filter (Filter > Blur > Gaussian Blur).
6) Another Gradient shadow was created with an additional layer mask, creating darker parts on the edges using the Multiply blending mode. Again, the Gaussian Blur filter was used to reach an acceptable shadow variation.
7) Another new layer was added with the blending mode set to Multiply to create a deep shadow beneath the model and suitcase. The layer was filled with black and softened with the Motion Blur filter by adjusting Angle to a horizontal setting.
8) When creating the shadows, it is often necessary to correct the shapes by applying additional brushstrokes and using the Smudge tool. The Smudge tool is located in the toolbar collected with the Blur and Sharpen tools; click the Blur tool to open the drop-down window. Finally, the density of the outer areas of the shadows was reduced using the Eraser tool at 10-15% Opacity.
9) A blue layer was put over the entire picture. Then the model layer was selected and loaded, arranging it onto the blue layer and carefully, using the Eraser tool (set to 10% Opacity), brushing from the center of the model toward the edges, the color and density were reduced to make the skin tones visible without removing all of the blue tones.
10) This step required diligence: cutting out the fish, adjusting their size and placing them around the picture.
11) Next, additional layers were created, and using a white Bubble Brush, the bubbles were added all over the image. A Bubble Brush can be created by the user or downloaded as freeware. When adding the bubbles, it is important to be aware of a pleasing distribution while making sure to not cover up important parts of the picture.
12) After all of the elements of the picture were properly arranged, another layer was added in the Multiply blending mode. Using the Gradient tool, a darker base for the sea floor was created from approximately the lower third of the picture to the bottom, and then the layer Opacity was reduced to 50%.
13) Again, another layer was added in the Multiply blending mode, and the layer was filled with black. Using the Lasso tool, a vignette was then created, which followed the incident of light. Clicking Refine Edge in the options bar, Feather was set to 250 pixels, and then the vignette was cut out. This last layer was again softened by applying the Gaussian Blur filter, and then reducing the layer Opacity until a harmonious picture emerged.
1) Use your creativity, ideas, imagination and fantasy. Find uncommon parts to create pictures with a surprising effect.
2) Take of all sorts of images to build your own photo archive of backgrounds, fragments and structures to create new combinations.
3) Learn to work with models and to fill them with enthusiasm for crazy and unusual ideas.
4) Let the models inspire you with their own ideas.
5) Get inspiration by looking closer: watch your favorite movies, look at classic and modern artwork, and study others' photos. Copying is a NO-GO, but interpretation can be very entertaining!
I'm from Germany and was born in 1961. I am a self-employed dentist. As I always wanted to do some creative work, I wrote and tried to paint in my youth and even tried pottery. Due to a lack of talent, painting never went beyond the elementary level.
In 1983 I borrowed an Olympus reflex camera for my holiday in Sri Lanka. I tried out various objectives and caught the photography bug. Since then I have collected a huge number of photos during all of my vacations and excursions.
Eventually I bought my first Canon reflex camera and joined a local photo club. There I learned a lot about cameras, composition and working in the photo lab. In the lab, I was very interested in all the technical possibilities to create something special out of a "common" photo. After the Canon, I used Nikon reflex cameras and felt comfortable with them. Due to the work with the photo club, I began to participate in photo contests and achieved some national and international success.
In 2003, a PC, a large printer and Photoshop moved into my home, and the possibilities for creation grew immense. But I still took analog pictures, scanned film and negatives — what a huge expense! So, in 2005 I bought my first digital camera, a Nikon D2x, and my workflow suddenly became sooo much easier!
Thanks to a good friend I learned to use Photoshop more efficiently, but even now, almost 10 years later, I still seem to have only scratched the surface of this mighty tool. But I enjoy learning more and more about it and experimenting with it.
In addition to photography, I enjoy traveling and cooking. I have a foible for animals; we have three horses and a dog. They are the reason that I take some "creative intermissions" from my photographic work, but I will never give up this wonderful hobby.