Patience, knowledge of bird behavior, a long telephoto lens and even more patience all pay off when photographing these glorious birds.
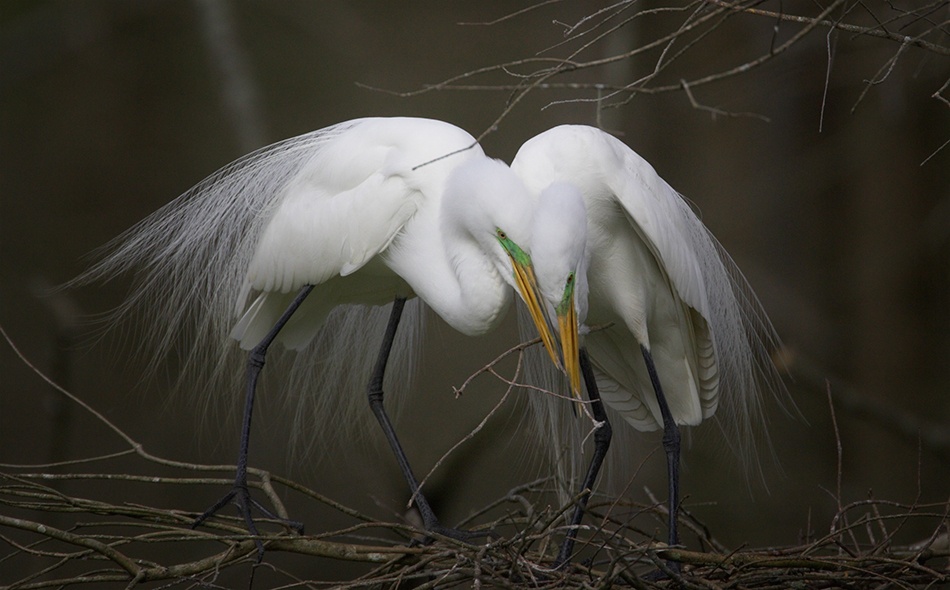
This photo was shot on Lake Martin, Louisiana, USA. The birds are Great Egrets (Ardea alba). While the overall purpose of the trip was to photograph a colony of Roseate Spoonbills in the area, I saw an opportunity to work on nesting egrets. The birds were starting their mating ritual, and they were in full breeding plumage, going through courtship behavior.
Canon 1D MK II . Canon 500mm f/4 . 700 with teleconvertermm . 1/2500s . f/5.6 . ISO500
The first thing to do is to find the appropriate nest to photograph; even better, find two nests — one for the morning and one for the afternoon. It would be unlikely to be able to photograph more than one nest from the same camera position due to sun angle considerations. In selecting a nest, I wanted to be able to show the birds tenderly getting together, in a pretty setting without vegetation obstructing the view. Nesting images are very difficult since there always seems to be a branch in the way.
"The male bird brings branches to give to the female, and then they mate. After mating they go through a beak-rubbing, neck-bumping behavior, which is the moment I wanted."
Once the nests are selected, arrive early for good morning light, unless you luck out with overcast skies. After you set up, you then must simply watch and wait. The male bird brings branches to give to the female, and then they mate. After mating they go through a beak-rubbing, neck-bumping behavior, which is the moment I wanted. It takes patience to be able to capture both birds in a good position since they don't always exhibit the behavior facing the camera. Using the all-focus-points setting on the camera works well in this situation because both birds will be in the same plane and the sensor can focus more quickly. Also, I like using continuous servo focusing rather than single, in order to track their movement.Using a tripod is a must since there is considerable magnification involved. For example, this image was shot with a 500mm lens with a 1.4x teleconverter, effectively making it a focal length of 700 mm. ISO 500 was about the limit for me with a good exposure; underexposure leads to noise when adjusting shadows in Photoshop. A priority in the image is sharpness, so I did not stop down the lens to gain more depth of field; instead, I used a fast shutter speed of 1/2500 second. The image is not cropped, and at the distance I was working, I had a considerably large depth of field. Just be sure both birds are in the same plane of focus, and make sure the birds' faces are sharp.
"It's tempting to look at the LCD, but it will be detrimental since something will always happen between the birds when you're not watching them."
All my images are captured in RAW format, and the continuous shooting mode is used with a five- to ten-frame burst every time. This increases your chances to get the precise pose you want, but there will be some images which turn out sharper than others. Taking your time and repeating the process is a must. Don't think you have the image you want just by glancing at the LCD screen — keep shooting. It's tempting to look at the LCD, but it will be detrimental since something will always happen between the birds when you're not watching them.
My aim while capturing images is to come up with something that will need very little processing regarding density, color and cropping.
The image was processed in Lightroom and Photoshop, along with the plugins Nik Dfine, Nik Color Efex Pro and PhotoKit Sharpener.
1) Lightroom was used for the RAW conversion. First, I checked the White Point and Black Point in Levels. White was right on the mark for this image, and Black just needed a small adjustment.
2) I then exported the image to Photoshop. The first step was to zoom to 400% view to check for dust spots. Having a clean sensor and using a wide aperture generally produces very little dust spots, but I still check at 400% view every time.
3) This image did get some help from Nik Software's filters. First I used Nik Dfine to clear up some luminance noise in the dark areas. Then I used Color Efex Pro plugin's Tonal Contrast filter on the white areas of the birds to give the feathers some contrast. This keeps them from looking flat. The borders of the image were darkened slightly using Nik Color Efex — Darken/Lighten Center to help direct the focus onto the main subject.
4) Sharpening was done in stages with PhotoKit Sharpener plugin. The first pass was Capture Sharpener, and then after converting, selective sharpening (Creative Sharpener) to the birds' heads for the TIFF file (very little applied) and finally some Output Sharpener. This last step should be done very selectively to the necessary areas only. It is best to work on a layer and paint in the sharpening effects; you do not want to sharpen the entire image.
1) Have a plan in mind for the image and carry it out. Keep it simple, particularly with the processing requirements.
2) Images should speak for themselves and have something to attract, amaze or motivate the viewer. If the viewer sticks with the image, trying to “get into” the image, I feel I have done my job.
3) For birds, it is helpful to understand some aspects of their general behavior before setting out.
4) Keep in mind that you cannot control the weather or the birds, so patience is of the utmost importance.
5) Pay attention to all the details in the scene, particularly the little branches getting in front of the birds. Any branches across the face are grounds for rejection, but I can live with one or two branches across the body.
6) Have a sturdy tripod. Use your Image Stabilization or Vibration Reduction if the lens has it. Set the proper distance (full or longer focus) for the lens so it does not have to hunt so much to focus, and prefocus on the nest itself for faster focus lock.
I live in Florida, USA. I have been shooting since the age of ten and started with a Leica 111f and two lenses. I have received some awards for my nature photos from NANPA (North America Nature Photographers Association photography). I have used SLRs, medium format and large format, always doing my own printing, both black and white and color. I specialized in underwater photography and then nature and birds for a number of years. I always shoot with my wife, Fabs. We both seem to take better photographs working as a team, giving each other inspiration and ideas. Currently, we are finishing our conversion to all Leica equipment and are looking forward to our next expedition.