I have photographed many landscapes over the years, but having the opportunity to witness and photograph erupting volcanoes has been the most extraordinary experience. In Russia, the only place to find volcanoes is the Kamchatka Peninsula, which has the highest concentration of active volcanoes on earth. There are about 30 active volcanoes in Kamchatka, and at any point in time some of them are erupting. The eruption of Plosky Tolbachik (Flat Tolbachik) volcano is considered unique since it occurred at quite a low altitude of 5,600 feet (1,700 m), which made this eruption accessible to scientists, tourists and photographers, including me.
I had always dreamed of going to Kamchatka, and as it happened, I arrived there on assignment the day after an eruption started. I heard all the stories about the eruption from the scientists there describing how spectacular it was. I was so close to it and yet so far away. The only way to go there was to take a helicopter, and there were either no choppers available or the price tag for the flight was too high. But I returned to Kamchatka in January 2013 and stayed near the eruption for two days.
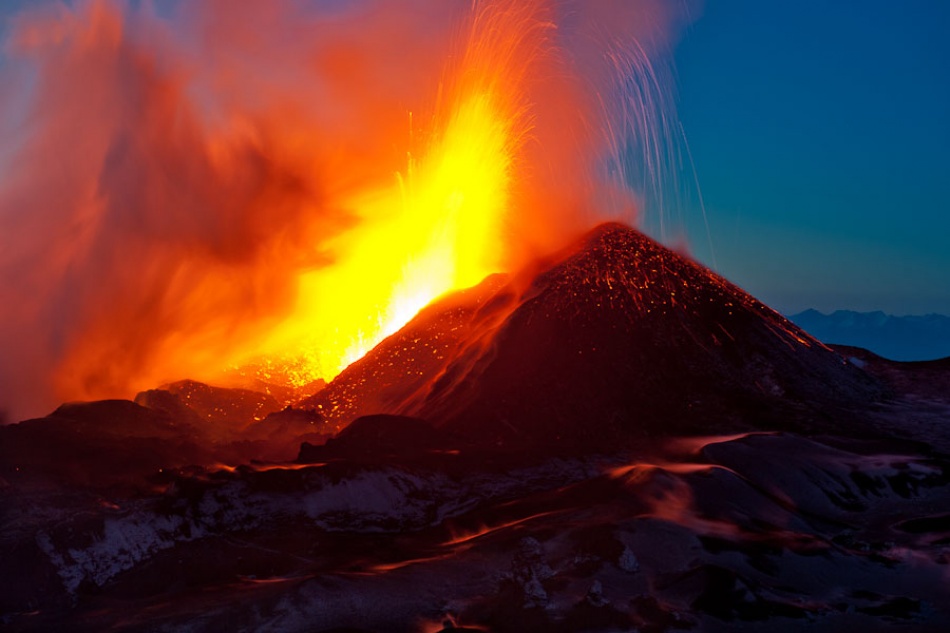
Nikon D700 . Nikkor 24-70mm f.2.8 . 2.5ss . f/8 . ISO 320
Working at the volcano is not only interesting but also extremely dangerous. The helicopter cannot land closer than one kilometer away (.6 miles) from the volcano. From there you have to trek the rest of the way to reach the best viewpoint to shoot. It’s not a great distance if you can walk in a direct line, but walking near a volcano is like traversing a minefield. If it's a winter expedition as this one was, you should be equipped to deal with the harsh weather conditions, such as temperatures down to –22 degrees F (–30 degrees C) and strong wind.
"Every step is dangerous as the stones can become loose and break, and God only knows what is beneath those stones. Every little pit and hollow could be filled with carbon monoxide or carbon dioxide."
The weather is not the only hazard, though. The path to the volcano is full of natural traps. There is a layer of knee-deep snow that hinders your movement. Then there are stones and fields of volcanic ash. Every step is dangerous as the stones can become loose and break, and God only knows what is beneath those stones. Every little pit and hollow could be filled with carbon monoxide or carbon dioxide. As you get closer, the stench of sulfur becomes heavier and almost overwhelming. In this situation, the best advice here is to turn back even if you see a perfect viewpoint and composition ahead; you can then analyze the wind direction and try to reach another viewpoint from the other direction. It is extremely advisable to not venture alone.In fact, I started taking pictures before I reached the viewpoint over the volcano. The shapes of the rocks partially covered with snow were very interesting. The stones and ash were still smoldering, and the snow above them was melting, engulfing the stones in thick fog. These strange shapes make a good foreground in a photograph to illustrate the peculiarity of the landscape. For that, you can use wide-angle lenses with focal lengths set to 24 mm or 35 mm and shoot with backlight so the fog glistens, but you can also create some abstract, backlit close-ups using a telephoto lens.For this image, the goal was to capture the eruption of the volcano. Before approaching, you should analyze the scene and possible vantage points. Positioning yourself from high above the eruption would most definitely be best, such as along the spine of a mountain. Near the volcano, most of the mountains' slopes are covered with a thin layer of ice, which makes the ascent very difficult, so consider using either crampons or an icepick. You can also use the tripod as a support during the ascent.
"Another issue to contend with is volcanic ash. The wind blows the small, rough, sand-like granules in your face; they sting your skin and will find their way into your eyes, nose and ears."
Another issue to contend with is volcanic ash. The wind blows the small, rough, sand-like granules in your face; they sting your skin and will find their way into your eyes, nose and ears. The best way to protect yourself is to use a ski mask and ski goggles. The ascent to the volcano is difficult, so if you want to shoot the eruption during the best light conditions at sunrise or sunset, you should start from the camp two or three hours before the sunset or sunrise. At the top, I had to take some time to catch my breath as the scenery was far beyond my imagination.I carried a Nikon D700 camera and a set of Nikkor lenses (AF-S Nikkor 24–70mm f/2.8, AF-S Nikkor 14–24mm f/2.8 and AF Nikkor 80–200mm f/2.8). I also used a Gitzo GT2531EX Explorer tripod with the Really Right Stuff (RRS) BH-40 LR ball head. I mainly used the 24–70mm lens, but I also used the 80–200mm lens to show some close-ups and details, which in a series would better describe the conditions. There are some ways to show the scale of the eruption. First is to add some recognizable objects to the frame, such as a person from your team or a tent in the foreground. Another possibility is to shoot a panorama. I mounted my camera on the tripod and took a series of vertical pictures, which I later stitched with panoramic software. It's best to shoot up to ten frames of the eruption for a panorama. There are clouds of thick smoke rising from the crater, and the lava is boiling and exploding with phenomenal bubbles. Your goal is to capture the most spectacular conditions of the lava and smoke. There is another way to show the colossal scale of the eruption: use a wide-angle lens and compose the frame with the eruption itself as a small object in the lower corner. This way the main part of the shot will be engulfed in smoke and clouds from the crater.
"As the daylight dims, the lava starts to shine, the landscape changes dramatically and rivers of lava become visible. The sparks from the volcano look like a gigantic firework display."
The most impressive shots are taken at sunrise and sunset since the sun paints the volcanic smoke in yellow, orange and purple. As the daylight dims, the lava starts to shine, the landscape changes dramatically and rivers of lava become visible. The sparks from the volcano look like a gigantic firework display. Set your camera on the tripod and use a remote control to fire the shutter. I do not recommend you to use the delayed shutter release option because the picture changes every second, and you should react as fast as you can. The settings on the camera depend on the type of picture and the effect you want to achieve. In my picture, "God of Fire," I wanted to show the power of the eruption, the sparks on the cone and the trails of lava from the explosion, so I set the aperture to f/8, ISO to 320 and shutter speed to 2.5 seconds. I thought it would also be a good idea to include some slopes of the volcano's cone and little clouds of steam as the light from the explosion illuminated them. This picture was made about 30 or 40 minutes after sunset; the light in the sky was already dim, but the sky was not completely black.
The post-processing was quite simple, and I concentrated on darkening the lights and brightening the darks. The image was processed in Adobe Camera Raw.
1) I increased Fill Light to 77 and Blacks to 16 to brighten the details below the eruption and to bring out those interesting clouds of fog illuminated by the eruption. To enhance the effect, I decreased Exposure to –1.40. The enormous value of Fill Light was compensated by the Blacks and Exposure, giving the overall picture natural look and a broad dynamic range.
2) I also decreased the Luminance in Blue (–30) to dramatize the sky.
1) Shoot in RAW format.
2) Shoot lots of pictures of the eruption.
3) Don't lose your head.
4) Before you start shooting, give yourself one minute to watch this marvel and to take note of your emotional reaction. After that, focus on shooting. The opportunity to take pictures of something like this is extremely rare, so don't spoil it.
5) The most interesting events happen after sunrise an sunset, so plan to take most of your photos at these specific times. Find the most interesting viewpoint during the day, set up the tripod and wait. The landscape will change dramatically as the light dims. At night, try taking pictures of the night sky and surrounding landscape illuminated by the light of the magma. You will get pictures no one will believe were made on Earth.
6) Be cautious. A volcano is an area of extreme danger. Before the beginning of the expedition, discuss possible threats with travelers who were already there. Discuss necessary equipment and clothing. Near the volcano, watch your step in deep snow and on stones, and watch out for the rifts and cracks as they may be filled with carbon monoxide or carbon dioxide.
7) Do not venture alone and always help your fellow photographers and travelers in difficult situations.
I was born and live in a small town in the Moscow region of Russia. From my window I see only the wall of the house across the street. I work as a traveling photographer and journalist for the project Strana.ru about tourism throughout Russia. In the last seven years I have traveled all across Russia, from the Kola Peninsula to the Caucasus Mountains and from Kaliningrad to Kamchatka. Everywhere I go I look for interesting human stories about extraordinary people or simple people who live in extraordinary places and conditions.