


|
|
|
|
Ever wanted to shoot at a live concert but have no idea where to start? How do I get to the front of the stage? Don't I need to use a tripod? What lens should I take? How in the world do I keep people from bumping into me? Well, you've come to the right place. All these questions and many more are answered here. Finally, music to your ears!
Let's start with the big questions: How do I get to the front of the stage and what do I do when I get there?
Email the publicist, organizers or producers and ask for a photo pass. This way you will have the credentials to shoot freely in the pit, the open area between the stage and the audience. Always make your request for a photo pass about three or four months in advance because there is a closed number policy, meaning most passes are reserved well in advance for professional press photographers.
It's great to have a photo pass, but there is a drawback: you only can shoot during the first 15 minutes of the concert or the first three songs, whichever ends first. This is the rule, and as far as I know the same rule applies everywhere in the world. It's unfortunate that this is the case because if you are a concertgoer, you know that the beginning of the gig is most often the least entertaining because the musicians are not yet "in the zone." On the other hand, you can move freely along the front of stage, and you can shoot all the crazy perspectives you want. You have those guys singing and playing music just for you, with no one getting in the way. When your time is up, security will ask you to leave the pit, and if you want to continue shooting, you must do it from the crowd where it's impossible to avoid heads entering your frame. My point is, being creative in those 15 minutes is key.
"Here's the good news: you can also photograph a concert without a photo pass."
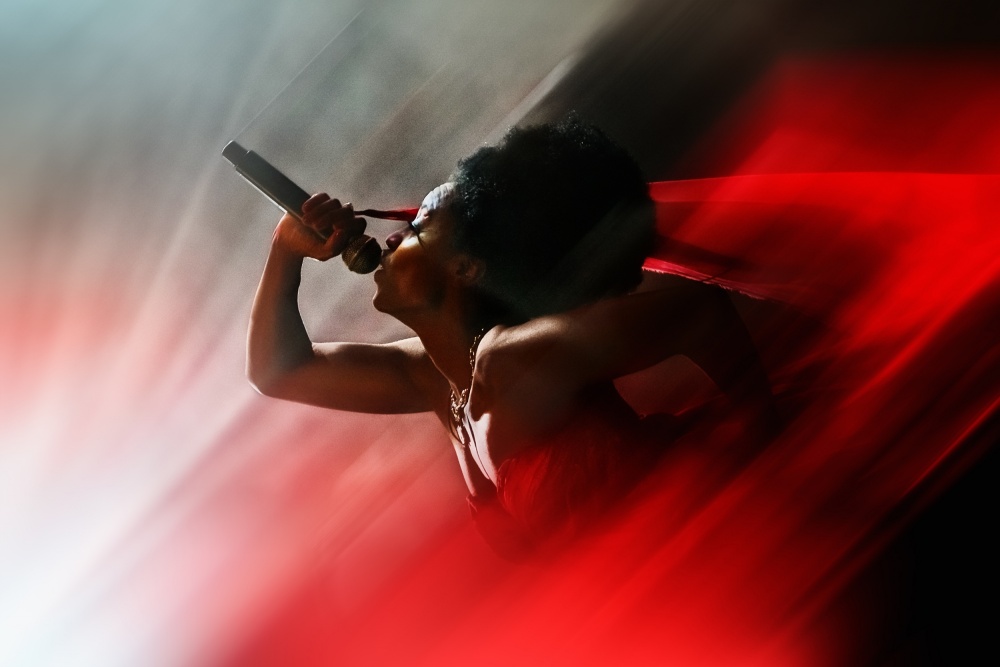
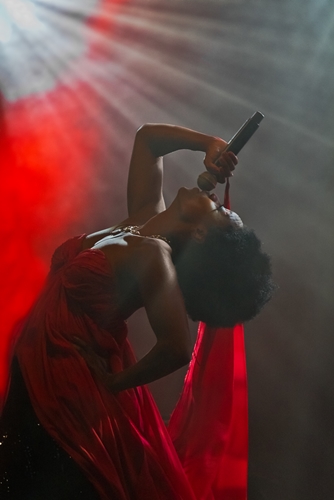
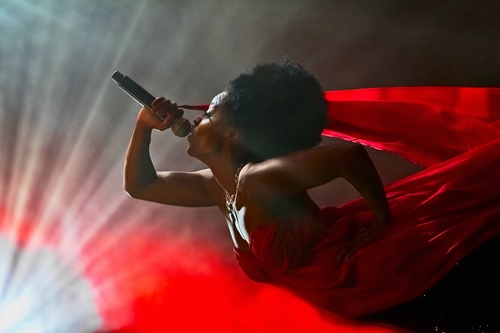
Here's the good news: you can also photograph a concert without a photo pass. It's the way I used to shoot concerts and the way this shot was taken. Of course, it is the more difficult way, but you will spend the entire two hours smiling with your camera instead of spending 15 minutes struggling to make one or two great shots and then sulking in the crowd for the other 105 minutes. This is the fun way.
So here's the deal. Arrive at the concert early. Try to be one of the first to enter so you can stand in front of the stage's crowd control barrier. This way you have time to study the stage and choose your position — front, left or right of the lead singer and somewhere in the middle of the stage. If you manage to pull this off, you are not restricted to shooting only the first 15 minutes. Make sure you do not use your flash after those first 15 minutes though; musicians really don't like that, and if you continue they may ask security to stop you. Feel free to use your flash in the first 15 minutes, but for the rest of the concert, shoot without it.
Once the concert starts, you will find yourself in the middle of a jumping, frenzied crowd that only wants to dance and go wild for the next two hours, and you are shooting constantly with a very slow shutter speed. So how do you manage? Experience is the key, but I can give you some good tips that have given me very good results.
" Instead, take a step back from the barrier, reverse your backpack so that it is in front of your chest and use the body of the backpack to support your camera."
1) If you were lucky enough to position yourself at the barrier near the stage, don't use the barrier as a tripod. It is not steady and people will continuously shake it, ruining your shot every time. Instead, take a step back from the barrier, reverse your backpack so that it is in front of your chest, and use the body of the backpack to support your camera. You will be amazed how steady your arms can be if you can rest your elbows on the backpack. It does depend on the lens you are using, but generally speaking, with some experience you can shoot at 1/50 second for artistic motion shots that have just a small amount of blurring, and you can expect some pretty decent shots at 1/100 second.
2) Blend in with the ambience and go with the flow; be nice and make friends. People go to live concerts to dance and enjoy themselves, so naturally they will bump into you. Just shake it off. You will find that if you treat people kindly at concerts, they will return the favor. Quite often, if you ask nicely, you will be able to step into the hot spot directly in front of center stage and fire off a few choice frames. I have done exactly that at a heavy metal concert and then showed the people the shots I took. They appreciated my involving them, and I thanked them for letting me step in for a few minutes. Take advantage of the happy mood people are in to achieve your goal. It works — try it!
3) The ideal situation is to go to the concert with two photographer friends. The one in the middle shoots while the other two stand guard on either side, protecting the middle photographer from being bumped. Have a rotation scheme worked out so everyone has an opportunity to shoot in the middle.
4) If you have a one-strap backpack worn on the side, you can wear it in front of you as well to support your elbows.
" If you arrive really early and can choose any spot along the barrier, don’t position yourself directly in front of the singer's microphone."
5) If you arrive really early and can choose any spot along the barrier, don’t position yourself directly in front of the singer's microphone. You will not be happy with your images because the microphone and stand will always be in front of the singer's face. Choose an angle that allows you to shoot a profile portrait, but make sure your position is not at such an awkward angle that you will not be able to photograph the other musicians. Positioning yourself about 8 or 10 feet (2.5 or 3 meters) to the left or right of the microphone usually works well.
6) Take advantage of the fact that you are lower than the stage and the musicians. Use the classic rules of photography to exaggerate perspective.
7) A live concert is not a good place to have delicate stuff in your backpack — stage diving and crowd walking, for instance, instantly come to mind. If you have a photo pass, you can plan your lens selection ahead of time. But if you don't know in advance where you will be set up, be sure to take a zoom lens with you. It will guarantee a safe focal distance and handle any situation you may run into.
8) I don't have one of “those” expensive lenses that everybody would like to have. But my favorite lenses are the 50–200mm f/4-5.6, which I used for this shot (and because my Samsung NX10 solves high ISO issues very well), and the 28–75mm f/2.8, which is perfect for low light situations. I think for full-frame cameras, a lens in the ballpark of a 50–200mm f/2.8 would be great for the shooting distances I have mentioned, and for cropped sensor cameras, the 28–75mm f/2.8 lens would be a very good choice under these circumstances.
9) Based on my experience I recommend shooting in manual mode, unless you are well-versed in Aperture Priority mode and accurate light metering. I don't recommend shooting in Shutter Priority mode for obvious reasons; you always want to have maximum control over the depth of field at a concert. Personally I like to shoot in Aperture Priority with spot metering, but this combination is much more difficult and requires practice. If you do decide to try it at a concert, never take a meter reading of the red lights on the stage. Look for the green and yellow lights instead (because of the color temperature) and find points near the main subject. Eventually you will be doing this instinctively.
"So save your battery and switch over to manual focus: your images will be always in focus."
10) If the distance between you and the stage is longer than the maximum focal distance of your lens, the autofocus (AF) is useless. So save your battery and switch over to manual focus: your images will be always in focus. I've shot many live concerts beside good photographers who simply forgot this and burned their battery for no reason. Also, don't hesitate to increase the ISO — it's better to have a great shot with noise than no shot at all.
Finally, this is not advice — it's just a reality check. If you don't have the gear (lenses, camera, etc.) that you would like to have, shoot with what you have and be content. If you don't have a prime f/2.8 lens, so what? You can take excellent photographs with any lens if, for instance, you incorporate motion, blurring or ghosting effects into your image. One of my favorite live concert shots was taken far away from the stage (I arrived late and did not manage to get near the barrier in front of the stage) with a natural motion, slow shutter effect that I really love. Also remember that zooming, panning and spinning your lens can produce all kinds of interesting, creative images. Enjoy those two hours!
TIPS
If you have basic equipment, photography at live concerts can be very rewarding. You can enjoy the music and still return home with many images worth processing.
BIOGRAPHY
I'm 46 and I live near Aveiro, Portugal. I am a self-employed lawyer. I started shooting digital four years ago, and it's been a continual learning process. I only shoot in my free time on weekends, and 1x is my solid base for learning.
 | Write |
 | Massimo Della Latta Complimenti |
 | Paulo Abrantes PRO grazie mille, Massimo |
| | Paulo Abrantes PRO many thanks, Yvette. It´s a real honnor to be part of this community and see my picture published here. |
 | Yvette Depaepe CREW Splendid stage shot and great tutorial, Paulo !!! Thanks a lot ... |
| Paulo Abrantes PRO there is "something" about my bio that needs an update just because the tutorial was writen 3 years ago, but don´t touch it, it´s amazingly fine like that :) |