


|
|
|
|
This started as a dream. This story has two dreams. The first one is about having a camera, a very special camera, something we can only stare at and imagine what it would be like to have one like this. It also happens because they are too expensive to buy new, even second hand, and because of their frame size. Minimum price is always around 1500 euros, and beyond.
Being a peculiar camera, with that amount of money there are lots of supplies, such as film, chemicals and paper we can buy, and that is an important consideration too for considering ones budget. First we must photograph, and for that we need film. A camera is a tool. But here we will be talking about a very twisted tool, with unusual frame format, only suitable for very specific subjects, but with infinite possibilities, and with results out of this world, like framing the world with a cinemascope vision, in very wide views.
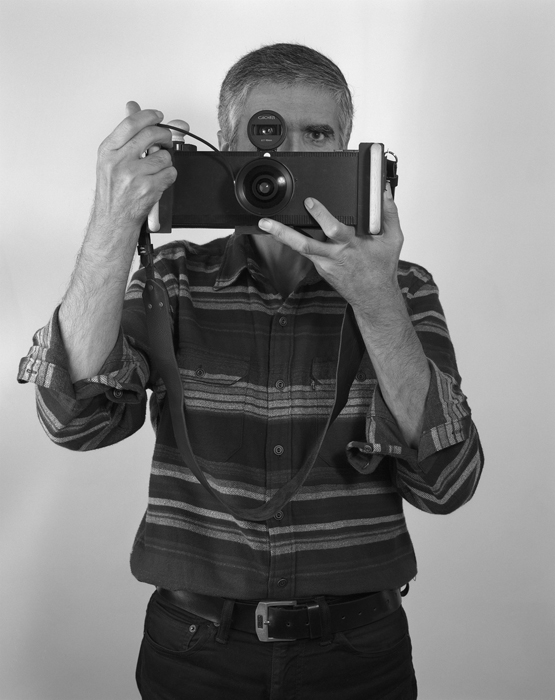
Yes, we are talking about the 6x17 camera! Yes, that was my dream from the start. That wide open negative, that wide open frame, which is not medium format any more, but its not large format either, a large negative on a medium format roll. Those who see a perfectly exposed transparency, think of Velvia, for example.. It has endless possibilities.
Me, like many other around the world, you will hear saying something like:” I will never be in possession of that kind of money, thousands of local currency, to buy an industry made 6x17 camera”.
So this is an article about the second dream I had, building one myself. DIY, do it yourself, you can do it, you just have to believe, like you must believe in spring. The seed was planted, nothing could stop me now. And so the story revolves around: I can do it, and yes we can!
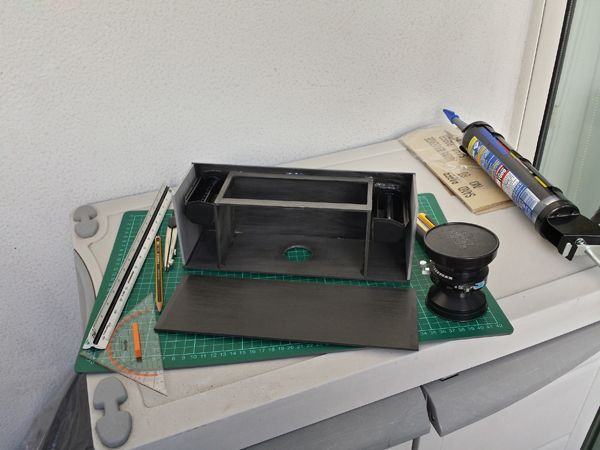
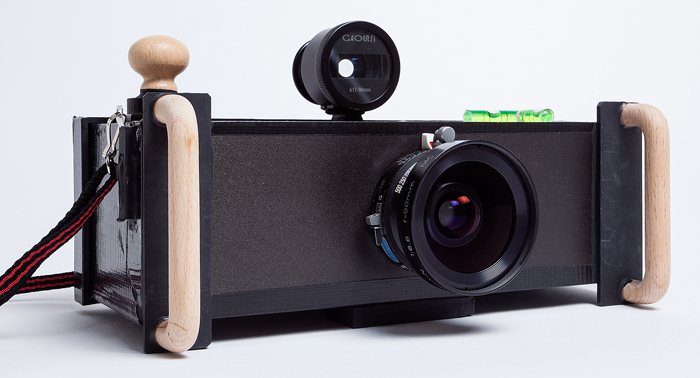
I am not very tool resourceful, only some skills from making small scale architecture models for building projects. I don't own a garage with every kind of bench or specialized machinery, , all I can count on is a living room table and a balcony with a surface to lay down a cutting mat and paint, with room to work on, some screwdrivers, a x-act, some rulers, and epoxy glue, all those I have and can use.
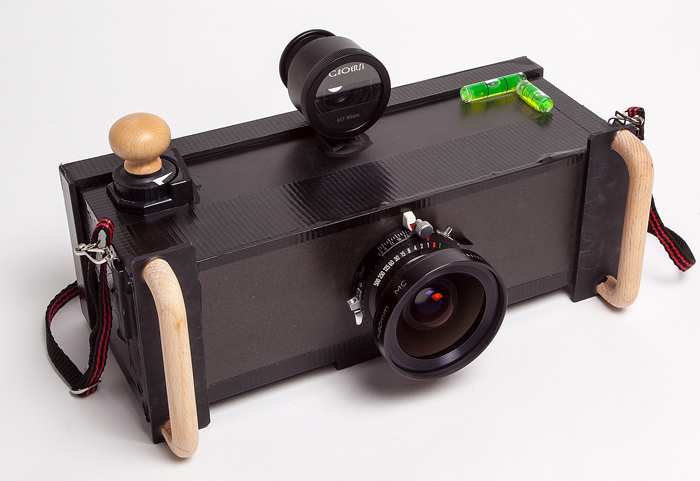
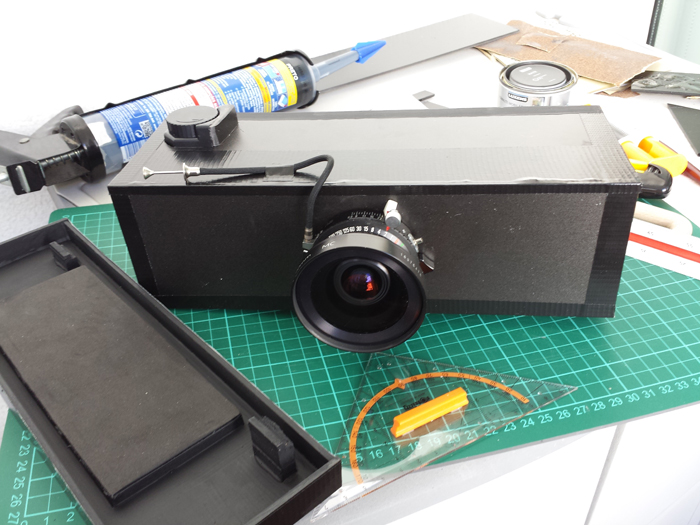
But the most important puzzle piece was already present from the start, the lens. A beautiful Rodenstock large format 90mm that I was not using much lately. Studying the manufacturer specs data, I learned that at infinity it shows up with a 230mm circle image, enough to cover a 6x17 wide negative. Smiles spreading across my face for such a good start. With 94mm flange distance, calculations for the design could begin. Some important decisions had to be made right away.
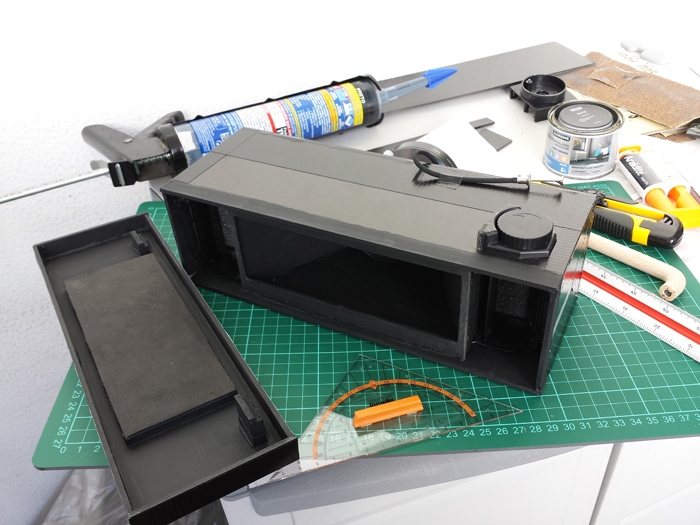
I am used to this rigid pvc 3mm thick to make lens boards. Its very easy to cut, but strong enough to hold together a strong structure.
Some basic drawings started to develop in my head and paper, widths and lengths, with problems to be solved about technical important details, like film loading and spooling.
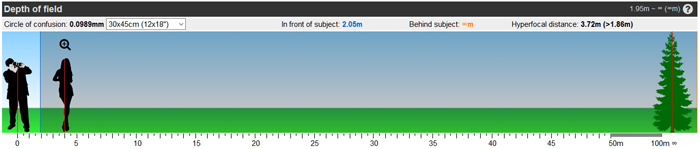
But first I went to calculate the fixed focal distance, based on the hyperfocal decided for a standard print format and digital size. As this was going to be a fixed focal camera, I did some measuring with the lens on a regular large format camera, relating the focal distance to infinity against 3 meters, and came out with a real 3mm difference.
So my 6x17, closed down to F22 and 97mm flange distance, focused to 3 meters, will have everything focused from around 2.5 meters up to infinity, as shown in the scheme bellow.
From here on I could start cutting down to precision the pieces to assemble the basic module.
At that moment a big problem, specifically how to make the roll go along the way from one spool to the other, came to resolution when I thought about using the Holga as the cheapest source of components for a system to carry the frames from one side to the other across the framing film window. So I dissected an old Holga, just to glue it all together again at the aligned place.
To count the frames, I made some testing on the turns needed to advance the film the right amount, noting down the results. And it seemed to work.
Some more down to earth engineering was done to make the pressure plate from soft foam, at the same time polishing it around the frame window so the film wouldn't get scratched upon advancing against it.
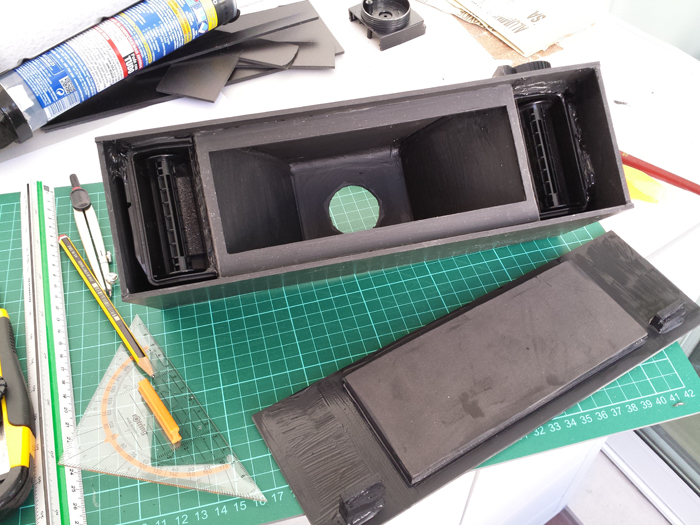
The inside was painted thoroughly with mate dark black paint to avoid diffusing the light and damaging the final image.
The part on the back was made at the end, tightly cutting all around with some overlap to avoid light leaks. Also black strong tape was placed on all corners as an extra layer of protection against outside light.
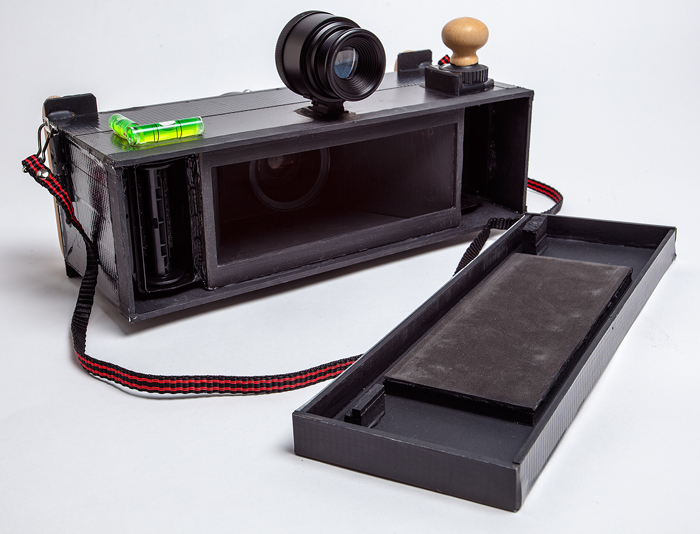
Some more wooden details were added as can be seen on the picture, to hold the camera securely.
Also taken from the Holga, the tripod sock was fixed in place, always with ultra-strong epoxy. A pair of levels for the two main axes was also added to help levelling the camera.
Now was the time to take the first roll of film for a test drive. And how happy was I with the results?There was no overlapping on the four frames, so the scheme on count turns worked!
There were no scratches on the film emulsion. That was very good, as there were no rolls to aid upon scrolling! There were no light leeks whatsoever and all of the frame was covered as expected, with some stylish slight vignetting in the corners!
Most importantly, the image was sharp all over, with extreme resolution from corner to corner! That is a Rodenstock for me!!
The goals were achieved, the dream had come true.
Using a small door hole viewer in the beginning, was not completely satisfactory, so upon looking in the usual places I found a cheap Gaoersi viewer exactly for the 90mm/6x17 combo. Framing the image would now be more precisely done, not letting anybody outside the image.
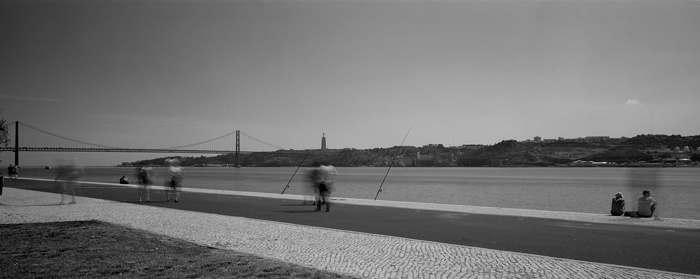
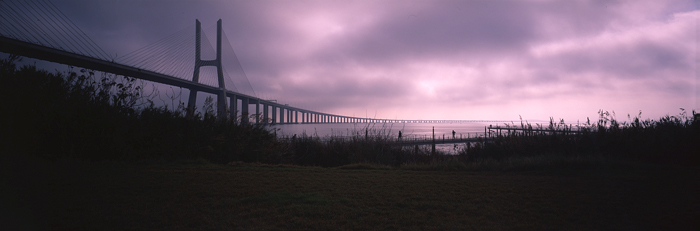
And the first two test images, one in black and white, Delta 100 developed in PMK, the other is a slide, and old Ektachrome. True panoramic images.
My tool was ready to go out making magic!
 | Write |
 | Massimo Della Latta Strong |
 | Raul Pires Coelho Now I noticed the article was publish!!! |
 | Yvette Depaepe CREW My admiring compliments for this amazing achievement, Raul !!! Great article ... |
| Raul Pires Coelho Thank you so much, Yvette!!! :D |
 | Steven T CREW I really enjoyed the article. I've made a few pinhole cameras, and modified film cameras - but my results were never as elegant and functional as yours. Thank you for sharing this with us. It's especially inspiring that you used basic tools and materials. |
| Raul Pires Coelho Thank you, Steven! Happy you liked it.... and if you ever come to Lisbon, we will go out with it so you can see it live! :) |
 | Graham Daly Fantastic article and fantastic achievement...it is not every day that one build themselves a panoramic camera at home :-). Am looking forward to seeing more results from this home made camera!! |
| Yvette Depaepe CREW Thanks for the huge compliment for Raul, Graham !!! I fully agree ;-) |
| Raul Pires Coelho Thank you, Graham!!! |
 | Hugh O. Smith Bravo on a fine job! |
| Yvette Depaepe CREW Thanks Hugh !!! I admire Raul for the terrific job he did with this self made magic camera ...
Cheers, Yvette |
| Raul Pires Coelho Thanks, Hugh!!!! |