




|
|
|
|


We all experience those precious and magic holiday moments !!! They stay forever in our sweetest memories. As photographers we are blessed to be able to visualize them through our art. That's exactly what Frank Wijn did here. Read how he processed this beautiful shot step bey step till he rendered the emotions he felt when he pressed the shutter button.
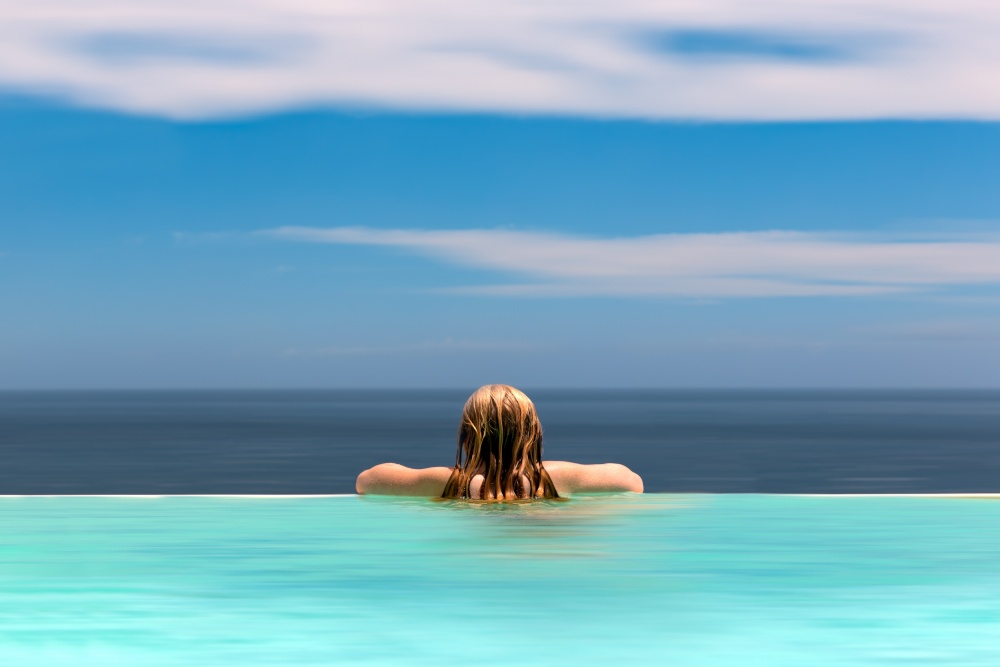
When my hearing-impaired daughter Bien (11) rested on the edge of the infinity pool, watching the endless sea and horizon on Corsica, a feeling of happiness came over me. The lack of sound was completely compensated by the beauty of nature. Her long red hair contrasted beautifully with the three colors blue.
It was a warm and sunny on Corsica that day. The wide view from the pool across the sea had inspired me from the moment we arrived at our rented house. When I saw Bien relaxing on the edge of the pool, I knew that was the right moment to make a nice picture. I asked Bien to stay there for a while, so I could setup my camera. I put the camera on the ground at the edge of the swimming pool for a nice low point of view and activated live view so I could see what I was doing. It was around 1 in the afternoon, so the sun was very high. I liked the light on her hair and arms, and the high sun made everything look fresh and bright.
I wanted the composition to be completely symmetrical. I positioned the camera straight and in the middle, so the lines of the pool and horizon were exactly aligned. The “resting” position of Bien was just right. I only made sure that her arms and wet hair were fairly symmetrical to get the best result.
I put the camera on aperture priority and selected f/10 to get a nice large depth of field and a razor sharp picture. I underexposed 1/3 stop to prevent highlights clipping. My 24-70 lens was already on the camera and perfect for the job. I zoomed until I had a large enough frame to be able to crop it later on when necessary. On the right side there were some trees below the pool sticking out just a bit, so I had to ‘accept’ some of the tree branches in the photo. I would get rid of those in post processing.
I connected a remote switch to prevent the camera from shaking and took 3 shots. On the display the results looked pretty nice.
Post processing
Opening the photos in Photoshop CC 2014’s Camera Raw showed me a nice but rather dull result. The composition was just fine, but there was some stuff I really had to fix:
- There was a lack of contrast and the colors weren’t bright enough.
- There was some slight vignetting in the edges.
- You could see some tree branches just above the edge of the pool on the right side.
- Because of the wind, the pool looked a little restless (waves). The sea was kind of wavy.
- Bien was wearing red bikini pants. You could see it through the water, which I didn’t like.
- The horizon was not 100% straight.
- The hair of Bien needed some slight adjustments.
In Camera Raw I made some basic adjustments:
Exposure +0,40 (because I underexposed a little while taking the shot)
Highlights -17 (to prevent clipping)
Shadows +24 (to reveal a little more detail in the hair)
Clarity +7 (to make it look a little snappier and give it more punch)
Vibrance +20 to make the colors pop a little more.
I opened the image in Photoshop and first cloned the sea to get rid of the tree branches by using the Clone Stamp tool. This was actually pretty easy. I used Lens Correction to get rid of the slight vignetting, and straightened the photo using the Straighten function in the Crop tool.
I wanted to minimize the waves in the pool and the sea, so I experimented with the Streak filter in Topaz Lens Effects. I created 2 copies of the background layer. On one of them I used the “right to left high” streak preset, and on the other layer the “left to right high” streak preset. The effect of both was very nice. It smoothened out the waves and made the clouds look perfectly flowing. By using layer masks on both “streak” layers I was able to blend the layers with the background layer. This way I could keep Bien completely sharp, and make a nice blend between the 2 streak filter layers to get the best result.
I used the Clone Stamp tool to get rid of the red bikini reflecting through the water and also did some cloning on the right and left side of the photo to lose some of the aggressive stripes that appeared because of the Topaz Streak filter.
Bien’s hair was positioned a little to the left side, so I did some cloning to the hair, to make it look even more symmetrical.
Finally I wanted the colors and contrast to pop even more, to give the photo a slightly surreal feel to it. I wanted the hair more reddish, and give the blues even more punch. Therefore I used a rather strange method I learned from Scott Kelby’s book “7 point system”:
- Flatten the image keeping all other layers intact (Mac: Shift-E, PC: Ctrl-Alt-Shift-E)
- Change the image mode to “Lab color” (don’t flatten the image)
- Choose “Apply Image” from the Image menu
- Set Blending mode to “Soft light”
- Change the channel to ‘a’ or ‘b’. In this case channel ‘b’ worked out better.
- Opacity 100% to boost the colors and contrast to the maximum
- Change the image mode back to RGB color.
The result was exactly what I wanted. The colors slightly changed and became very pronounced. Bright, slightly over-the-top saturated colors blue and red and the skin tones were still intact.
As finishing touch I did some sharpening on the photo (unsharp mask, amount 120, radius 1,0 pixel, threshold 6 levels). This emphasized the structure of the hair just a little more.
When I look at the photo now, it brings back the joy I felt when watching Bien ‘inhaling’ the heavenly view. Realizing that she didn’t hear a thing (no hearing devices in the pool). No sound, just nature in its most beautiful form. But there’s also a little sadness I feel. Life would have been so much easier for the little girl when hearing normally. Because her hearing impairment is progressive, she will get a cochlear implant (CI) pretty soon. Another chapter my wife and I are worrying about. It’s a comforting to see that Bien lives in the moment most of the day. She has lots of friends (with normal hearing) and is happy and positive. I’m proud to be the father of this strong girl.
Hints
Taking this picture in the middle of the day, with the sun high in the sky, is probably the best option. Almost no shadows, bright colors and great contrast.
When photographing 3 layers (pool, sea, sky) make sure to position the camera so that the layers are perfectly aligned. Think about how to divide the layers in the frame. You can’t (easily) correct this in post processing.
If you want perfect symmetry, look closely at the model. In this case the position of the arms and symmetry of the hair. When you’re having trouble styling the model and taking pictures at the same time, ask someone else to style the model.
When using filters like the Topaz Lens Effects Streak filter, try to experiment with the settings to achieve what you want.
Try Scott Kelby’s ‘Lab color’ trick I described before, to boost (but also slightly change) colors and contrast. The effect can be surprising. Be careful with skin tones (can become too red).
Biography
I’m actually a music producer/composer, writing music for commercials, companies, TV and pop artists. I’m the owner of Ocean Cosmos based in Amsterdam, and member of the nu-classic band Bardo State.
Next to music I have a strong interest in photography. I did some commercial photography, but I’m mostly interest in photo art. I’m developing my skills and creative ideas. Finding my own ‘signature’ in photography is something I’m still working on. This signature should be very ‘Frank’, not just what the large audience would like to see.
I find 1X.COM very inspiring. The best you can find on the web, and I’m very proud that “Red and Blue” was published. Thanks to the great 1X team and all the inspiring 1X members!
 | Write |
 | Graham Daly Great article. I loved reading the insights into what the photographer had visualized in their mind and then the step-by-step process of how they processed the image in order to make the visualization become a reality. Well done to the photographer on producing such a simple looking but really effective image. |
 | Hans Martin Doelz CREW Many thanks to Yvette and Frank ! Enjoyed reading the making-of. It would have been great, however, to see the original photo and photos of some intermediate stages to get full insight into the great work Frank did. |
 | Thierry Dufour PRO Yvette thank you for this excellent interview and thank you Frank for explanations and the success of this splendid picture !!! |