


|
|
|
|
There are many ways to label professionals!
In days past there were two kinds of photographers if you consider the way they worked once the film was out of their cameras ready to process. One group would develop and print their own negatives. The other sort would rely on others for development, (it could be a friend, an employee, a specialist or a nearby photo shop), someone he could trust to do the best job.
Famous is the story of Robert Capa, who sent to England the precious negatives he made on D day, June 1944 on Omaha beach under heavy fire, with blood and death everywhere. A technician almost ruined that valuable and unique document. Only a few frames were saved and they are history today. Two examples on ways of dealing with those priceless negatives: first we have Ansel Adams, who developed and printed all his material to extreme precision based on his own devised Zone System. On the opposite side we have Cartier-Bresson, who delivered to his staff all his negatives for developing and printing, eventually giving some personal input after receiving the contact sheets.
We can then start to devise the birth of that photolab we so much need and love. It can be at home, if you are so inclined, or elsewhere, but it is the place where all your produced material as a photographer is processed. The main editing tool is the contact sheet, where all your negatives are laid out by direct print on photo paper. From there a decision can be made about the best one to enlarge and do a possible final print.
Both ways have advantages and disadvantages. The professional specialist will do the best job he can (not for Capa in WWII for sure), but he is not you. By doing it all yourself the complete work flow is under your control. Certainly, Cartier-Bresson would have got the prints exactly the way he wanted, or course.
So, at the heart of the photolab there is a laboratory, a place where chemicals are thrown into special containers to develop negatives. Afterwards we make contact prints. In the end, with an enlarger and the aid of precise techniques you print your best images on emulsion covered photographic paper that again goes into specific containers with chemicals to get the final photograph.
But, at this point, in the flow of time, there is a new path on the horizon; unstoppable: digital! Computers start popping up everywhere you look!
Soon, you will have the option to register your photo work not in a negative as before, but on an electronic sensor, and all you get to process in the end will just be a digital file! If you choose this new path, your smelly chemicals will be useless forever. Your home or street lab is fighting a losing battle with the future. Or so it was thought in those historical years.
The traditional lab technician had no idea what to do with that digital file you lay on his desk. That image file must be processed using a computer. Some software is needed to do it. The Knoll brothers, Thomas and John, arrive on the scene. It was the late 1980's and the image revolution has started. The brothers saw an opportunity and they took it to heart. A milestone software was created to take care of those files as if they were negatives. They were not photographers but software engineers. I always have thought Photoshop should be called Photolab because it really was conceived to be a photo lab, not a photo 'shop'. Finally, every photographer from now on could have his/her lab at home. No need for a wet zone, dry zone or red light. Gone were worries about dust and particles in water, and all that. You still have the option to send your files to a Photoshop specialist to process them for you but that is not the idea behind the software. Would Cartier-Bresson's work flow change if he was shooting with a digital camera today?
Let us now imagine the Knoll brothers, the digital pioneers, seated at a table brain storming to launch their big idea. They would have known everything about the traditional lab (ie. exactly what was necessary to process a negative and make a print on an enlarger). Their aim was to replicate those tools and work flow into the software because that is what a photographer at that time would be expecting and be comfortable with. The file arrives from the camera, is placed on the computer disk, and from there our software should be able to take care of it and manipulate the image in ways similar to the old methods. You could develop your negative consistent with your pre-visualized ideas for the final photograph. With this software you must also be able to brighten or darken the image. The print can have more or less contrast according to the grade paper it is printed. You must be able to do it with our software. And so on.
The digital work flow had its roots in the conventional lab that was the norm for more than a century. The tools and modifying windows you have in those menus and tool bars came from all that lab stuff. It was simply a translation of the process.
The aim of this article is to compare the digital tools used today with the tools available in old days. I believe many digital photographers today have no idea where they came from and it’s important for them to know. They are used intensely and experts can render beautiful results but I think knowledge of its genesis will be insightful and make them more aware of the history of their trade.
Today, every step is so simple to perform. The photographer can focus on ideas and subject, about the story to tell, and save time not dealing with all the technical matters a darkroom requires. Maybe that makes them better professionals. Or not! In the past it was all a lot of hard work: pure craftsmanship.
CROPPING
Look at a simple crop where you cut around the edges of your image, modifying the proportions for a better composition and framing. With a negative on the enlarger, what you do is move the head up and down over the easel where the photo paper will be laying flat later and at the same adjust the rulers around the image light to place it exactly where you want it, all under red light of course. It’s a very thoughtful process. And it’s very creative and beautiful. The outside world stops it's motion, all that's left is that projected light image down there, ready to be carved on the paper emulsion. Once these decisions are made the paper comes out of the box, the exposure seconds calculated based on a test strip made previously and on to the chemicals that process it: developer, stop bath and fixer. Finally you can turn on the white light and see how it went. Are you happy with it? It may be good, even awesome. If not, back to the beginning. Now that the crop has been perfected: what about the other variables?
DODGE AND BURN
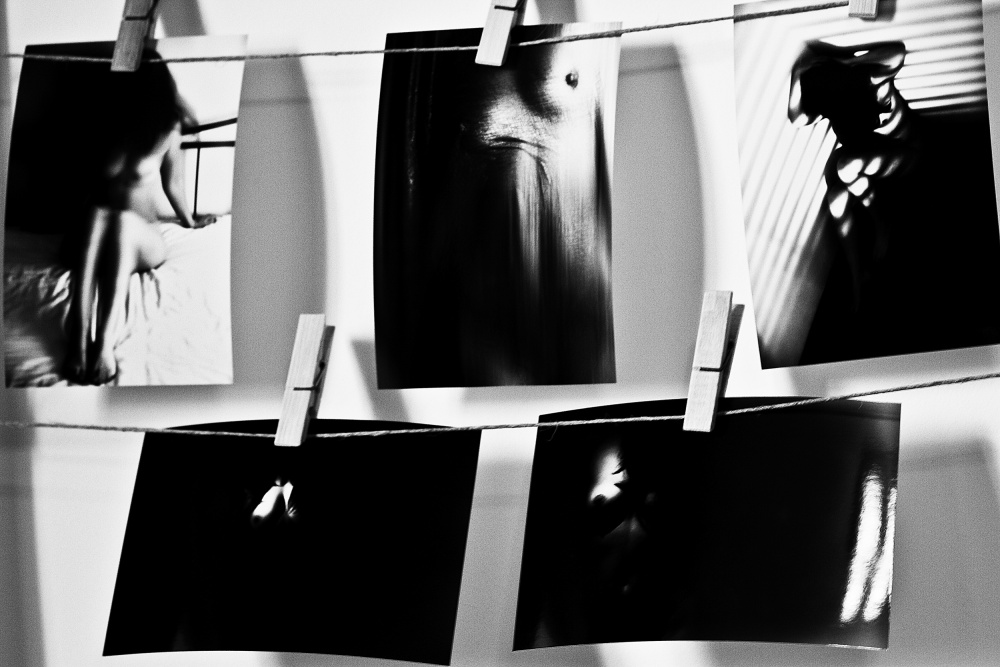
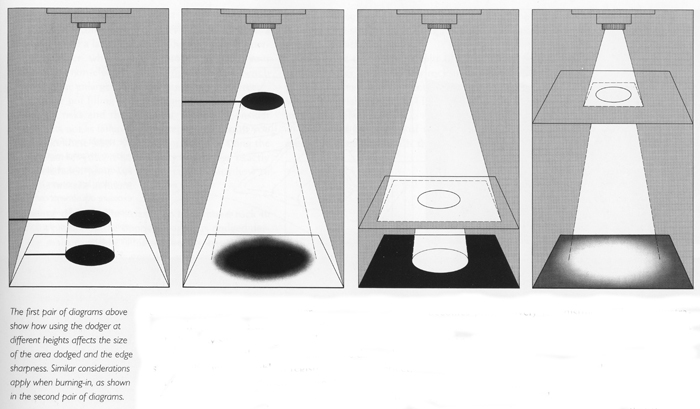
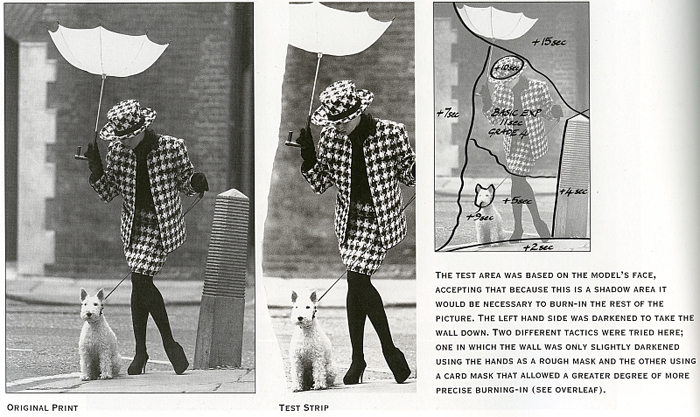
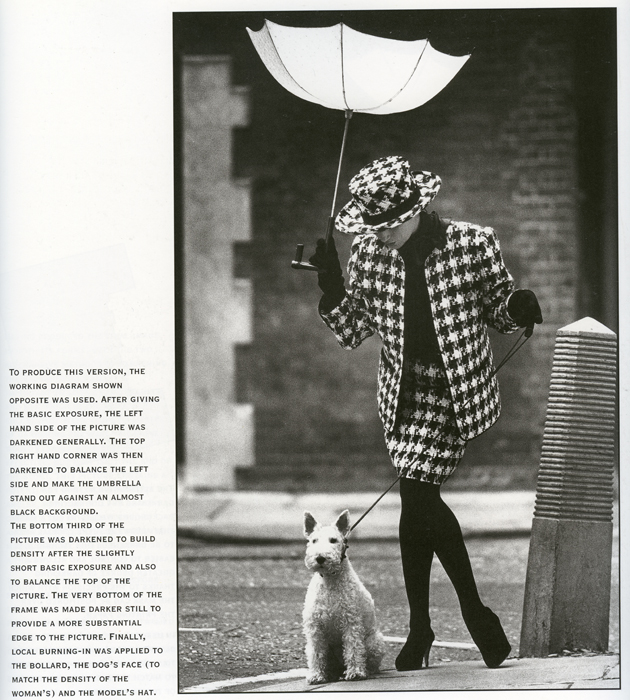
Some parts of the image may be too dark, others locally too light. Some dodge and burn here and there will surely help. What is it and how do you do it using an enlarger? It’s all so easy with your beloved software. You burn overexposed areas and dodge underexposed areas. To burn under the red light, holes are used to focus light where additional exposure is needed.
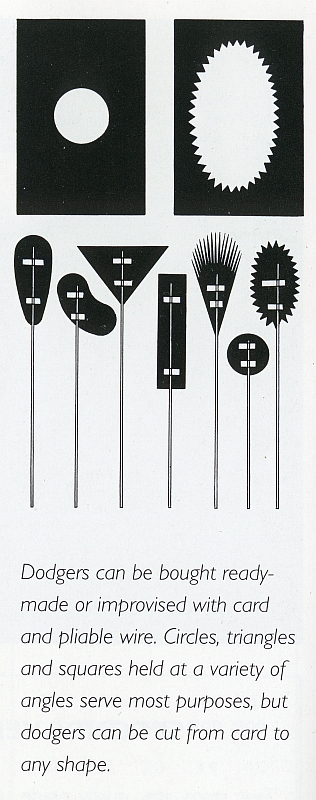
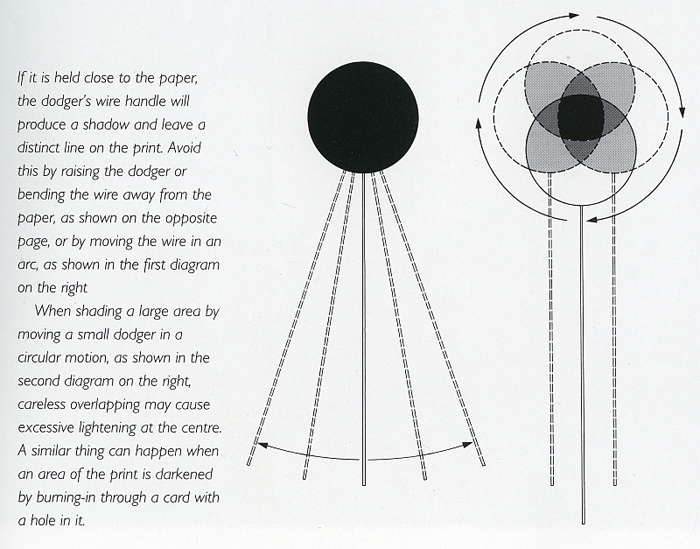
To dodge in the darkroom cardboard masks of various shapes and sizes are used to shield areas where less exposure is necessary. This is a complex task, because while you are doing it, light continues to spread over unmasked areas. An accurate scheme has to be devised based on seconds or exposure units. It’s a trial and error process. You do it one time, develop and fix, then inspect the results. Is it good? No? Stick another sheet of paper on the enlarger and start from beginning for one more try. Several sheets and many hours later something good is coming out at last, if you are lucky! You have your final print with the exact burn and dodge in place, the exact exposure and contrast, a masterpiece perhaps, ready for the upcoming exhibition.
UNSHARP MASK
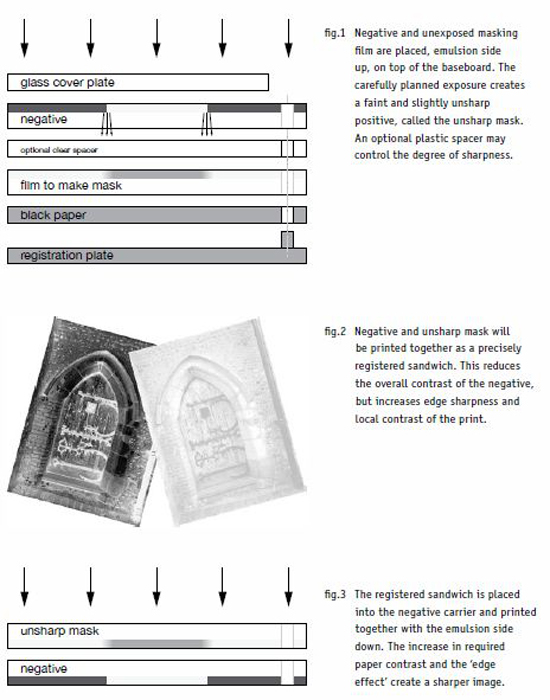
But it's the Unsharp Mask that is truly fascinating, and the one that I find most interesting to explain. People ask all the time why is it called unsharp if what it does is to make an image sharper. What does this mask do to make an image sharper? Well, in the old days doing it in the lab was hard work over many hours, even days, to accomplish. In Photoshop all it takes are a few seconds, depending on your computer processor. Once again the Knoll brothers knew all about it, of course. If we can replicate that time consuming process in our software, we will be a success. And they were. Look at figures 1, 2 and 3. Two negatives are needed, one made after the other, and this is mostly done with 4x5 large format negatives. The second one, our unsharp replica, will be a blurred version of the first, and is obtained by contact print transferring from the first negative, using exact light times. But, because there is a distance between the two (as an option a transparent separator can be used), it can be seen that after development and drying the image is not as sharp as it's twin. Next day, with both negatives precisely aligned, they go into the enlarger again to make the final amazingly sharp photograph. The lucky few that have seen a print made this way swear they have never seen anything like it!
PERSPECTIVE AND SKEW
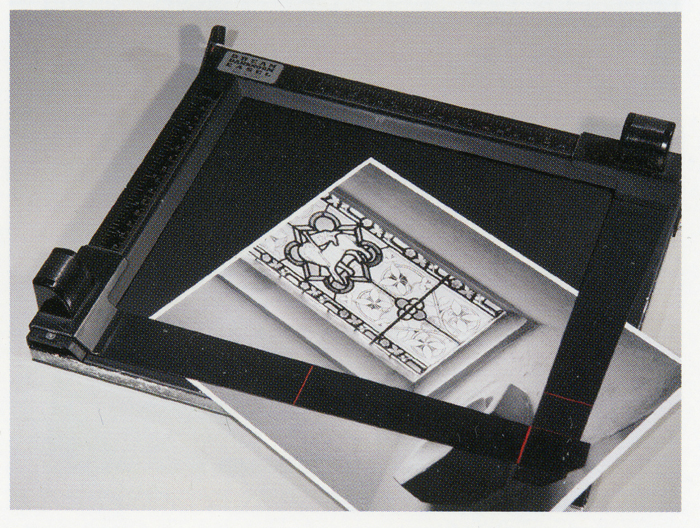
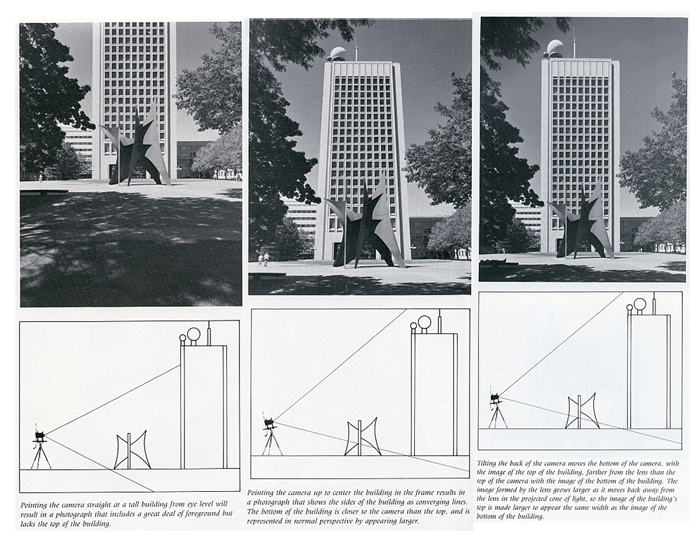
Skew is another fascinating and easy tool to use when, for example, you do architectural photography and you want to vertically align the convergent lines resulting from having to point your camera up. In Photoshop just grab the handles on the image and drag them to the sides to obtain full precision. It's that easy! The same results can be obtained in the darkroom. How? By using a view camera. Those types of cameras allow us to change the plane of focus regarding the lens plane. By moving the back of the camera, convergent lines can be corrected right there in the field. It is another time consuming but fascinating job because every time you change the planes, focus must be corrected over and over again until all is in focus in the ground glass.
RETOUCHING
To finish this discussion on the origins of modern digital tools we still have time to talk about the band aid tool, the retouching tool, or whatever you may call that circle placed over ugly spots that come from a dirty sensor.
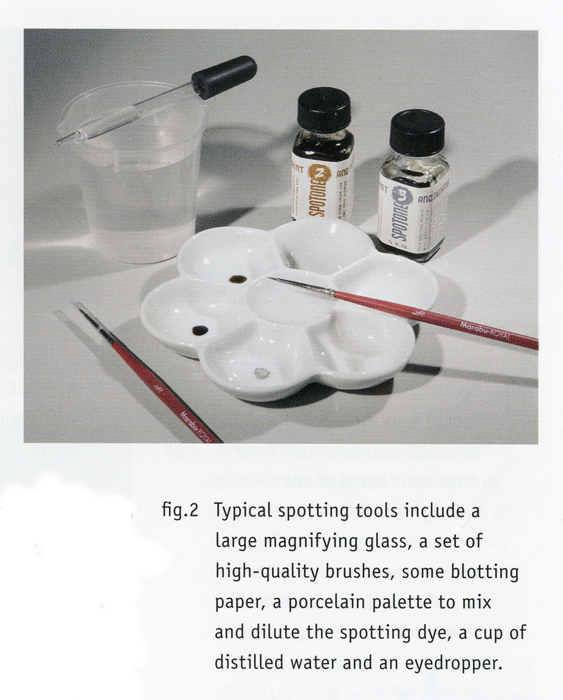
In your processing window on your computer screen, just go around clicking those nasty spots and, as by a sort of magic, they all disappear in front of your eyes. In the past , and indeed, present times a negative can also pick up dirt: from particles in the water, dust from the air while it’s drying or from sloppy handling. Those random imperfections will show up in the final print. Also in the processing cycle from enlarger to drying it can accumulate strange spots along the way from dirt in the water ect. So your final print, after drying and flattening is ready for display in your portfolio. Is it? No! Because there are present (just like in that computer screen we have mentioned) nasty spots that we need to remove. Your masterpiece has some white or black spots, big and/or small, that only hard and meticulous work can eliminate. No easy clicks of the mouse here. Grab the retouching kit that includes special pens, small bottles of colored dyes, carefully crafted tiny brushes and sharp x-acto knives. Patience and steady hands are also a must. White spots are easier than black. A brush carefully applied over and over with the right colors does the trick. Black spots have to be removed first with the x-acto knife, just the bare surface, to turn it into a white spot, then the brush finishes the job covering it. It may take several hours. If successful, your masterpiece is ready for the fierce museum curator to accept. If not, back to the negative and enlarger all the time thinking that you must try to be even more careful about the cleanliness of the whole process. The sense of reward after all this hard work, holding that print in our hands, one you can feel with all five senses is something to remember and be proud of.
Do we feel the same after the ease of our digital work flow?
Recommandations
PERSPECTIVE and SKEW
A Users's Guide to the View Camera, Jim Stone, Harper collins, 1987
Master Printing Course Tim Rudman, Mitchell Beaxley Editor, 1994
CROPPING, UNSHARP MASK, RETOUCHING
Way Beyond Monochrome, 2nd Edition, Ralph Lambrecht, Focal Press, 2011
DODGE and BURN
Master Printing Course Tim Rudman, Mitchell Beaxley Editor, 1994
Black and White, Larry Bartlett, Fountain Press, 1996
 | Write |
 | JeffBaker Nice, thorough article. Thank you!
(D-Day was in June, 1944, however). |
 | Yvette Depaepe CREW Thanks, Jeff ;-) Correction done ... |
 | D. Sarma PRO Fascinating, very well written, and an important record with examples of those days gone by. Brought back memories from decades back working in the dark room as an apprentice, as a high school student... Thank you for taking me back on memory lane, very much appreciated! |